
DNS Geolocation is a wonderful tool for anyone working on systems or web applications. While this can be complex and costly with on-premises technologies, it is simple and affordable with cloud services. In fact, you can set up Geolocated DNS in minutes with AWS Route 53. That’s exactly what we are going to see in this post.
DNS geolocation, but what is DNS? And What is geolocation? If you are doubtful here, you should read this article on DNS first. In fact, in this post, we will dive straight into DNS Geolocation, without covering the basics of DNS. Instead, if you just need a refresh on geolocation, here’s a quick one.
DNS Geolocation means responding to DNS queries differently based on the source IP address. Since IP addresses represent the geographical origin of a query (more or less), we can give different answers to different parts of the world.
DNS Geolocation Tutorial
Before you start
Implementing DNS geolocation on your own server is complex. It may require dealing with complex tools from different vendors, and it is not something we can cover on a quick guide of one single post. So, we are going to implement it with AWS Route 53.
Guess what? To do so, you need to have an AWS Account (not an Amazon account). Once you have that, you can start using the Route 53 service for DNS – and geolocation.
If you don’t have an AWS account yet, check out this guide to set up your first AWS account. Once you are ready, continue below.
Introducing AWS Traffic Flow
To implement DNS Geolocation in AWS Route 53, we need to use the traffic flow section. Traffic flow contains two more items, traffic policies and policy records, and you need to use both combined.
AWS Traffic Policy
The AWS Traffic Policy is the place where you define how the Geolocation must behave. For example, you may give the same answer to all clients in Asia except – say – Vietnam. You define this kind of rules inside a traffic policy, and that’s where we are going to start.
Cost warning! A traffic policy cost roughly 50$ per month, and it is not expensive at all compared to the on-prem costs. However, it may be a little bit above the budget you have for testing, particularly if you are a solo developer. Consider that before starting!
Creating your traffic policy
In AWS Route 53, browse to Traffic flow > Traffic policies. Here, if you don’t have any policy, you will be prompted to create a new one. Click on Create traffic policy to start.
Instead, if you already have some policies, click on one, then click on its latest version.
The visual editor of the policy will appear. This editor is a block diagram that follows the decision-making process Amazon will make when responding to the query.

As you will see, you have several blocks you can put in your diagram. You can chain different blocks to nail down the behaviour you exactly want.
The starting point
AWS names “starting point” the beginning of the decision-making process. Here, you need to select the type of DNS entry you want to geolocate. In fact, you cannot geolocate the type of entry. You can only geolocate its value.
If a client asks for a CNAME entry, you must respond with a CNAME entry, no matter the geolocation. Yes, you may give different values as answers, and that’s what geolocation is about. However, the type must not change, and you set it at the beginning.
After the starting point, you can see a Plus on the arrow. You can click that to chain a rule to your starting point. You can chain any type of rule.
DNS Geolocation rule
That’s the thing we’ve been dreaming of. DNS geolocation. We can implement it with a geolocation rule. In this block, you define a series of locations. You choose them from a drop-down list, and locations may be countries (France, US, Mexico, etc.) or global regions (North America, Australia, etc.).
You can add multiple locations to your rule. From each location, you can chain another block of any type you want. However, it is unlikely that you may want to chain two geolocations together, as you can do everything with just one.
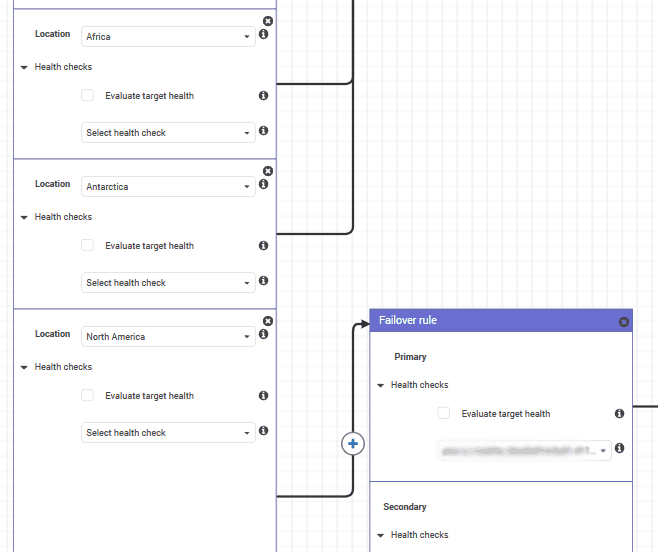
Remember, Amazon processes rules from most specific to most generic. Thus, if you have an entry for France and another for Europe, users in France will get the France entry.
Endpoint
Endpoints are not exactly rules, they are the place where the decision making ends. In an endpoint, you define a value you want to use in your answer to the query.
If the decision-making process gets to that endpoint block, the value contained in it will be returned. Dead simple.
Of course, you cannot chain anything after an endpoint, because with it the decision-making terminates.
Failover rule
You may also want to embed some kind of redundancy inside your DNS geolocated entry. To do that, we have the failover rule.
With this rule, you decide a primary and secondary resolution. You associate each with a health check (still defined in AWS Route 53). Then, Amazon will use the Primary as long as the health check associated with it is available. Then, it will use the secondary.
AWS Policy Record
The policy record is the other part of our geolocation, and it is extremely simple. With the traffic policy, we define how the geolocation behaves. With the policy record, we associate a traffic policy with an actual DNS record.
Creating one is simple, go to Traffic flow > Policy records, and there you will need to select:
- Name of the traffic policy to apply
- Version of the traffic policy to apply
- Hosted zone in which to add the entry
- Actual record value, and optionally a modified TTL

You may also add multiple records for the same policy, in that case use the Add another policy record button. Once you are satisfied, go on with Create policy records.
Final words on DNS Geolocation
In this brief post, we saw how quickly we can create a DNS traffic policy that resolves differently based on the geolocation of the user.
With as little as 50$ per month, you can implement complex rules that can easily satisfy Enterprise-grade customers. Besides that, geolocation is a must for any modern application, particularly if you are looking for horizontal scalability.
Do you implement DNS geolocation? Do you plan to do it with AWS? Let me know in the comments.

