
If you are into Enterprise networking, chances are you are going to work with BGP. With this protocol, you can own your own range of IP addresses and attach them to any service provider. Furthermore, you may use it to run it as an internal protocol over a big MPLS network. In this article, we are going to see the basics of BGP and learn its configuration commands. Before we go, we will discuss some basic design techniques to implement BGP the right way.
To make learning BGP easy, we are shipping this article with a Packet Tracer lab. You can download it for free using the link below, unzip it, and run it with Packet Tracer 7.

Once you obtained the lab, simply continue reading the article. We will present the configuration commands gradually, and you will be able to try them in the lab.
Single-Homed BGP Lab Intro
The topology
For this topology, we kept the design as simple as possible to introduce the commands. In fact, we are going to use two routers only: the Edge and the ISP. Of course, the Edge represents your own router, and ISP represents the provider’s router.

Be aware that this topology does not completely reflect reality, as Packet Tracer is limited in features. As a result, we have to keep things simple: two routers leveraging the only link between them. Nonetheless, this is far enough to introduce the BGP configuration commands. We will explain how to do a better design in real life at the end of the article.
The Requirements
With BGP, requirements are so easy. Our goal is simple: advertise to the provider our addresses. The Edge router has some interfaces with public addresses, and we want to inform the provider about them. Of course, this must happen through BGP. On top of that, here is some information that will help you along the way.
- The networks to advertise are
56.4.30.0/29,87.3.9.0/29and13.24.121.0/28. - Our BGP Router ID should be
172.16.1.2in the AS 65001 - The provider told us to use
172.16.1.1as peer, in the AS 65000
This information is enough to complete the configuration. However, in the next paragraphs, we will give you an overview of BGP. This will allow you to understand what you are doing, and why you are doing it.
Introducing BGP
Border Gateway Protocol is the only protocol available to interact with third-party networks. That is, if we want to connect to someone else’s network, we must use BGP. Of course, this applies only if that other network has its own globally assigned addresses. For example, your home router doesn’t talk BGP with the provider: your router has an address within the ISP’s addresses.
With BGP, we introduce the concept of an Autonomous System (AS). An AS is a group of routers and network devices managed by the same entity. Each ISP will have its own Autonomous System, or maybe more. These new concepts allow BGP to create its own category of routing protocols: Path Vector. In fact, the metric for BGP is the number of AS traversed to get to a destination, the lower the better.
BGP is the protocol we use to exchange Internet Routing Tables, containing almost all public subnets world-wide. Such hundreds of thousands of entries, and weight many megabytes. Many Interior protocols wouldn’t be able to handle such a table, but BGP is. This is because BGP is TCP-based. This has a drawback: it is slower converging than other protocols, requiring even a few minutes.
BGP Peers
Making adjacency with other BGP-speaking routers is different from any other protocol. With other protocols, in fact, we established adjacencies with directly connected routers. Here instead, we can establish an adjacency with a remote router. That’s right, two BGP peers don’t need to be directly connected. You can use another protocol, like EIGRP or OSPF, to create the routing required for two routers to talk. As they can communicate with each other (using the routes from the Interior protocol), they can also form an adjacency with BGP.
As a result, you can’t discover neighbors automatically. With BGP, you have to specify the IP address of each neighbor manually. If two neighbors are in two different Autonomous Systems, we have an External BGP (eBGP) adjacency. If instead, they are within the same AS, we have an Internal BGP (iBGP) adjacency. The protocol running is really the same, but the router will treat them as two different protocols. In fact, iBGP has a quite high administrative distance (200), while BGP has a convenient one (20). In fact, for routes within the same AS, you should always prefer an Interior protocol.
Redistribution might be a bad idea…
With Redistribution, you can take routes from a routing protocol and redistribute them in another one. At this point, many people may think they should speak BGP to their neighboring AS, and use EIGRP or OSPF inside. This is partially correct. In fact, you will also need a way to communicate to your inner routes how to reach the remote destinations in different Autonomous Systems. In theory, a redistribution is an option, but practice knows better.
BGP is specifically designed to handle huge updates, other protocols aren’t. If you implement this type of redistribution, your interior protocol is likely to collapse. It will require so much CPU on your routers that they will start rebooting. Redistributing the other way (internal to external) is fine, obviously. However, we still don’t know how to propagate routes internally. With BGP, obviously.
You should configure each of your routers to have a neighborship in BGP with all other routers in your AS. This way you will achieve a full mesh, manually. It’s easy to identify that we have a clear problem here: the number of adjacencies grows exponentially. As a result, the topology can be quite hard to manage. An alternative to that is a Route Reflector. This is a central router that propagates eBGP updates to all other routers in the topology using iBGP. CCNP stuff, of course.
Implementing Single-Homed eBGP
The Configuration
Our lab starts with the configuration. As you might have guessed already, we are going to work only on the Edge router. Here, we will configure neighbors and peers.
Creating the BGP Instance
Like any other routing protocol, we need to use the router global configuration command. This will allocate resources for BGP, and create the BGP Routing table in the router’s RAM. Of course, this is not the global routing table. This command expects to know the Autonomous System Number (ASN) to create the instance from. So, we will type exactly as below.
router bgp 65001This will also add two defaults command: bgp log-neighbor-changes, no synchronization. You can just ignore them. Now that you are in the Router(config-router)# prompt, you can start typing some interesting commands. First, you should define the Router ID with bgp router-id. If you check the requirements, you will see that we need to type:
bgp router-id 172.16.1.2Now we can start tweaking with neighbors.
Configure peers
When you configure a BGP peer, you need to tell the router the IP address and the AS of the peer. Based on that, the router will know if we are talking about iBGP or eBGP. To configure a peer, we need to use neighbor <IP> remote-as <AS>. If you check the requirements, you will see that we need to enter the command below.
neighbor 172.16.1.1 remote-as 65000With BGP, you can also configure peer-specific settings, like authentication or metric tuning. To do that, you always need to use the neighbor command, specify the peer and the peer-specific command. The syntax looks like neighbor <peer-speciifc command>. We don’t need to do that for this lab.
Configuring Networks
Now, we need to tell which networks we want to advertise with BGP. We are going to use the network command, like with any other protocol. This command expects to know the subnet address, and optionally the mask. If you want to specify the mask, as we will do, you will need to use the mask keyword. This time, we are talking about a real subnet mask, not a wildcard mask. Below the commands we need to type, according to the requirements.
network 56.4.30.0 mask 255.255.255.248
network 87.3.9.0 mask 255.255.255.248
network 13.24.121.0 mask 255.255.255.240
With other routing protocols, we can use the network command only on connected networks. BGP is different. In fact, you can use the command for any network present in the routing table. If the network isn’t in the routing table, it won’t be advertised to the peers. Remember that the match is against the routing table, this is extremely important!
And now, congratulations. If you did everything right, you have completed the lab. In case you see the score isn’t 100%, check your configuration against the configuration boxes above.
Verify BGP
We have several options when troubleshooting BGP. For the CCNA we can rely on three commands, which we can also find in Packet Tracer. Continue reading to find them out.
Verify the BGP Table
To verify the entire BGP table, we can simply type show ip bgp. The output, on the Edge router, is the one below.
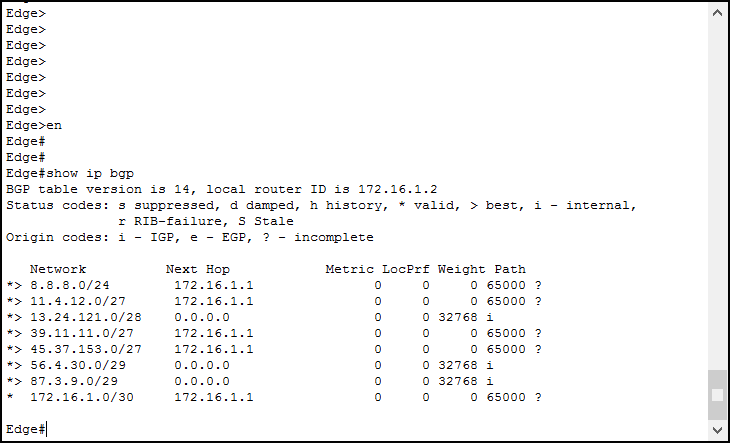
At the very top, we have an overview of the current table. In fact, we can see the version and the local router ID (the one of this router). Then, we have a quick explanation and all the entries. For each, we have several fields.
- At the beginning, we have the status code, represented by symbols. We want to see a star (
*) for each entry, because it indicates that the entry is valid. If we also see a greater than (>) symbol, it means that this is the best route. In other words, this is the best path to reach this destination BGP is providing. As a result, the router tries to inject all routes with that symbol into the global routing table. - The network indicates the destination network.
- The Next Hop indicates the next-hop for the route: if you see zero, it means that the route didn’t come from BGP.
- Then we have Metric, Local Preference, and Weight: some BGP-specific attributes.
- The last column is the Path: the list of AS to traverse in order to get to the destination.
Verify Neihgbors
The command to verify BGP neighbors is show ip bgp summary. We can also have a detailed version, which is show ip bgp neighbors. For this lab, we are going to focus on the compact version: here a sample output.
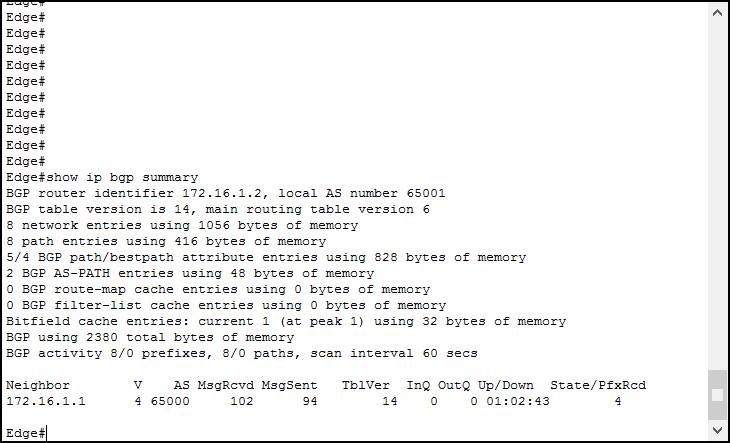
The first thing we can see from this command is an extensive overview of the BGP configuration. However, we don’t need that. It contains a lot of advanced information that we don’t even need to check at the CCNA level. Instead, we want to check the neighbor table at the end. You can see that we have a list of neighbors in a table, in this case just one. For each, we can see:
- In the neighbor field, its IP address
- The “V” field indicates the BGP version we are running with that peer
- Then we have the AS the peer belongs to
- Message Received and Message Sent are here for statistic purposes, the same as In Queue and Out Queue
- Table Version indicates the BGP Table Version the peer is holding
- In the Up/Down field, we can see how long ago the peer changed state (going from down to up, or vice versa)
- The State/Prefix Received indicates the current state of the peer. If it is up and running, you are going to see a number here: the number of networks received. So, we always want to see a number here.
These commands will save your day at some point in the future. Remember them, and be confident in using them.
A Real-Life BGP Design
Below, a real-life BGP Design with explanation.
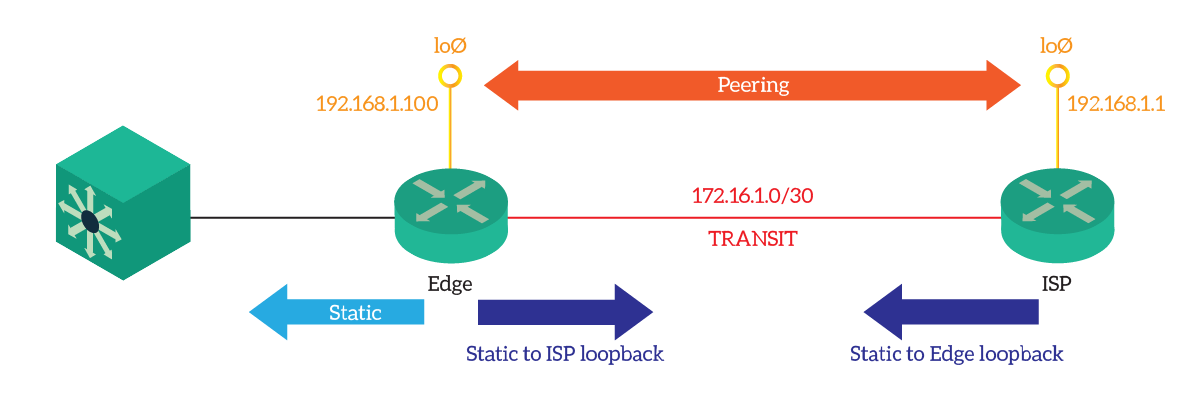
Here we can summarize the important points.
- Peers point to each other using loopback addresses, and as a result, use static routes or interior protocols to propagate the loopback addresses
- To save addressing space, we can use a private IP address on the transit network and on the loopbacks. This is because we don’t need to route them globally, as soon as the traffic reaches the Edge router, it will know to use the transit link to forward it to the ISP.
- The Edge router has some static routes to an internal device, like a multilayer switch. This offloads it and allows it to do just BGP routing
Keep these in mind when you want to do a real design.
Conclusion
In this article, we faced one of the most advanced complex topics in the entire CCNA: BGP. Now, you know its basics and you are able to configure it to address simple needs. Here we have a recap of what you need to take with you.
- BGP connects networks managed by different entities (Autonomous System), and its metric is the number of AS traversed
- Since it is designed for Internet Routing Tables, BGP converges slowly but it is reliable: it is TCP-based
- Never redistribute BGP into another routing protocol unless you know what you are doing. Confused? Just don’t.
- Create an instance with
router bgp - Define the router ID with
bgp router-id <ID> - Identify a neighbor with
neighbor <IP> remote-as <ASN> - Add networks with
network <IP> mask <mask> - Troubleshoot with
show ip bgpandshow ip bgp summary
Congratulations, we are almost there with the CCNA. From now on, it will be a downhill path. We will see how to tune some Enterprise Services, and we will discuss some technologies at a high-level. Just continue with the CCNA course, and you will get certified soon.

