We talked a lot about what is a switch or a router, what they do, and at which OSI layer they work. However, we haven’t said a lot about their physical characteristics just yet. A network device is a tangible piece of hardware that you can work with, connect together with the cable, or stack one over the other. This article is just about that, we will see how is it like to unbox a network device such as a router or a switch.
The Network Device
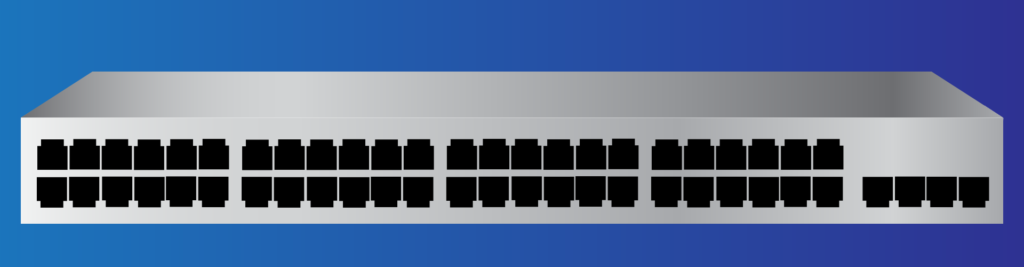
Overview of the front panel
Networking devices grants connection to other devices. By their nature, you can manage them only through other means, specifically remotely. Because of that, they have a rectangular shape, short and large. They do not come with mouse, keyboard, or screen, you cannot even connect these peripherals to a networking device like a switch or a router, this is not part of the design. However, some devices may have a small LCD screen giving some basic information about the internal temperature and the health status of the device.
Instead, you can always find interfaces (known also as ports). These interfaces are the slots where you can plug cables in, and the majority of them will support ethernet cables with an RJ45 termination, or SFP slots for fiber optic cables. You can find all these ports in front of your device, while on the back you can find the power cord for the power supply. However, many network devices do not have a power switch, they turn on as soon as they receive power.
Let’s get back to the front panel of our device. Many ports are going to be the ones you use to connect devices (other switches, routers, or computers), but this is not the only kind of port you can find on the device. Some ports, separated from the others, are the ones to manage the device: the console port and the AUX port.
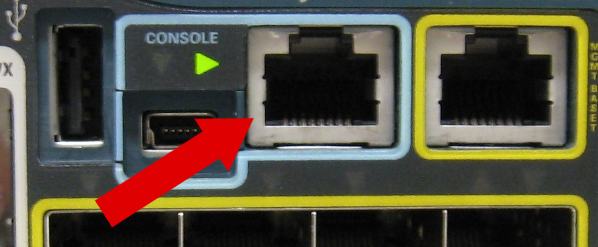
Management ports
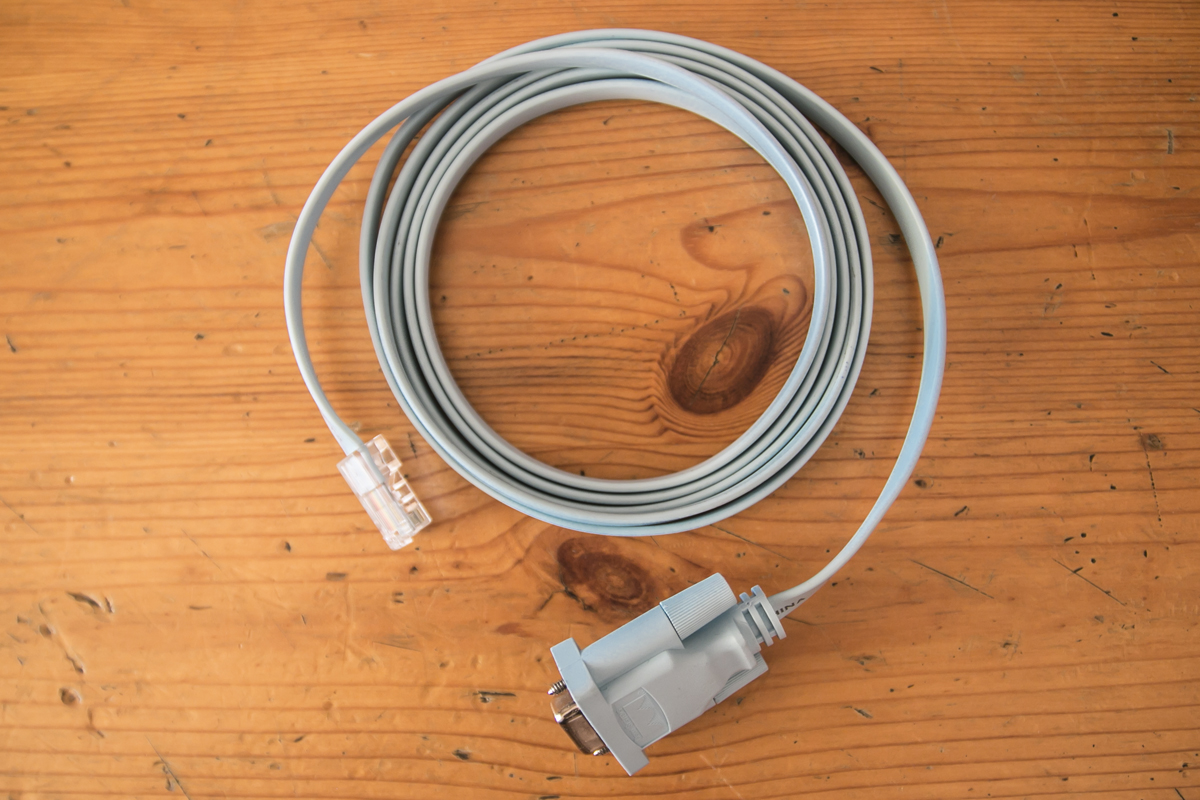
The console port is the first one you are going to use after unboxing the device. In order to configure the device, you have to use a text-based interface, where you write text, the device reads it, and returns other text to you: the console ports provides just that, allowing a synchronous transmission of text characters. Even if the console ports are an RJ45 plug, you cannot use a simple network cable right here, but you have to use a specific console cable, which has an RJ45 side and an RS232 (Serial) side. Many modern PCs do not have a built-in RS232 connector, so you have to use the console cable in combination with a USB to Serial converter. Due to the nature of this connection, console cables are relatively short (a few centimeters to a few meters), they are not for long-distance transmission.
The AUX (Auxiliary) port is also designed to configure the network device but in a different way. With the console port, in order to connect to the device, we must be close to it. With the AUX port, we can do this remotely. Specifically, that port is designed to act as an analog phone. Using a modem, you can call a phone number assigned to the device and then gain access to its configuration. This allows you to connect to the device remotely even if the network went down, however, this is not so common nowadays. Even if the idea behind is good, as it allows Out of Band (OOB) management of the device (the device is managed using a dedicated network), this solution is not cheap.
In order to allow that, you should prepare a whole separate infrastructure running separated physical cables to all of your devices, connect them to a Private Branch Exchange (PBX) and then to the public telephony network, taking care of obtaining all phone numbers you need. Moreover, modern telephony systems rely on the network and they won’t work if the network is down. Because of that, using AUX ports is now considered a legacy practice. However, that port works with the same logic of the console port. This means you can use some tricks to use that port as a console port in case the console port is broken. This, however, is way out of scope for this article.
The form factor
Network device in a rack
Now that we have a general idea about the shape of a networking device, is time to talk about it in technical terms. In fact, the form factor of a networking device is simply its shape. We can divide ICT devices into two major categories: end-user devices and data center devices. The end-user devices are the ones directly used by someone. An example of an end-user device can be a laptop, a smartphone, or a desktop computer. Instead, data center devices serve other devices: they are networking devices, switches, routers, firewalls, and so on. Because of that, these devices are not designed to sit on a desk. Instead, they are put in specific rooms (the data centers).
In a data center, many different devices from different vendors have to share the same space. Without some rules, this could result in a big mess. Fortunately, we have those rules. In order to maximize the space dedicated to devices, we have the concept of the rack. A rack is a closet designed to hold devices. A data center is a room with one or more racks in it. Racks have standard sizes, and devices to be put inside them must follow these sizes too. Specifically, the width and depth are always the same, while the height can vary, but only in increments of 1.75 inches (or 44,45mm). This means that we can have devices of 1.75” or 3.5”, but not of 3.0”. Because of that, we do not measure the height of a device in inches or millimeters, but instead in Rack Units (RUs), with 1RU = 1.75".
Switch Configuration form factor
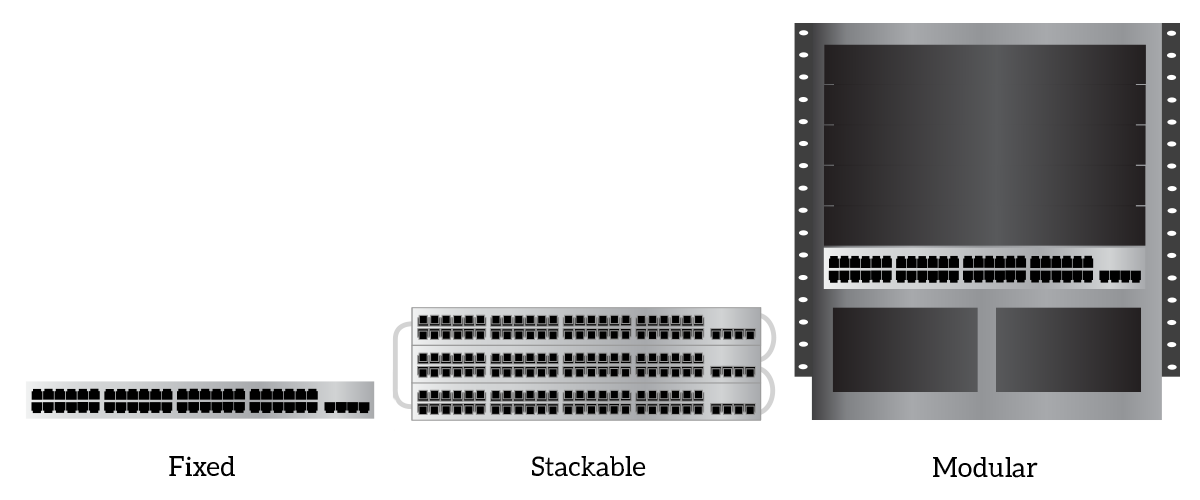
While these rack rules apply to all data center devices, there is some specific concept that applies only to networking devices. Now we are truly talking about the form factor. The form factor is the shape of the networking device in terms of flexibility and modularity. In networking devices, we can find three types of form factors in switches.
- Fixed Configuration Switches – switches with this form factor are 1RU in size. You cannot expand the number of ports on them. This is the simpler and cheaper form factor available.
- Stackable Configuration Switches – switches with this form factor are similar to fixed-configuration ones, with some enhancements. You can connect them together with a specific cable, they will act as a single device. The cable used, for Cisco device, is called Cisco StackWise. It can connect up to 9 switches in a loop fashion (first device to the second, second to the third and third to the first one).
- Modular Configuration Switches – these switches are the most expensive (and powerful) ones. They have a chassis which is basically a box with redundant power supplies, and in that, you can put several line cards, according to your needs. Line cards are components physically hosting ports, while the chassis allow inter-line-card communication. This type of device is used in the Enterprise Backbone.
The following picture presents the different form factors already explained.
The console
Entering the console
Now that we know the physical characteristics of a network device, it’s time to see how we can get to configure them. This way, in the following articles we can start to put our hands on the configuration part. In order to gain console access to a networking device, you are going to need the console cable and the USB-to-serial converter. After that, you are going to need a terminal emulation software. That software is the one that controls the sending and receiving process of characters on the console cable. Fortunately, there are several free software to do just that. The most famous and simpler one is PuTTY: it doesn’t even need to be installed, it is a simple executable file you can download and run as you need it.
Tip: USB-to-serial converters are not plug-and-play devices, you have to install their drivers. Fortunately, this is not a complex task. Check with the manufacturer of your converter what is the driver you have to install.
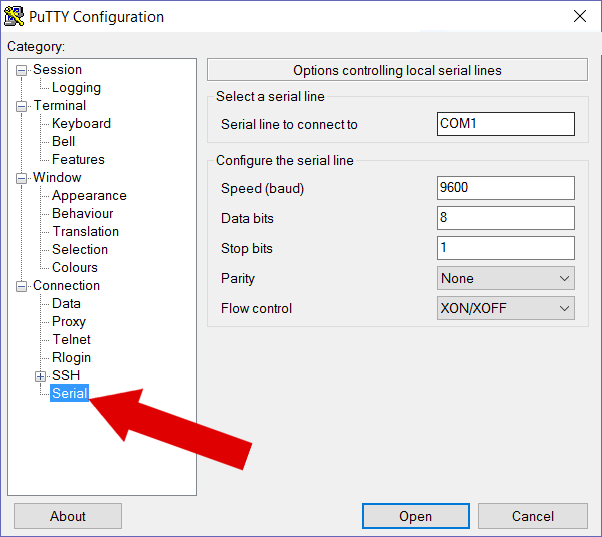
Once your drivers are ready, run PuTTY as administrator. Before connecting, you may want to check the Serial settings. Go to the Connection > Serial tab, everything should be as in the picture below (default settings).
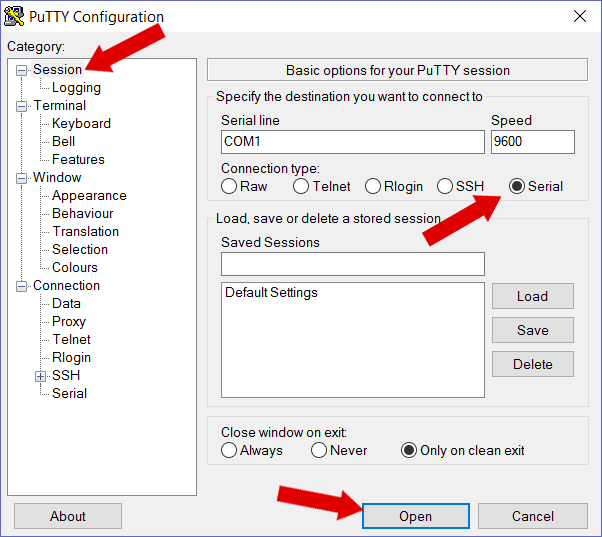
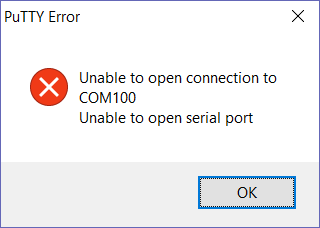
Once you are ready, the networking device is powered on, and everything is connected, you can launch the connection. Do that from the Session tab by selecting Serial. You will also have to specify the serial line, which is the serial port on your PC you are trying to use. Common serial lines are COM1, COM3, and COM5. If you get an error saying “Unable to open serial port” you are probably using the wrong serial line.
If everything is OK a new black window will pop-up. In there, hit the Enter key a few times until some text appears. If the device is brand new, it will prompt you to the configuration wizard. Instead, if this device has some configuration, you might have to authenticate with the user and password.
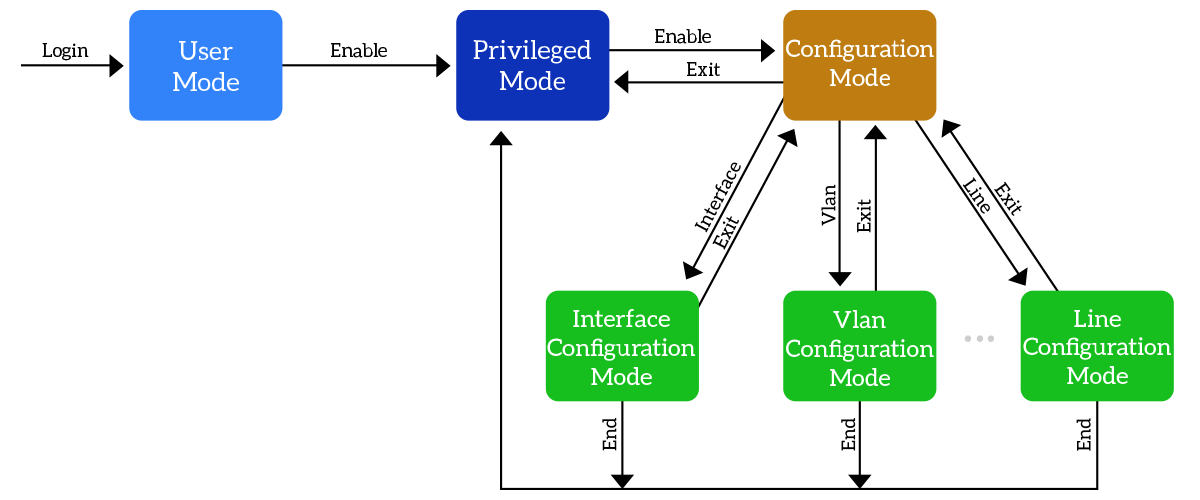
The Cisco Prompts
Cisco Prompts System
Connecting to a device in the console is identical regardless of the vendor. However, what you type once you are logged in depends on the hardware vendors. Each product implements its own proprietary configuration commands. There is no standard about that, you just have to know what to type. However, the logic behind the configuration is always the same: you have to enter a specific configuration area to perform certain commands. Cisco implements this concept with a simple prompts system.
Configuring a networking device is about sending and receiving text. However, it is not like writing a text document, it is a lot like chatting: you write text line by line and then press enter. Every time you write a line and then hit enter, the device processes the instruction and behaves accordingly. After that, it sends you a piece of text to tell you that it is ready to process more commands. That piece of text, that you are going to find at the beginning of every line, is called prompt. It is a visual identifier of the current configuration/management state.
User and Privileged mode
As soon as you log into a device, you enter the User mode. This prompt is identified by the name of the device followed by a “greater than” sign (>). As an example reference, let’s say we are configuring a device named “Router”. In this case, the prompt will be Router>. In this prompt we are allowed to do almost nothing, so we can type the enable command. That command will ask us to provide a password (if previously configured) and then will get us to the Privileged Exec mode, identified by the pound sign (#, e.g. Router#). From there, we can do all the verification commands we need. Moreover, we are allowed to enter the configuration mode. To do that, we type configuration terminal and then we are in this new prompt Router(config)#.
From there, we can configure general settings about the device and enter item-specific configuration modes. For example, we have specific modes to configure interfaces, VLANs, routing protocols, and so on. To get to the “parent mode”, you can type exit. However, note that the Privileged mode is not a child of the User mode, and typing exit in Privileged Exec mode will disconnect you from the device, showing again the login prompt. From any configuration mode, you can type end to reach the Privileged Exec mode immediately. The following image shows you how to move between Cisco prompts.
Conclusion
After this article, you know how to handle network devices from a physical perspective. You learned how to get around between Cisco prompts, so you are ready to put your hands on the real configuration. In the next article, we will show you how to practice all the CCNA-level configuration you need. The cool thing about that is that you can do it without purchasing any networking equipment! Then we will continue the CCNA guide with several labs to grow your technical skills!

