
If you are following the CCNA Course, you now have a solid understanding of Spanning Tree. STP has the simple goal of removing loops, and because of that will disable links in your network. This means that if you connect two switches with multiple cables, only one of them will be active. To overcome that, we started to use PortChannels (or EtherChannels, to use the Cisco term). A PortChannel will bundle together multiple physical interfaces into one logical interface.
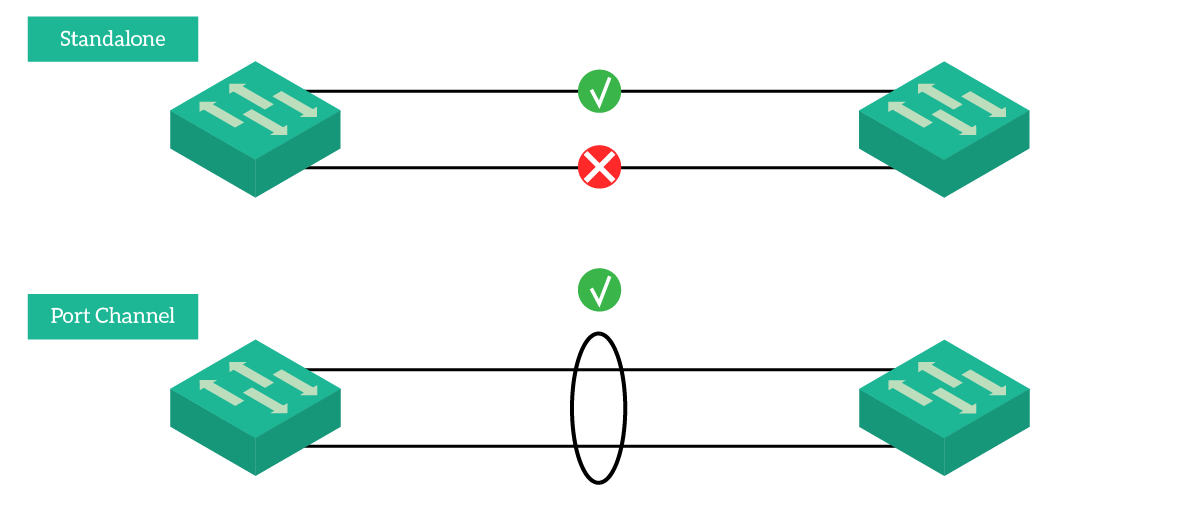
Tip: As in the picture, to represent that some links are bundled you just draw a circle around them.
Once you have a bundle, STP can only block or permit the logical interface. If the interface is in the forwarding state, all its physical interfaces are too. This results in having multiple active links between switches: better resiliency and more bandwidth. Since aggregating links into logical ones have huge benefits, we do it everywhere. We even have even defined a “globally accepted” term: LAG – Link Aggregation.
This article introduces you to the beauty of PortChannels. Not only we will explain to you how this technology work, but we will give you the commands to try PortChannels on your own. Because of that, we created an awesome Packet Tracer lab that you can download for free at the link below.

Once you downloaded the lab, just open it with Packet Tracer. Then, continue reading and try what you learn in the lab. This is the best way to master PortChannels.
PortChannels Lab Intro
The Topology
We can use PortChannels literally everywhere. Switches, routers, and even servers supports them. Nonetheless, for this lab we are going to use simple switches, to verify the STP benefit. We have three different options to create a PortChannel, so we needed four switches in a chain to create three pairs of links in total. Here’s what the topology looks like.

We decided to push things a little bit further, using the same interfaces on all switches. Specifically, SW1 and SW2 use Fa0/1 and Fa0/2 between each other, while SW2 and SW3 uses Fa0/10 and Fa0/11. Instead, SW3 and SW4 use both Fa0/20 and Fa0/21 between each other. This will help you a lot in the configuration.
The Requirements
Three links mean three requirements, pretty straightforward huh? Here’s what we need to do:
- Create a static PortChannel between SW1 and SW2
- Create a dynamic PortChannel with a standard protocol between SW2 and SW3, with SW2 being the master
- Use a Cisco proprietary protocol to create a PortChannel between SW3 and SW4, where both are masters
On top of that, we need to set all the PortChannels we created to be trunks.
Introducing PortChannels
What is a PortChannel?
A PortChannel is a logical association of physical links, that make them look like a single one. You can configure that logical interface like any other: set an IP address, configure it as a trunk, enable PortFast, and so on. All the configurations will be automatically replicated to the children physical interfaces.
You can bundle into a PortChannel interface on the same type only. For example, you can’t put a FastEthernet interface in the same PortChannel where you put a GigabitEthernet. Furthermore, each switch has a limitation on how many interfaces can join the same PortChannel. Most of the time, it is 8: you can have a PortChannel relying on up to 8 physical links.
For a PortChannel to work, both devices at its ends must agree on it. They must know that they are talking over a PortChannel, and to treat it like a single link. If a device treats some physical links as part of a PortChannel, but the other device doesn’t, these links will be down. As we will see in the next section, we have different options to create a port channels.
PortChannel modes and Protocols
Not all PortChannels are made equal. You can have some static, and some dynamic, but there’s more. Dynamic port channels can have a master on one side.
With a static PortChannel, you need to hardcode on both devices the existence of the PortChannel. Then, they will start to treat the links as a bundle, as simple as that. However, if one of the two devices is misconfigured, the other will notify out-of-order packets and will shut down the link. This is probably the easiest way and the preferred one when a device doesn’t support a negotiation protocol.
To have a more scalable approach, you can use a dynamic protocol to negotiate the existence of the PortChannel. You have two choices, Link Aggregation Control Protocol (LACP) and Port Aggregation Protocol (PAgP). These are not interoperable, so both devices need to talk the same protocol.
LACP is the standard version (IEEE 802.3ad), and it is widely accepted. You are going to find LACP on Switches from different vendors, and on servers. If you configure a port to work in LACP, it will start to work as a standalone, like any other physical port. However, it will start to send (and listen for) LACP messages. In case it finds an LACP peer on the other side, the port will be automatically added to the bundle. This protocol has two modes, active and passive. As you can tell, an active port will actively try to make the bundle, while a passive one will wait for the device on the other side to initiate.
As a last option, with have PAgP, the Cisco proprietary aggregation protocol. It works exactly like LACP, but only Cisco supports it. So, what’s the point in using it? Nowadays, there’s no point: use LACP whenever you can.
Inside a PortChannel
No matter if you hardcode ports statically or if a dynamic protocol negotiated them: once they are in the bundle, they are in the bundle. Now that the bundle contains multiple ports, how will the switch select which packet send through which physical ports? This is where hashing comes in.
Each physical port is associated with a specific identifier, the hash. Once a packet arrives on the switch, and the switch understands that it should go on a PortChannel, it runs a hash function on the headers. All in all, it takes the source and destination addresses (IP, MAC, Layer 4 ports) and with some mathematical calculations obtain a hash from it. Then, the packet is sent to the port with that hash.
Since the hash works well only with the power of two, your PortChannel should always have a number of links which is the power of 2 (2, 4, 8). Don’t use any other such as 3 or 6, because traffic won’t be optimized. In fact, in case you have such a number, a link might run 2 hashes, having twice the traffic of the others. For example, if you have three links, the hash function will divide traffic for four hashes, but one link will have hash 3 and hash 4.
Do PortChannels increase bandwidth? Yes, however, not on a single flow. The same flow will be hashed always on the same link, so it will get the bandwidth of that link as ceiling. Instead, we can see that the bandwidth of a PortChannel is the bandwidth of all its physical ports if many flows run on it.
Tip: to optimize the distribution of traffic, you can select what to use in the hash function (e.g. source MAC). Change it according to your needs.
Configuring PortChannels
A Static Port Channel
By requirement, our connection between Switch #1 and Switch #2 should be a static PortChannel. So, we need to bundle together FastEthernet0/1 and FastEthernet 0/2 on SW1. A switch can have multiple PortChannels, so we need to specify to which one we are associating the interface. In doing so, we also tell which mode to use (static, LACP, PAgP).
To do that, we enter the configuration prompt for the physical interface. Then, we use the channel-group <ID> mode <mode> command, where the ID identifies the PortChannel and the mode identifies the protocol. To set a PortChannel as static, the mode to use is “on”. We can conveniently apply this command to both interfaces as below.
interface range FastEthernet 0/1 - 2
 channel-group 1 mode on
The PortChannel ID is local to the switch, it doesn’t have to match on the other side. However, we still need to apply these commands on the other side. For scoring purposes, use ID 1 on SW2 too, but be aware that this is not necessary. As long as the ports are on both sides, they will form the aggregation. You can also see that every time you change the mode of a port, it will go down. If then the negotiation succeeds, it will go back up.
When you add physical interfaces to a PortChannel, the switch creates the logical interface. In this case, it is PortChannel1 (the ID), and you can configure it like any other interface. We put this interface in a trunk, on both SW1 and SW2, and we are done for this link.
interface PortChannel 1
 switchport mode trunk
A LACP PortChannel
The configuration of a PortChannel which uses LACP is similar to a static one. We still use the channel-group command, but we need to change the mode. Here, we have two options.
activewill actively try to negotiate with the other device, if the negotiation succeeds the port will join the bundlepassivewill wait for the other side to initiate the negotiation. Of course if then the negotiation succeeds it will join the bundle
Since we want the master on SW2, we are going to configure it to be active. Also, since we already used the PortChannel 1 to talk with SW1, we are going to use 2 here.
interface range FastEthernet 0/10 - 11
 channel-group 2 mode active
Instead, on the other side (SW3), we will configure passive mode. However, on that switch we don’t have any PortChannel, so we can use the first ID, as below.
interface range FastEthernet 0/10 - 11
 channel-group 1 mode passive
Don’t forget to specify that the PortChannels we just created are trunks, as we already indicated in the previous section.
A PAgP PortChannel
For our last link, we are going to use PAgP. Like LACP, it still uses the channel-group command. However, since “active” and “passive” keywords were already taken, Cisco used two new keywords.
desirableindicates that the device will try to negotiate, using PAgPautoindicates that the device will wait for the other to negotiate in PAgP
Since we don’t care about who is the master, we are going to put both SW3 and SW4 into the desirable mode, using the following commands on SW3.
interface range FastEthernet 0/20 - 21
   channel-group 2 mode desirable
And these commands on SW4.
interface range FastEthernet 0/20 - 21
   channel-group 1 mode desirable
Now, set the PortChannels on both sides to be trunks, and you are done! Your score should reach 100%, but there’s more. Remember the ugly amber dots? When you started the lab, all the links on the bottom were blocked by STP. Now that they are bundled, they are not anymore. Since each switch is connected to the other with a single logical link (the PortChannel), there’s no loop anymore.
Troubleshooting PortChannels
Sometimes, PortChannels are just broken. This often happens when someone moves cables around in the switch closed, breaking a PortChannel. As a network engineer, you need to assess if all the ports are part of the group or if something isn’t working. We have plenty of commands to do that, but we are going to need only one.
Interestingly, Cisco names Link Aggregation PortChannels when naming the interface and channel groups when working on the physical port. Well, for the “show” commands, we have even another name: EtherChannels. Don’t worry, they are all the same thing.
A summary of PortChannels
To have an overview of the link aggregations on your switch, you can simply use show etherchannel summary. This commands will tell everything you need and has basically the same information of show etherchannel. Only, this command has a more compact output.
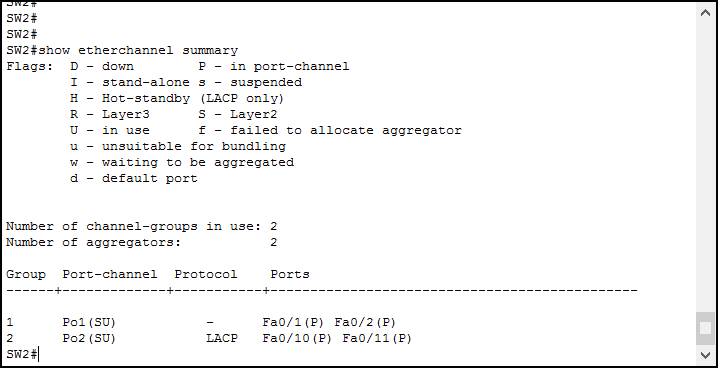
This output is extremely easy to read, thanks to the Flags explanation part. For each LAG, it tells you the ID (in the field “group”) and the interface name. Next to it, it tells you the overall status of the PortChannel using flags. In there, we always want to see at least a “U”, meaning “in use”.
After that, we see the Protocol of this channel, and then the list of physical ports in it. For each of them, we have a flag indicating the status. If you don’t see a P in here, then something is wrong. 99% of the time, it is in the configuration, so double-check it.
Conclusion
In this article, we learned how to configure and troubleshoot PortChannels. With them, you are now able to overcome a limit of STP, having resiliency on inter-switch links. Not only this increase the performance, but it also eases the maintenance of the network and reduces the need for STP re-convergence. Here’s what you need to take with you:
- You can configure a PortChannel either static or dynamic (LACP, PAgP), but both sides must agree
- Always use a number of physical ports which is the power of 2 when creating the bundle (e.g. bundle 2 or 4 together, not 3 or 5)
- Use the
channel-groupcommand in the physical interface configuration to associate it to a PortChannel - Use
interface PortChannelto configure the PortChannel, and reflect the configuration to the physical ports - Troubleshoot with
show etherchannel summary
With this knowledge, you can now design and implement a consistent LAN. But don’t stop here. Continue with the CCNA course, as we will see how to add Layer 3 redundancy, creating an Enterprise-level campus.

