
Each so-called Enterprise has some WAN connections. To create them, we can use a lot of technologies: wireless, fiber, serial, and so on. Serial links are quite popular, and they can rune different Layer 2 protocols. One of them is the Point-to-Point Protocol or PPP. This standard and efficient solution allows you to establish a direct connection between two routers. In this article, we will see how to use it and how to configure it. Then, we will introduce some of its great features such as bundling multilink or authenticating the other router.
This article requires you to do a little bit of configuration and troubleshooting. So, it comes with a Packet Tracer lab. You can download it for free by following the link below.

You will get a compressed file: un-zip it and run it with Packet Tracer. By trying what you learn in the lab, you will soon mater PPP and networking.
PPP Lab Intro
Lab Topology
Probably, this is the simplest topology you are going to see in a lab. PPP is a Layer 2 protocol, and it can connect two routers only. So, we just need two routers in our topology, as you can see below.

We connected these two routers with a Serial cable. This is just a type of link that can support PPP as a protocol. Also, note that for this lab we have no IP address. In fact, we are going to start with the bare physical layer and we will implement the data link layer. Nothing more than that.
The Requirements
For this lab, we want to set up a serial connection between the two routers using PPP. We also want that the two routers authenticate each other before establishing the link. This authentication must check their hostnames, and the shared password must be ictshore. For this, we want to use the best authentication method available.
Understanding PPP
Since PPP and Serial links are completely new to you, we will give you a little bit of explanation before diving into the configuration.
Serial links are a type of point-to-point link. This means that such a link can connect only two devices, one with the other. Therefore, Layer 2 protocols running on these links don’t need too much complexity. They don’t need a complex address such as a MAC address, for example. Now, while we can identify what a Serial cable is, we can’t easily identify its termination. Unlike Ethernet cables, that all use the RJ45 connection, serial cables can use different types of terminations. For this lab, we won’t care about it.
However, what you must know is clocking. To transmit data over a serial link, someone must beat the time. The provider’s device does that, as we use serial links to connect with the provider. The device beating the time is known as giving the clock to the link. It send pulses so that the other device knows when to transmit, and when to listen.
On serial links, we mainly have two Layer 2 protocols. The default one is the High-Level Data Link Control (HDLC), which Cisco implements in a proprietary way (cHDLC). Then, we have a more interoperable protocol: the Point-to-Point Protocol, or PPP.
The PPP Frame
The PPP Frame is somewhat simpler than the Ethernet frame. It contains 7 fields in total, one being the payload: you can have a closer look in the following picture.
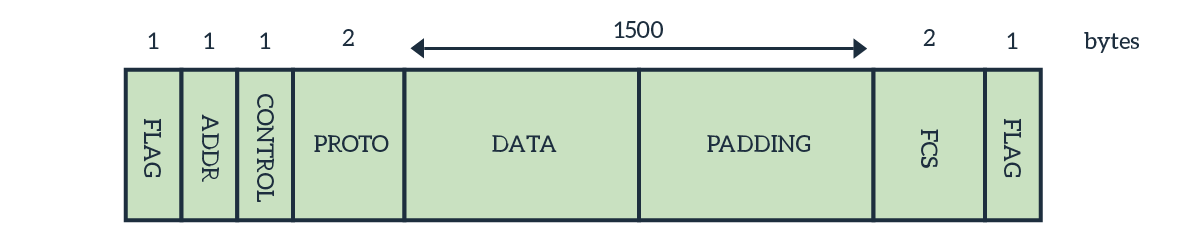
At first glance, it may seem confusing. If it is really a Point-to-Point protocol, why do we need such overhead? Couldn’t we just send raw data because they can only go to our receiver? Well, sort of. We could get rid of some PPP header fields, but not all of them. To see why, we need to look at the purpose of each.
- The Flag field indicates the beginning of the frame and its end. The value of this field (1 byte) is always
0x7E. As soon as the receiver sees this data combination, it gets ready to receive. - The destination address indicates who is the receiver. Since we are on a point-to-point link, with two ends, there is no need for this field. As a result, we always put the broadcast address, which is
0xFF, since this field is just 1 byte. This can be effectively omitted when using compression, as we will see later. - After that, we have the control field. This byte contains always
0x03, which means “unnumbered information”. If we use compression, we can get rid of this field too. - The protocol field indicates which kind of network layer protocol this PPP frame contains.
- The information is the actual payload.
- In case the information doesn’t reach 1500 bytes, we add some extra blank bytes to reach 1500. They are the padding.
- In the end, we have the Frame Control Sequence (FCS). This is a basic checksum to validate the integrity of data received.
Link Negotiation
PPP is different from Ethernet in many ways, and one of them is the link negotiation. Now, think about Ethernet for a moment: it is just an encapsulation layer. In fact, you just put IP packets into Ethernet frames and send them on a link. Ethernet will take care of the local delivery. You don’t need to take care of anything else, you just have to do the encapsulation. Think of it as a taxi always parked at your house. You can leave whenever you want, it will be there for you. PPP, instead, introduces the link negotiation. Now, you have to call the taxi first. In other words, the two devices on a PPP segment will exchange some data before the link can be considered “up/up”.
PPP relies on its own sub-protocol to do it: Link Control Protocol (LCP). This is a simple protocol with some specific goals. LCP will check the identity of the peer, define the MTU, and check for any configuration error. If we have any kind of problem, the link won’t go up at Layer 2 and will remain in the “up/down” state. Once LCP negotiates the link successfully, the link goes up and the routers can start forwarding on it. LCP can also negotiate compression to omit some fields from the frame, and save bandwidth.
Up to this point, nothing fancy. But that’s not all. When negotiating the link, PPP can also authenticate the peer. This does not only mean to check its identity, it means using passwords. With authentication, you can be truly sure about your peer. Because of that, ISPs can use this protocol to identify when a customer connected and bill him.
PAP and CHAP Authentication
To authenticate the peer, PPP can use two different sub-protocols. The simplest version is the Password Authentication Protocol (PAP), and the most secure version is the Challenge Handshake Authentication Protocol (CHAP).
You should avoid using PAP because it is simply insecure. PAP takes things extremely simple: each device sends its password to the other. Then, the other device checks the password and see if it is okay. If both end up having valid passwords, they have authenticated. The thing is, the password is sent in cleartext. Anybody in the middle could sniff it. Even if it is unlikely, as we are negotiating at Layer 2, a Man in the Middle attack could still happen. Imagine a hacker that exchanges some cables: the next time your router will send the password to his router, and he will know it. Just avoid that.
CHAP is a much better alternative because we never send the passwords on the link. With CHAP, each device sends a challenge to the other. That challenge is nothing more than a random sequence of bytes. The device receiving the challenge will encrypt the bytes using the password as the key, and this will result in another sequence of bytes. These resulting bytes depends on the password, in such way that only the password can generate them. Instead, from them, you can’t get to the password. The device will send back those bytes, and the device doing the authentication will perform the same check with his own password. If both end up having the same resulting bytes, their passwords must match. The link will go up. Here’s a visualization.
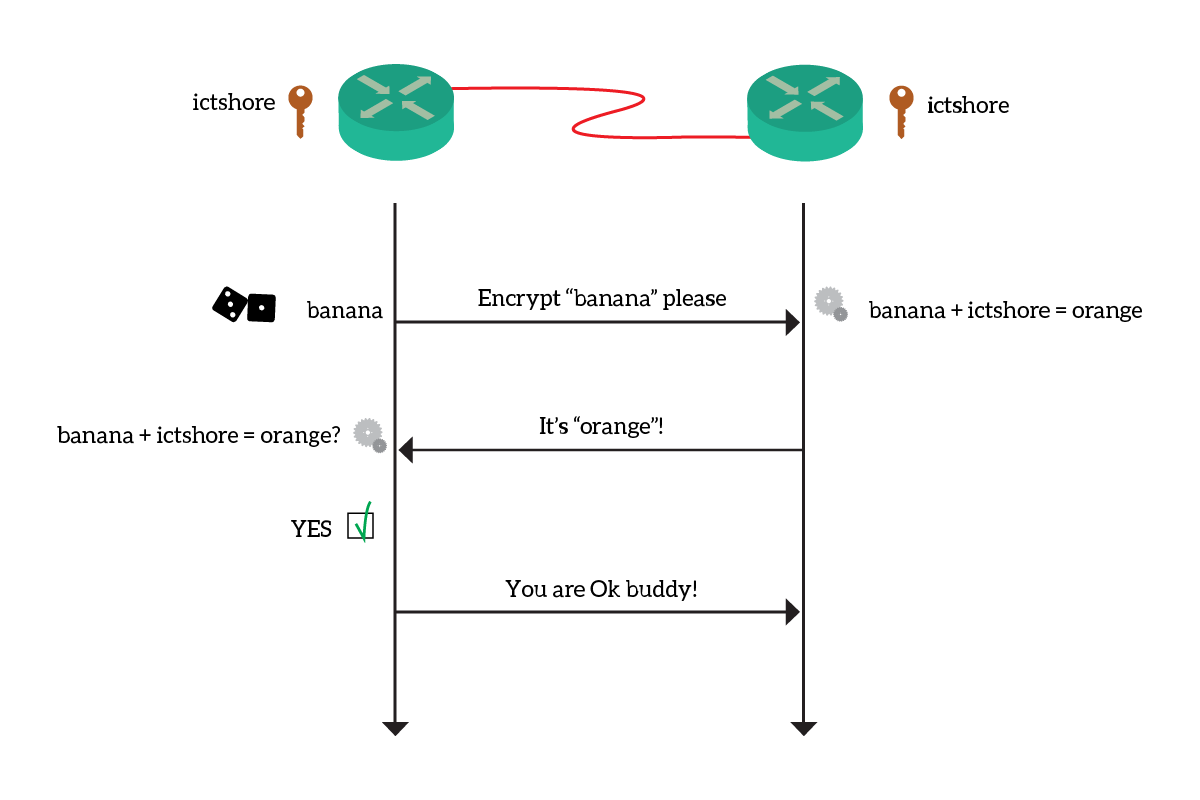
Of course, we do this two times. Each device will challenge the other because they both have to be sure about the authenticity of the peer.
Multilink PPP and Multiclass PPP
PPP runs on serial links, which means limited bandwidth. Generally, the maximum bandwidth we can get on them is 1.5Mbps, which may not be enough for the modern enterprise. We could use different technologies, such as Ethernet or even wireless, but some times serial is the only means available. If we want more bandwidth, we can use multilink PPP. This is a lot like etherchannels for Ethernet. In fact, we bundle multiple PPP links together to use as a single link. The router will load balance and distribute traffic across them, at Layer 2.
Multiclass PPP is another technology worth mentioning. With multiclass, you have a single serial link, but you run multiple instances of PPP over it. This results in multiple logical links over a physical single link, like the Ethernet subinterfaces. While doing so, we can’t omit the address anymore in the frame. It will be used to identify the instance of PPP. We generally use multiclass PPP for segmentation, but this is out of scope for the CCNA.
Configuring and Troubleshooting PPP
The PPP Configuration
We talked a lot about PPP, but now it is time to do the configuration. By default, all serial links on Cisco routers will use the Cisco proprietary version of HDLC (cHDLC). We need to change that to PPP, so we log into the router on the left and go to the interface Serial0/0/0 configuration. From there, you can type encapsulation ppp. If you do that on both routers, the link will go up/up. Both router have no parameters, so they are using a blank PPP. Since they both are the same, the link negotiation succeeds (enter the no shutdown command now).
However, we want to push ourselves a little bit further. So, we are going to enable CHAP authentication. To do that, we type ppp authentication chap. This will make the link go down, as we haven’t defined the passwords already. Of course, do that on both routers.
To define the password, we need to use exit to return to the global configuration. Now, we need to create a user for the other router. That’s right, R1 will have a local user named “R2”, and R2 will have a local user named “R1”. Obviously, passwords must match. Since the router needs to know them to be authenticated, and not only to authenticate, we have to store them in clear text (don’t use the secret keyword). We have seen this command when configuring SSH, we need to type username R2 password ictshore and username R1 password ictshore.
Congratulations! You completed this lab, your score should be 100% by now.
Other PPP Tuning
PPP, by default, authenticates using the router’s hostname. You can change that for PAP by using ppp pap sent-username <other username> password <other password>. You need to either this command at the interface configuration level, and the router will send this interface-specific username to the neighbor, instead of its hostname.
Cisco Packet Tracer doesn’t support multilink PPP, but real routers do. In fact, you can bundle up to 10 serial links in a PPP bundle. To do it, you need to configure the encapsulation on all of them to PPP, and then type ppp multilink group . Links with the same group ID will join the same multilink bundle.
How to troubleshoot PPP
Cisco Packet Tracer doesn’t offer any show command for PPP. The good news is, if PPP doesn’t go up it is because the parameters aren’t correct. You just need to compare the configuration of both routers and ensure that matches. To do that, rely on the old-but-gold show running-configuration. If you still struggle in finding the problem, Cisco offers us some help with the debug commands.
When debugging, you can see what happens the moment it happens. Packet Tracer allows you to debug the PPP packets, authentication, and negotiation. This is more than enough for our CCNA, and we will take a look at the debug of the negotiation. You can simply turn it on with debug ppp negotiation from privileged exec, then reset the interface.
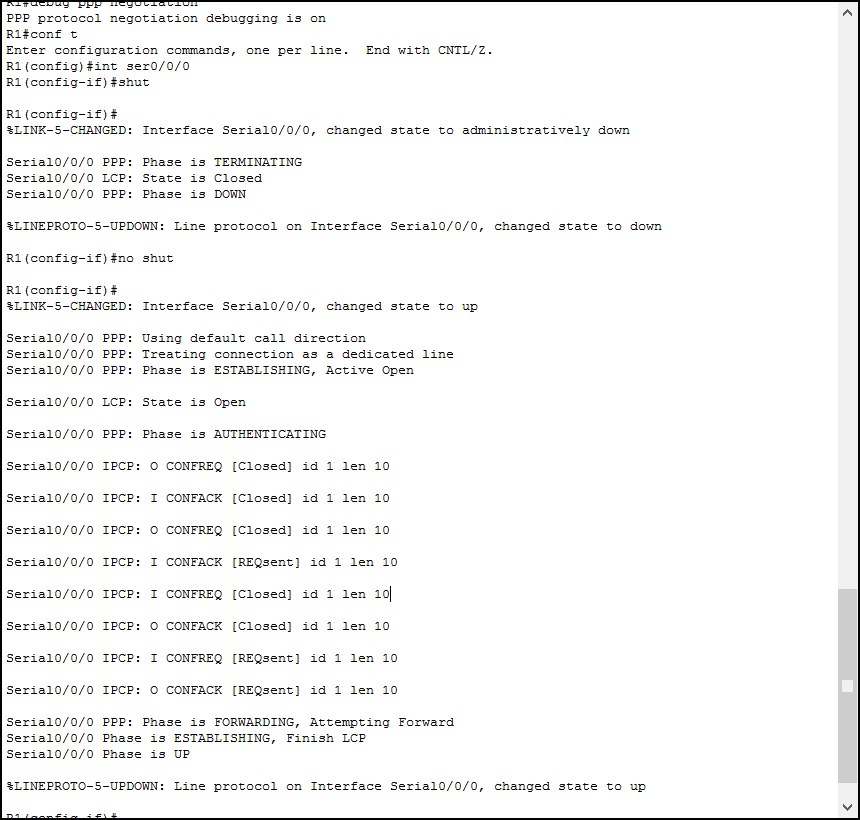
Now, you need to look at the “Phase” messages. In the end, you want to have the UP phase, and the interface will turn up/up. Another way to see if you have problems is to sit and wait. If you see the same output repeating over and over, it means that the device is trying to establish PPP, but fails. After a while it repeats but fails again. Look for the last phase before the failure, the problem is going to be there.
Conclusion
PPP is a simple protocol and has a lot of features you can turn on. With it, you can configure serial links “the right way”. Furthermore, having a great understanding of point-to-point links will allow you to learn better about other protocols. Here’s what you must remember.
- PPP is a protocol for serial links, designed for point-to-point connections (two routers only). It has a small header, which can be compressed removing the address field in the majority of cases.
- PPP uses Link Control Protocol (LCP) to negotiate parameters before turning the link up. Parameters include MTU size and compression.
- You can authenticate your PPP link with PAP (passwords sent in clear text) or CHAP, which never sends out the password being the most secure.
- To turn on PPP on a serial link, type
encapsulation ppp. - Use
ppp authentication paporppp authentication chapto enable authentication. - Define a shared password by creating a user with the name corresponding to the hostname of the neighbor with
username <hostname> password <shared password>. - Troubleshoot with
show runanddebug ppp.
Now, you should have all the basics of PPP. Stay tuned, because we are almost at the end of our CCNA journey.

