
Reading the routing table is only the first part. We need to understand where the routing table gets its routes, and how it chooses one over the other. Furthermore, you need to be able to manually configure routes. If you want to start manipulating the routing table, this article is for you. We will cover the configuration of static routes on a Cisco device, then explore all the details of the routing table we haven’t already covered in the previous article. We will touch key topics like administrative distance, metric and floating routes.
As this is a configuration and discovery article, it comes with a Packet Tracer lab. You can download it for free by using the link below, and I encourage you to do it! This way, you are going to benefit the most from this article, as you will try what you learn when you are learning it.

Once you downloaded it, just open the Cisco Packet Tracer lab and follow the instructions you find in this article.
Static Routes Lab Intro
The Topology
For this article, we are going to work with the following topology.
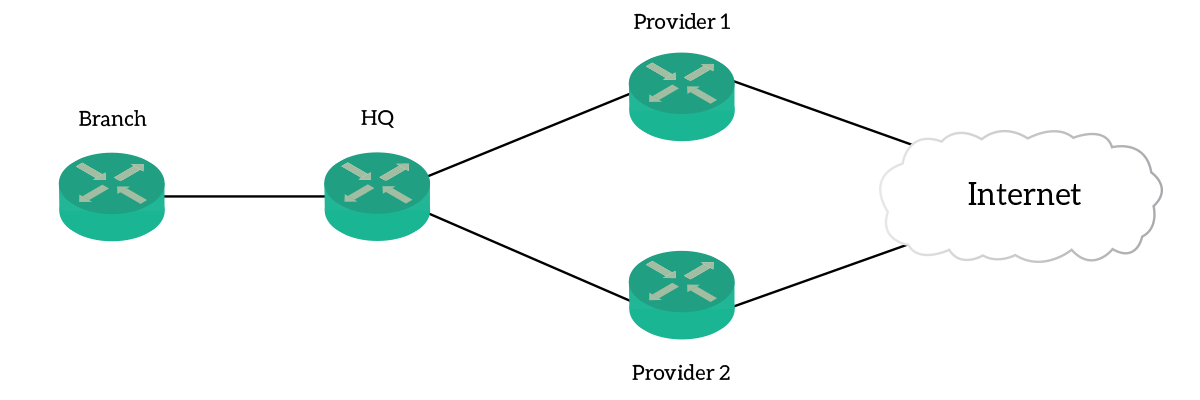
The topology for this lab is fairly simple, yet interesting. For that, we have a router in the main site – HQ, and a remote route – Branch. The branch is connected to HQ only, but HQ has two different Internet providers connected to the Internet. In this scenario, we want to establish communication and routing in the best way possible.
The Requirements
This lab comes with provider-side routing already configured. However, the customer-side of the network has no routing at all. As a result, you will need to create new static routes on both Branch and HQ routers. To speed things up, we pre-configured IP addresses on the interfaces, so that you’ll need to configure routes only.
For this lab, we are emulating two LANs: Branch LAN and HQ LAN. To do that, we leverage interface Loopback 0 on both Branch and HQ routers. We will consider that as the office network in Branch and HQ, respectively.
As a requirement from a routing perspective, everything must be able to communicate with everything. Specifically, Branch must be able to communicate with the Internet and HQ LAN. Moreover, we want to add some redundancy: HQ should connect to the Internet using Provider 1 unless the link is down. If that’s the case, it should automatically fall back on the second provider. We must achieve all of that with static routes.
Check out the following table to understand the addressing plan.
| Subnet | Description |
|---|---|
10.0.1.0/24 | Link between HQ and Provider 1, where HQ is .1 and Provider is .2 |
10.0.2.0/24 | Link between HQ and Provider 2, where HQ is .1 and Provider is .2 |
10.0.3.0/24 | Link between Branch and HQ\, where Branch is .1 and Provider is .2 |
10.10.0.0/24 | Emulated HQ LAN (Use .1 address for tests) |
10.11.0.0/24 | Emulated Branch LAN (Use .1 address for tests) |
94.11.68.0/24 | Emulated Internet (Use .1 address for tests) |
Understanding Routing Sources
Before we can dive into the configuration of static routes, we need to understand how the routing table is created. To do that, we need to go back to where the routing table takes its knowledge. We are talking about routing sources.
The Sources
The routing table has a single purpose: forward traffic to the right destination. By itself, it does not implement any fallback strategies in case of link failure, nor the exchange of updates with other routers. Instead, the routing table sits on top of that. Routers maintain their routing table always up-to-date, so traffic goes to the correct destination in every moment. To do that, they modify the routing table according to updates from the routing sources.
So, what are routing sources? A routing source is anything that can inject a route into the routing table. For instance, it could be a dynamic routing protocol (like EIGRP, BGP, OSPF, RIP and so on). Another type of routing source are static routes, which you have to configure manually. The last type of routing source are connected routes, that we will cover soon.
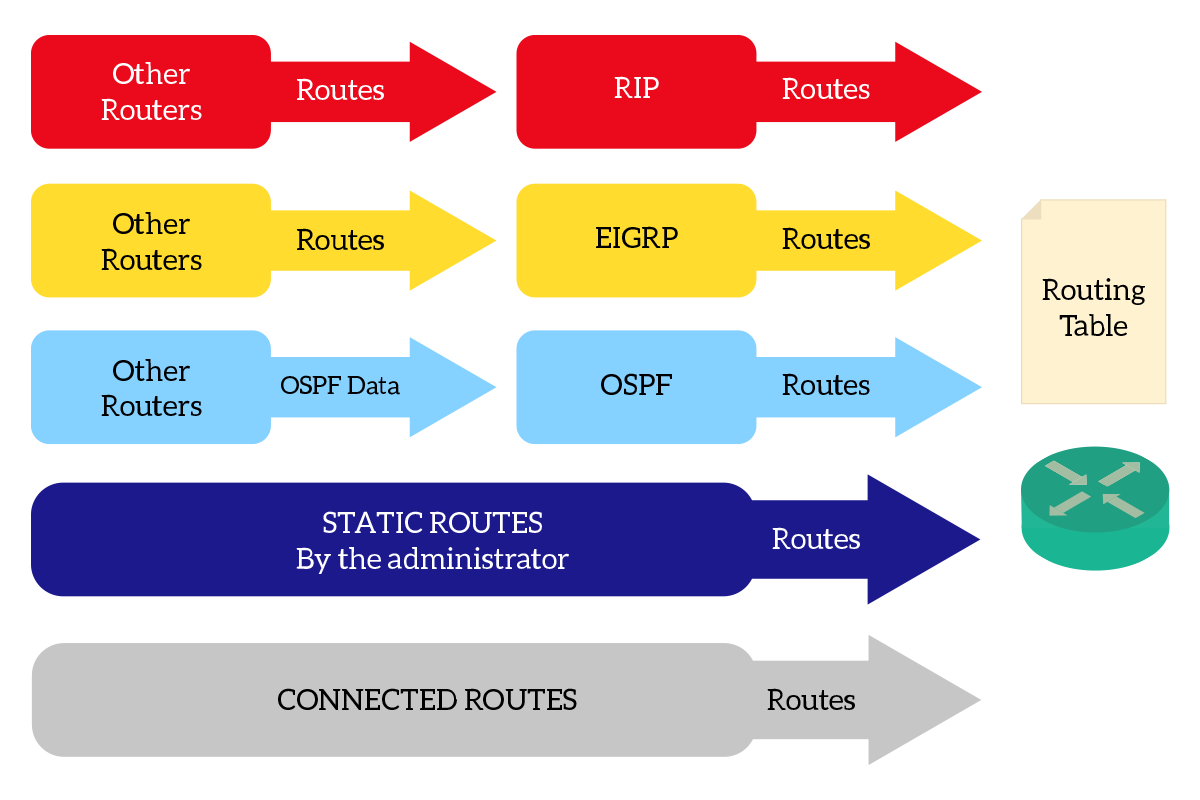
The picture above shows the process that puts routes into the routing tables. Using dynamic routing protocols, routers exchange routing information. Each routing protocol maintains some information on each router, then some of that information is converted into routes for the routing table. Since we don’t need to consider how routing protocols work, this is fairly simple for now.
Connected and Local Routes
We should spend a few words more on connected and local routes. The router automatically discovers these routes and keeps the routing table updated accordingly. Furthermore, you can’t do anything about it: you cannot alter this behavior, nor influence it in any way.
For each interface with an IP address in up/up state, the router injects a connected route in the routing table. It uses the subnet address as the target address and the interface with that IP as the exit interface. For example, if you configure the IP address of 192.168.1.1 with a mask of 255.255.255.0 on GigabitEthernet 0/0, the related connected route will be 192.168.1.0/24 via GigabitEthernet 0/0. These routes allow communication with neighbors.
For every connected route, the routers generates also a local route. This route points to the IP address of the router itself in that subnet, and have always a host mask (/32). With local routes, the router knows that traffic for a specific IP address is for itself. Considering the previous example, the router will generate a local route of 192.168.1.1/32 via GigabitEthernet 0/0. The exit interface, in reality, is not used as the traffic remains inside the router.
Both connected and local routes are dynamically updated. Every time a link goes down, the router removes its connected and local route from the routing table. Once it comes back, the router will put the routes back. This is an automatic behavior that you can’t configure, as changing could disrupt the routing logic.
Route Selection Process
With such a variety of routing sources, it is extremely likely that some conflicts will arise. Luckily, Cisco router are equipped with several strategies to determine which route is the best, under any condition. Remember that two routes to the same destination cannot live together in the routing table. Just to clarify that, two routes are for the same destination if they are identical both on target network and mask.
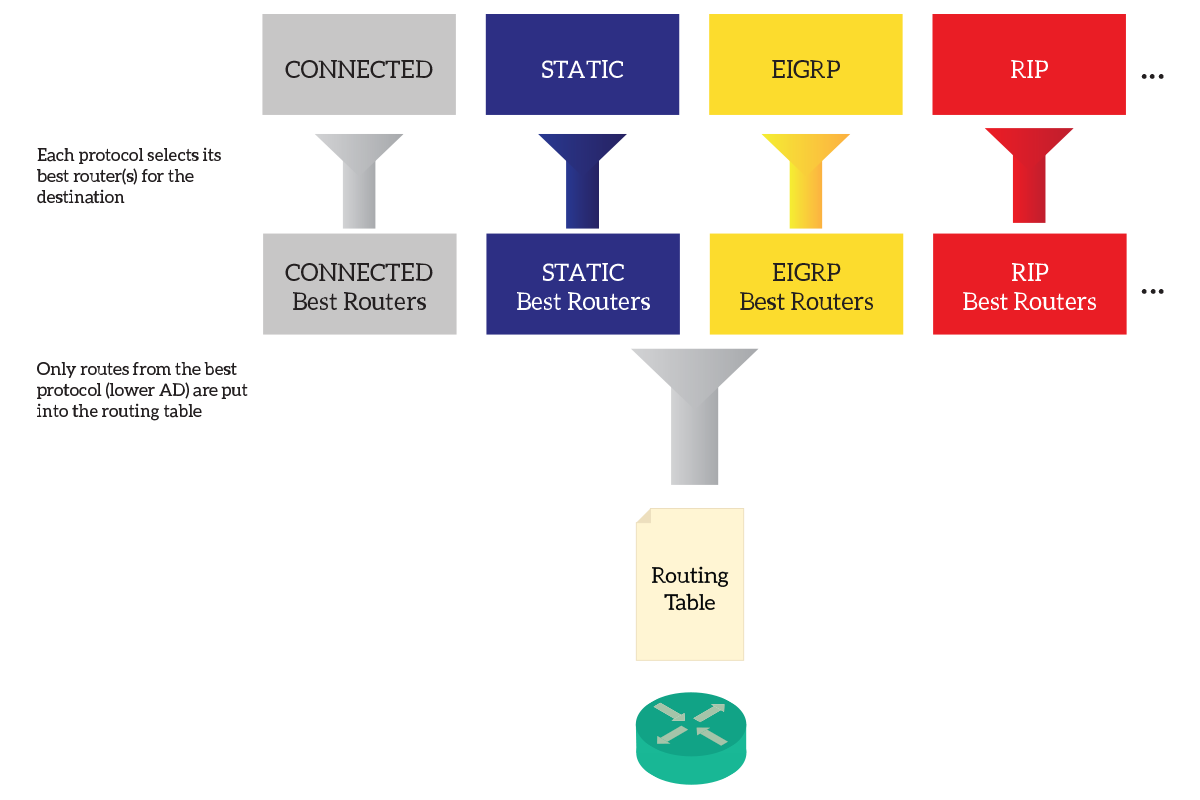
First, each routing protocol does an internal selection. This happens in different ways, depending on the routing protocol. Anyway, the purpose of that is to present only the best routes to the routing table. The same protocol won’t present two conflicting routes, but conflicts might arise between different protocols.
The Administrative Distance
In case two protocols try to inject routes to the same destination, the router needs to know what to do. All in all, the router must choose one protocol over the other. To do that, the routers checks for a specific value: the administrative distance. When a conflict happens, the lower administrative distance is preferred. Each routing protocol has its own administrative distance value, but you can change it. Furthermore, you can also configure static routes with custom administrative distance. The following table reports the default administrative distances for Cisco devices (that you need to remember).
| AD | Routing Source/Protocol |
|---|---|
| 0 | Connected routes (cannot be modified) |
| 1 | Static routes |
| 5 | EIGRP Summary |
| 20 | External BGP |
| 90 | EIGRP |
| 100 | IGRP (A legacy protocol) |
| 110 | OSPF |
| 115 | IS-IS |
| 120 | RIP |
| 140 | EGP (A legacy protocol) |
| 160 | ODR |
| 170 | External EIGRP |
| 200 | Internal BGP |
| 255 | Routing source unknown. This is the maximum value, and if a route has this AD it cannot enter in the routing table, effectively discarding the route. |
If there is a conflict, the router will select the route with the lowest AD. However, if the protocol withdraws the route later, the other one will be used (since there is no conflict, one only protocol remained active).
The Metric
Before a routing protocol can propose a route to the routing table, it must do its checks. The value used for that is the metric, a value used within the routing protocol but also reported into the routing table. This value simply indicates how convenient that route is, the lower the better. The following picture shows the route selection process, with metric and administrative distance.
Different routing protocols calculate the metric in different way, considering different items (such as link bandwidth or latency). Because of that, metric from different routing protocols are often not consistent with each other.
Static Routes Configuration
For this lab, we need to configure communication between HQ, Branch, and the Internet using static routes. At the moment, there is no route in HQ and Branch device (except connected and local routes), so we need to everything.
Simple Static Routes
We know that a route has three main parts: target network, mask and next-hop/exit interface. These are exactly the items we need to configure when inserting a static route. We do that in this very order, using the configuration command ip route.
To simplify the process, we can start from the Branch router. This is connected only to HQ and has to go through HQ in order to reach anything else. Therefore, the kind of route we can use there is a default route. As a next-hop, we need to use the IP address of HQ on the link with Branch. To do that, we use the command ip route 0.0.0.0 0.0.0.0 10.0.3.1. This way, we are telling the router that the network 0.0.0.0/0 is behind 10.0.3.1 (the next-hop). Instead of the IP address, we could use the exit interface. However, since this is an ethernet segment, this is not recommended. The result is in the picture below.
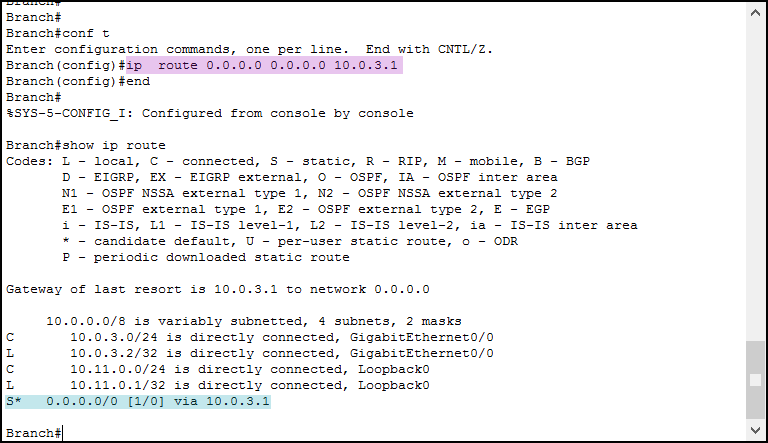
In light-purple, we create the default route. Then, when we issue show ip route, we see that route at the very bottom. This is because it is the default route. If you have done this correctly, your Packet Tracer Activity score will be at 25%.
Reading the Routing Table
At this point, we can introduce some other useful information contained in the routing table. To do that, we can analyze the entry (route) we just created on Branch, as reported below.
S* 0.0.0.0/0 [1/0] via 10.0.3.1In the following list, we explain all the components of this static route.
S– Static Route*– This is the default route0.0.0.0/0– Target network (in this case, the Internet)[1/0]– In square brackets, we find the administrative distance on the left (1), and the metric on the right (0)via 10.0.3.1– Next-hop
Remember where you can find administrative distance and metric, it is always handy!
Testing Routes with Extended Ping
At this point, we might think that we have configured communication between Branch and HQ. To verify that, we can use a standard ping. However, in this case, it is better to use an extended ping. An extended ping allows you to tune some parameters, like timeout, counts, don’t fragment flag, and more. Moreover, with extended ping, we can select which IP address we want to use as the source IP address (among the ones on the router). To issue an extended ping, just type ping and hit enter. Then, the software will guide you through the tuning of the parameters. Please be aware that the source interface is part of the extended commands.
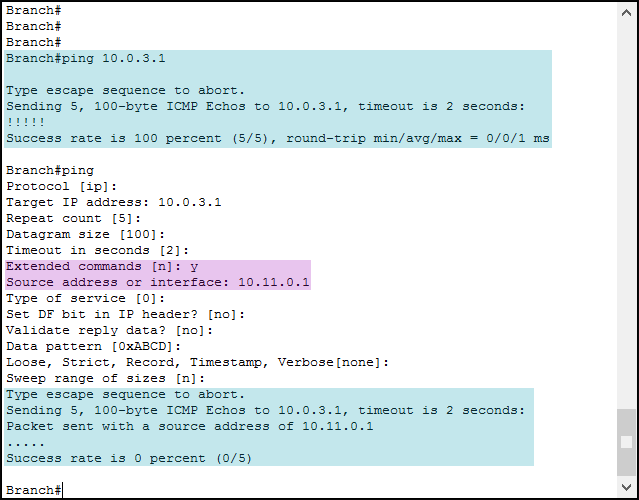
As you can see from the picture, we issued a standard ping successfully. Then, we used the extended ping (note the extended command, where we said “yes”). Unfortunately, this ping fails. Why? How can the source IP address influence the success of a ping? The reason for that is simple: the response goes missing.
Detecting missing Return Routes
Cisco devices always use the closest IP address to a destination when doing a ping. Therefore, when we issued ping 10.0.3.1 the device checked how to reach that destination. Since the exit interface for that is the GigabitEthernet 0/0, the router used the IP address on that interface as a source (which is 10.0.3.2). The request reached the destination, and routers in the path (in this case only HQ) were able to route back the reply to 10.0.3.2. Apparently, they fail to route back the reply to 10.11.0.1.
From that, we know that we can use extended ping to test return routes. If the normal ping succeeds, but extended ping fails, then our routes to other devices are OK. However, other devices’ routes to us aren’t! We need to fix that by connecting on the HQ router.
Adding more routes
HQ needs to know that 10.11.0.0/24 is behind Branch. Furthermore, it needs to know that the Internet is behind Provider 1, or Provider 2 if the first is unavailable. For now, we can forget about the fallback on Provider 2. We can just configure two static routes, as follow.
ip route 10.11.0.0 255.255.255.0 10.0.3.2
ip route 0.0.0.0 0.0.0.0 10.0.1.2
If you push those two commands into the HQ router, you should see your score going up to 50%. Great! But now we need to focus on the last task for this lab, the fallback.
Adding a Static Floating Route
We can configure a very easy fallback system by using a floating route. A static floating route is a static route that you configure, but that you don’t inject in the routing table. Instead, it is just “floating” in the configuration ready to hop into the routing table.
To create a floating route, we need to already have a route to the same destination with a better administrative distance. This way, that other route will be preferred as long as it is available. We already have a route to 0.0.0.0/0, so we need to add a new one with a higher administrative distance. For this lab, we used an administrative distance of 2.
The syntax for that is simple, we just use the ip route command as we already did, and we add a fourth parameter at the end: the administrative distance. So, we are going to type the command below.
ip route 0.0.0.0 0.0.0.0 10.0.2.2 2Just after you type this command, you’ll see your score reaching 100%. Congratulations! However, you won’t see any change in the routing table. To see them, you need to shut down the GigabitEthernet 0/1 on the HQ router. If you do so, you will see the following routing table (on HQ).
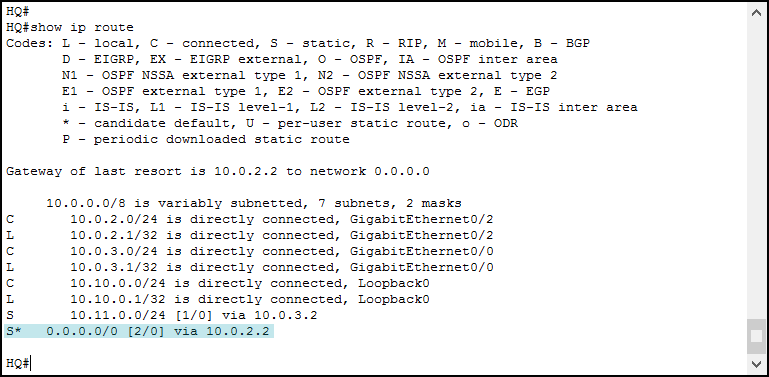
If you look closely at the route highlighted, you will see it has an administrative distance of two. Thus, it is a floating route.
Conclusion
In this article, we learned the missing pieces of the routing table. Then, we configured four static routes in total, one of them being floating. Here’s a quick recap of the concepts we covered.
- Routers automatically create and destroy connected and local routes for each connected LAN segment
- Routing protocols use metrics to present a route to the routing table, the routing table uses administrative distance to avoid conflicts
- You can use the
ip routecommand to create a static route - The extended ping allows you to test return routes
- You can optionally set the administrative distance in the
ip routecommand to create a floating route
At this point, you know all the basics of routing. You are now ready to face a more complex and realistic scenario, such as inter-VLAN routing and dynamic routing protocols. Just continue with the CCNA course to learn all of that!

