
Simply put, switches connect end devices. You can find them in the Enterprise Campus, in the Data-Center, and even in the Service provider. Each network engineer must be able to work on them, and this is what we are here for. In this article, we will see how to prepare a basic Cisco switch configuration with a step-by-step guided Packet Tracer lab.

Use the link above to download the Packet Tracer Activity, open it and work on it while reading the article.
Lab Intro
The Topology
Here’s a picture of the devices contained in our lab.
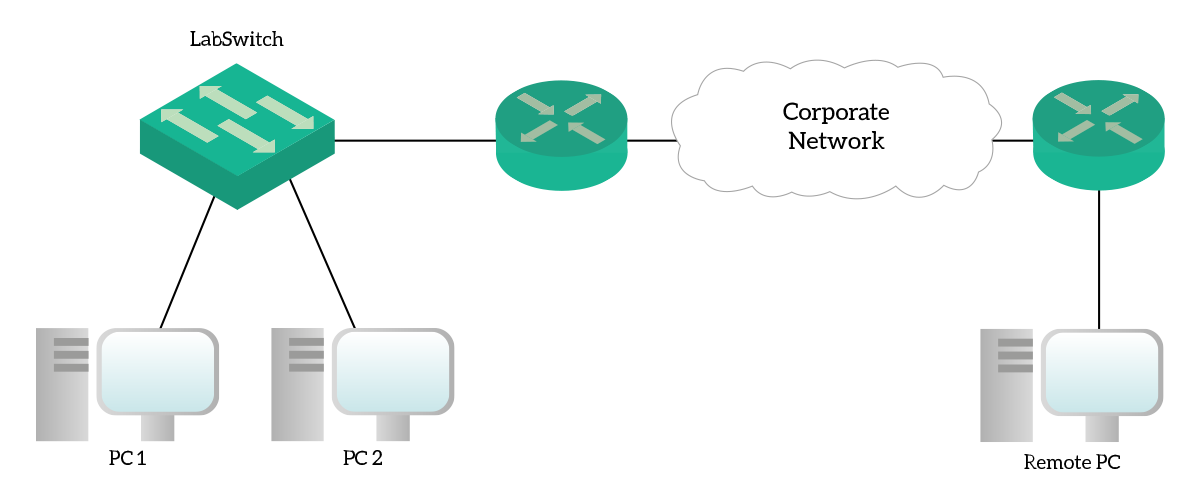
In this topology, we find two desktop computers connected to a 2960 switch. That switch is then connected to the Corporate Network cloud through a router. On the other end of the cloud, we find another router with a computer connected to it. In this topology, the only configuration item we are going to work on is “LabSwitch”. We will also use the three PCs to make some tests and verify that we set up everything correctly.
The Requirements
The switch you find in this topology is completely brand new. Therefore, we will need to prepare all the initial switch configuration. Specifically, we are going to define the hostname and the banner message, set up the switch for remote reachability, and add some basic security items. The following table summarizes the requirements per topic.
| Item | Requirement |
|---|---|
| IP Configuration | The device should be reachable at 192.168.1.2/24 on Vlan1, where the default gateway is .1. |
| General settings | The device should be named “LabSwitch” and prompt “My first switch” every time a user logs in. |
| Security | Secure Privileged Mode access with password “ictshore” and line access with password “cisco”. Encrypt all passwords. |
| Remote Management | All VTY lines must accept telnet connections |
List of steps
In this switch configuration, we are going to follow these steps:
- Introduce the commands useful to navigate between Cisco prompts
- Configure IP address settings
- Configure the default gateway
- Configure hostname and banner
- Configuring enable secret, VTY password and password encryption
- Enabling telnet access on VTYs
Step-by-step Switch Configuration
Cisco quick tips
Before you dive into the configuration, we can spend some on improving proficiency. Cisco offers a lot of commands to do a lot of things, so it might be hard to remember them all. Cisco knows that, so they offer us some hints embedded in the operating system. First of all, the most useful component is contextual help. At any point in the configuration, you can type a question mark to see what are the commands available. Furthermore, you can do it while you are typing a command! As a result, you can use the contextual help to see how to complete a command. Especially the first time, this will be a precious feature.
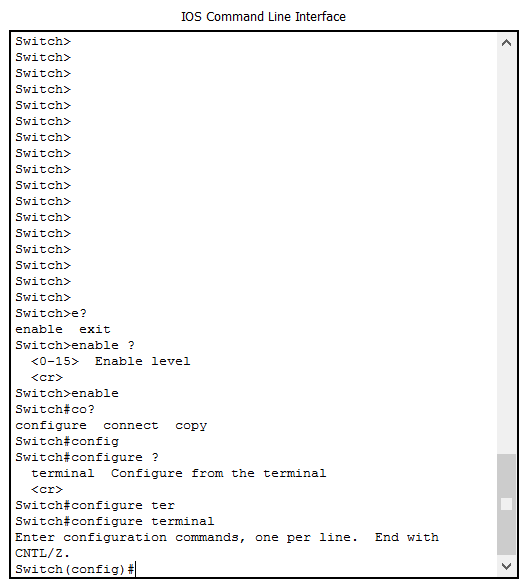
As in the picture, if you use ? in a word without space, the device will show how to complete that command. Instead, if you use it after a command, you will see what are the next words you can type.
On top of that, Cisco offers you several commands to navigate inside the prompts. Since you cannot use the mouse inside the prompt, we need to find alternative ways.
- Use the left arrow and right arrow to move the cursor to the previous or the next character in the line.
- Use the top arrow to recall the entire previous line you entered. Note that if you already typed something in the current line this will be lost. You can recall several previous commands by pressing the top arrow several times.
- Use the down arrow to recall the next command, in case you went “too back” with top arrow
- Press
Ctrl+ato move the cursor to the beginning of the line - Press
Ctrl+eto move the cursor to the end of the line
IP addresses: a quick recap
Each switch has the same major goal: allow layer 2 communication between connected devices. Thus, it does not need an IP address to work properly. However, configuring an IP address on a switch can extend its features. In addition, we are looking for is the possibility to manage the device. Out of the box, we can manage our switch only via console, but this is not so flexible. Since we are going to manage several switches around the company, it is best to find a way to control them remotely. Before that, we need a way to communicate with these devices remotely, and this is where the IP address comes in.
Each device correctly configured with an IP address, subnet mask and default gateway can communicate with remote devices. As a result, we are able to manage the device remotely with telnet or SSH. Moreover, we can monitor its health status with ping or SNMP and generate alerts in case the device fails. Before we dive into the configuration, let’s refresh those concepts.
- The IP address of a device is its Layer 3 address used in communication.
- With the IP address, we must configure a subnet mask. The device will use it to determine which hosts are in the same subnet and which hosts are remote.
- The default gateway is where we are going to send all the traffic for remote destinations.
Configuring IP
The first thing you want to do is to click on the LabSwitch device and go to the CLI tab. Then, once the boot process finishes, we must reach the configuration prompt. We can do it by simply entering these commands.
Switch>
Switch>enable
Switch#
Switch#configure terminal
Switch(config)#
The first command we are going to type is enable. This will bring us from user mode to privilege mode, then we use configure terminal to enter the configuration mode.
Opposite as a PC or a router, all the ports on a switch works at the Data Link layer instead of Network layer. Consequently, you cannot assign an IP address to them. However, we can assign an IP address to the switch itself, with that IP address not related to any physical port. As part of the switch configuration, we can assign an IP address to a logical interface. Since we just want remote reachability, we are going to use the default logical interface, although this is not the best practice. The default logical interface on every Cisco switch is called VLAN 1. Here are the commands.
Switch(config)#
Switch(config)#interface vlan 1
Switch(config-if)#ip address 192.168.1.2 255.255.255.0
Switch(config-if)#no shutdown
Switch(config-if)#
First of all, we are entering the interface configuration prompt for the VLAN 1 with interface vlan 1 command. Then, we set the IP address and the subnet mask for that interface with the ip address command. Finally, we enable the logical interface with the no shutdown command. Note that, with the Cisco syntax, to remove a command from the configuration you just type no followed by that command.
Configuring the default gateway
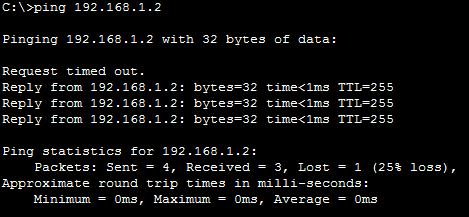
Now, our switch can communicate with other devices in the same subnet. Try that out by issuing ping 192.168.1.2 on PC1 command prompt (note that the first request might timeout).
However, if you repeat the same test from Remote PC you will see that all requests time out. This is because our switch has no default gateway just yet. When the Remote PC tries to ping the switch, traffic arrives to the switch correctly, but then our switch do not know how to send a reply. It checks that the destination is remote using IP address and subnet mask, then drops the packet because there is no default gateway. Changing it is easy.
Switch(config-if)#exit
Switch(config)#
Switch(config)#ip default-gateway 192.168.1.1
Switch(config)#
We use the exit command to get back from interface configuration to global configuration, then we use the ip default-gateway command to specify the IP address of our gateway. In this case, our gateway is going to be Router 0. Once the gateway is configured, try again pinging from the remote PC. This time the request is going to be successful.
Configuring General Settings
Each switch configuration includes these general settings: a name for the device and a banner. Since you are going to work with several switches together, we must find a way to quickly identify which switch you are working on. To do that, we set the hostname of the device. In this switch configuration, we are going to set it to “LabSwitch”.
Switch(config)#
Switch(config)#hostname LabSwitch
LabSwitch(config)#
Basically, the hostname command expect a name without spaces as a parameter. After you type that command, the prompt will change to reflect the new hostname. So, we know that the default hostname for switches is simply “Switch”.
The next step is to configure the Banner Message of the Day (MOTD). This is simply a message shown every time you connect to the device. Because of that, it is generally used to tell the whereabouts of the device and some warning against unauthorized access. A real-world switch configuration will have a banner containing the site where the device is in and discourage unauthorized access. For this lab, use the following command.
LabSwitch(config)#
LabSwitch(config)#banner motd $My first switch$
LabSwitch(config)#
Since the banner can be multiline, we need to use a text separator. In other words, the first character you type after “motd” will be used to close the banner. In this case we used the dollar sign as separator, so the device will consider anything we type as part of the banner until we type another dollar sign.
Securing the Privileged Mode
With the basic switch configuration, we must learn how to secure the management for the device. Because privilege mode allows to see sensitive data and enter the configuration mode, we want to grant access to it only to authorized users. We can do it by setting a password to access it. To do that, we have two alternatives: enable secret and enable password. These two commands both set a password to gain privileged mode access, but they differ in the way the password is stored. With secret, the password is stored as encrypted text, while with password it is stored as plain text. As a result, enable secret is the most secure alternative and we should always use this one.
LabSwitch(config)#
LabSwitch(config)#enable secret ictshore
LabSwitch(config)#
Now, for each user trying to enter the privileged mode will have to insert “ictshore” as a password. But this is not enough as security precaution. Even the user mode can expose some data we don’t want to show to everyone, and can even expose you to some attacks if we don’t protect it. So, we should ask a password every time someone tries to connect remotely to the switch. With remotely, we intend any mean other than console access. To do that, we must secure the VTY lines.
Securing User Mode
A VTY line is a “channel” a user can connect into to manage the device. Each telnet or SSH connection to the device will occupy a VTY line and if all lines are busy no other connection can be made to that device. As a user, you start to “occupy” a line as soon as you log in. This means that an attacker could saturate all the lines and prevent you from managing your own switch! We must put a password on that, and this is extremely simple.
LabSwitch(config)#
LabSwitch(config)#line vty 0 15
LabSwitch(config-line)#password cisco
LabSwitch(config-line)#exit
LabSwitch(config)#
This way, we just set a password (which is “cisco”) on all VTY lines, from 0 to 15. However, this password is stored in plain text. If we want all the passwords to be encrypted in the configuration, we must turn on a specific service. No worries, this is a single-command task. The service to enable is called “password encryption”, and you can turn it on as follow.
LabSwitch(config)#
LabSwitch(config)#service password-encryption
LabSwitch(config)#
This will encrypt all password already in the configuration and every new password you add.
Enabling VTY access
Now that we secured the VTY access we must enable it. To do so, we must select which type of connections are we going to accept: telnet, SSH or both. In a production environment you want to use SSH only, since all the traffic is encrypted. However, in this switch configuration we are going for telnet only. The reason for that is setting up the device for SSH connections requires more configuration and it is out of scope for this article. Instead, turning on the telnet connection for the VTY lines is very simple.
LabSwitch(config)#
LabSwitch(config)#line vty 0 15
LabSwitch(config-line)#transport input telnet
LabSwitch(config-line)#exit
The command we use to specify which protocol is accepted is transport input. As you can see from the code above, we used only telnet.
Saving the configuration
Once you finished configuring a device, you must save the configuration. Even if changes take effect immediately, you will use all your work with a reboot of the device unless you save. Cisco works with two copies of the configuration, called running-configuration and startup-configuration. When the device boots, it copies all the content of the startup-configuration into the running configuration. Then, the device uses the running-configuration and any change you make is applied to that configuration. Once you device to save, you issue a specific command and the device copies all the content of the running-configuration into the startup configuration.
To save the configuration, you can issue two commands that both do the same thing. The classic version is copy running-configuration startup-configuration, while the short version is write. You can issue these commands from the Privileged Exec prompt only.
Now, here’s a tip: you can move from the configuration mode to the privileged exec mode by typing end. However, you can type any privileged exec command from any configuration mode if you add do before it. As an example, if you are in global config, you can type do write.
To view the content of the configuration, use show running-configuration and show startup-configuration. Since the content is going to be pretty long, you will have to hit enter or space bar several times to see it all. Note that default settings are omitted.
Verify your lab
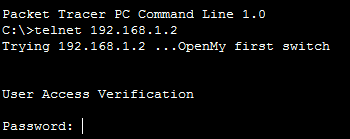
Since this switch configuration task was a Packet Tracer Activity, you can see the completion percentage on the activity panel. However, just to see that you set up everything correctly go on Remote PC command prompt and type telnet 192.168.1.2. You should be prompted for a password, which should be “cisco”, and see your banner motd.
Conclusion
Congratulations! You completed your first switch configuration. Before moving to another topic, we can leverage this already-constructed lab to see how Layer 2 forwarding works. Understanding how a switch works will be extremely useful in troubleshooting, and it is a mandatory skill for every network engineer. Follow our CCNA course with the links below to learn more!

