
We need to admit it – without handling events, JavaScript would be useless. In fact, we do not want just to write JavaScript code. We want to execute that code only in specific circumstances. For example, we may open a pop-up when the user clicks a button, when she scrolls down the page, and so on. In other words, we want our code to react to events. This JavaScript tutorial will explain how to use events in JavaScript.
This JavaScript tutorial assumes you are already familiar with JavaScript. If you aren’t, you should start with this introduction. Note that you should also be familiar with functions, and if you need a refresher we have a good tutorial on functions in JS as well.
What are JavaScript Events?
Even in real life, an event is something that happens at a specific point in time. If it is a wedding, it will have a specific date, if it is a corporate retreat it may last a weekend, but it still has a definite date. Also, comparing it to the other things you do in life, events are almost instantaneous, one-offs. What is an afternoon compared to a lifetime after all?
The same is true of events in JavaScript. They happen, and they are virtually instantaneous. To give you an example of few possible events:
- User clicks on a button
- The page finishes to load
- User scrolls up to a specific element
- A specific key is pressed on the keyboard (or any key)
- The user is typing into a specific text fields
And of course there are more, but as you can see they all indicate a clear condition that verifies. So what? By themeselves, events do not give us much power after all. However, we can trigger a function – any function we want – when an event happens. This mean we can execute our code only when an event happens.
In fact, we can attach a listener to an event. A listener is nothing more than a function, the function you want to execute when the event happens.
Implementing JavaScript Events
So, the concept of an event is fairly simple: something that happens at a specific point in time. Yet, how can we proceed with the implementation? As we will see in this section, it is fairly simple. Furthermore, we have two options: using HTML (that has some limits), and using JavaScript.
Using HTML
As we know, some events may relate to some specific parts of the HTML page. In fact, if the event is “when the user clicks on a button”, then the button clearly plays a role here. In all those cases when we can immediately connect our event to an HTML element, we can use some specific HTML attributes to wire a listener.
HTML attributes that trigger events always start with “on”, where that “on” means “upon the happening of”. Two common variants are the event for click (onclick) and the event for loading (onload). While the click event is fairly simple to understand, the load event means that the HTML component has fully loaded.
As a value for these attributes, we only need to provide our function. Alternatively, we can write some simple in-line JavaScript code as well. Take a look at the following example.
<html>
  <head>
    <script>function log() { console.log('Logging'); }</script>
  </head>
  <body onload="alert('Body has loaded');">
    <button onclick="log()">Log something</button>
  </body>
</html>
As you can see in the example, when we click the button we will execute the log function. Instead, as soon as the body load we will generate an alert (pop-up).
Limits of Events in HTML
Wiring events in HTML is quick and it can definitely do the job. However, it has some limits. The first and most important of those is that you are strictly dependent on HTML components. However, that’s not the only one.
Another important limitation to keep in mind is that you need to wire all the elements from the start, statically. This can work in some cases, but most of the time you want something more dynamic.
Think about a TO-DO list app. You want a button to add items to the list, and you can manage that as you will always have just one button for that. However, you also want a delete button that you create dynamically whenever a new item is added in the list. Clearly, you need to wire the event dynamically as well. That’s where we use JavaScript.
Using JavaScript
As an alternative to HTML, we can wire events using JavaScript. We do that by attaching a listener to an event on a specific object. So, the first thing we want to do is to identify the object where the event will happen. Then, we need to define the event name we want to listen for, and finally our function.
We can do all that with the addEventListener() function, which we can apply to any individual DOM component.
document.getElementById('my-id').addEventListener('click', myFunction);
Another benefit of doing so is that we don’t need to define the function beforehand. Instead, we can use an anonymouse function. An anonymous function is just a piece of code, a function that you create in the place where you want to use it, and use it only there. It is anonymous because it has no name, like in the example below.
document.getElementById('my-id').addEventListener('click', function () {
  console.log('Inside an anonymous function!');
});
And another key benefit is that we can decide to remove the listener from the object, should we need to. This is as simple as calling the removeEventListener() function.
document.getElementById('my-id').removeEventListener('click', myFunction);
Limits of Events in JavaScript
Attacching (or detaching) events in JavaScript is clearly one step ahead than simple HTML. However, it still has a limit that HTML does not have.
The key limit of using JavaScript for events is that the JavaScript file has to load first. If the event happens before the JavaScript file loads, and thus before you are able to attach the listener, you will simply miss it. The event will happen, but since you are not listening to it just yet, your function will not run.
In some cases, this is not a significant problem, and we can simply live with that. However, in some cases you may need to be sure that you fetch all the events from the very first moment. In those cases, using HTML may be more appropriate. Yet, those are rare cases and in case you are not sure, you can probably be just fine with JavaScript.
What Events Can I Listen To?
Be it with HTML (prefixing with on), be it with JavaScript: what is the list of available events? The Mozilla has the official list on MDN, but here you find the ones you will use the most often.
load, when a component (or the page) loadsfocus, an element receives focusblur, an element has lost focussubmit, a form is being submittedkeydown, a key is pressedclick, click on an elementdblclick, double-click on an elementmouseover, the mouse is over an elementmouseout, the mouse exits an element
By combining those events, you can effectively do pretty much anything a modern application would require.
JavaScript Events for Full Stack Developers
The best way to learn is to practice. We know this very well, and this is why we always give you an opportunity to practice what you learn with our tutorial. Besides, this JavaScript tutorial on events is part of a larger free course about Full Stack Development. In this course, we are building a website for a pretend bakery store, and today we are going to do some exercise on that.
I encourage you to do this exercise even if you are not following the course, it will help you fix these concepts firmly. However, be aware that to execute this exercise you need to have completed the one from our previous tutorial first.
You can find out more on GitHub.com at alessandromaggio/full-stack-course. Furthermore, if you are looking for the solution of the previous exercise (so that you can build on top of it for this one), you can check this commit.
The Assignment
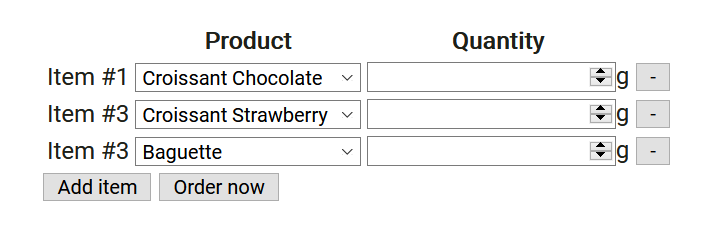
In our order.html page, we need to create a button to add new items. We start in a situation where the first item is added by default, but for this assignment we need to remove that and start with zero items. The user will be able to add a new one with the appropriate button.
In addition to that, each row must have a new button that allows for the removal of that row. We need to accomplish it by removing the entire row (tr tag). A tip to do that is that you will need to use a “normal” function inside an anonymous function.
The final result will look something like this.
To correctly execute this task, you will need to create two new functions: removeElement(n) and createRemoveButton(n), and also edit the createOrderItem(n) function.
Try to figure out the solution on your own before checking ours. Then, once you did your best, you can check the solution below. Yet, I encourage you to try it on your own first.
The Solution
So here’s the solution, be sure to give it a go on your own before checking. In case you want to see the full code for this solution, you can check this file or browse the files from this commit.
The first thing we did was removing the last line in our script.js that was adding a row automatically. However, we did not exactly remove it. We just wired it to a listener to a button that we have created (<button type="button" id="additem">Add item</button>)
document.getElementById('additem').addEventListener('click', function() {
  addOrderItem(getOrderItemsCount() + 1);
})
Now we are all set for adding new lines, but what about removing them? First, we need to make some space for the button in the table, and that’s why we add a new td4 in our createOrderItem(n). In that TD, we will place our button to remove the element, coming from a function yet to be created.
In addition to that, since we need to remove the TR, we need to reference it univocally. Thus, we add an ID to it.
function createOrderItem(n) {
  let tr = document.createElement('tr');
  tr.id = 'row-' + n;
  // ... Code from previous tutorial omitted ...
  let td4 = document.createElement('td');
  td4.appendChild(createRemoveButton(n));
  tr.appendChild(td1);
  tr.appendChild(td2);
  tr.appendChild(td3);
  tr.appendChild(td4);
  return tr;
}
Now, we can create our removal button, which is fairly simple. The only point of attention is the function inside an anonymous function. That is the only way we have to pass the attribute n now, but execute the function later.
function createRemoveButton(n) {
  let btn = document.createElement('button');
  btn.type = 'button';
  btn.innerHTML = '-';
  btn.addEventListener('click', function () {
    removeElement(n);
  });
  return btn;
}
Finally, we create the function to remove the element. That is simple, it searches the table body and removes the specific row from it.
function removeElement(n) {
  document.querySelector('#order-table > tbody')
    .removeChild(document.getElementById('row-' + n));
}
All set! You have now created a functional list of items!
Conclusion
With this JavaScript tutorial we saw how to use events to execute JavaScript code at will. Effectively, you are now ready to create complex applications and represent complex data in a way that is intuitive to the user.
Yet, there is still one key piece of the puzzle that is missing to create complex application. That is, the ability to make asyncrhonous calls: updating your servers without refreshing the page. That’s what we should explore next.

