
Cisco is leveraging a lot on security, lately. Because of that, they require any CCNA-certified network engineer to know the basics of Access Layer security. In fact, we can easily prevent the majority of attacks by simply adding a few commands. In this article, we show how to do that using some cool features. We will see the old-but-gold non-native VLAN technique, the DHCP snooping, and the dot1x.
What is security at the access layer?
Imagine a bank that receives clients daily. Instead of meeting them in the hall, or in the meeting room, they welcome them in the vault. While waiting, clients can sneak around precious metals, and potentially steal some. This is what will happen if you don’t apply security at the access layer. You will put everyone in the vault. In fact, access layer security allows you to control who can access what.
We are not talking about firewall policies, but a more primal technique. In fact, firewall policies start to matter when you have already an IP address and basic connectivity. With this type of security, instead, we can even prevent you from getting one. Access layer security ensures you are not a malicious device. In fact, it will protect you from these type of attacks:
- Trying to talk with another VLAN without passing through the gateway
- Performing man-in-the-middle attacks leveraging DHCP
- Spoofing MAC addresses to look like some other device
And, on top of that, it can authenticate you before you get access to the network. Applying security at this layer is easy, requires little effort, and can protect you from a great deal of breaches.
Tip: we also talked about a simpler way of applying access layer security. You can read our Port Security article if you haven’t already.
Access Layer Security
The VLAN Hopping attack
VLAN hopping could be an easy way for an attacker to bypass your gateway. A normal user would need to send traffic to the default gateway if he wants to talk with another VLAN. This allows you to put policies or ACLs on that gateway, having some level of control. However, if you don’t take care of the switch, an attacker could bypass that policy.
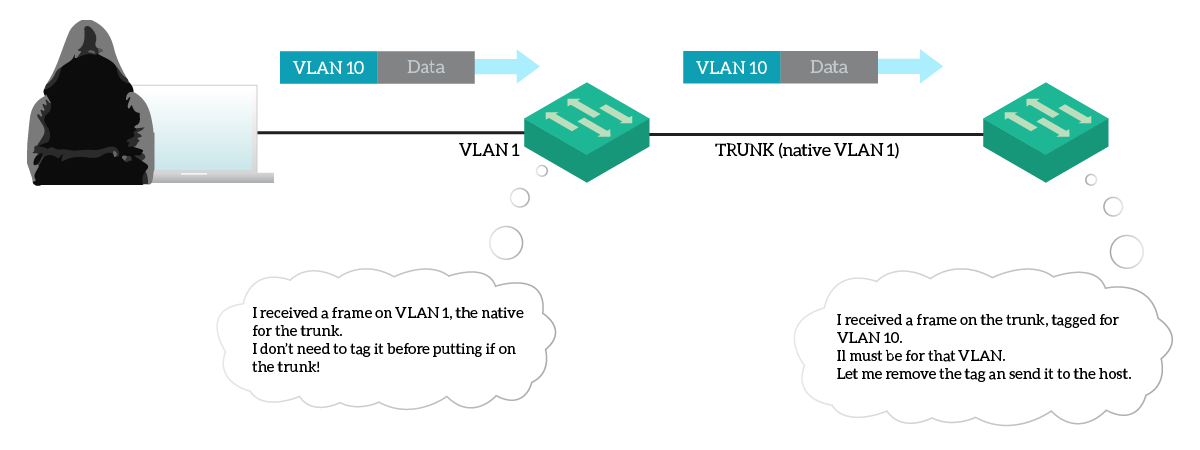
To do that, the attacker needs to be connected to a port in the VLAN which is native on a trunk. By default, all trunks have VLAN 1 has native (untagged) VLAN. Each frame without an 802.1Q tag received on a trunk will be considered part of VLAN 1. On top of that, there’s a great deal that the network may effectively use VLAN 1 to host clients.
In such an environment, the attacker can create an 802.1Q frame with the tag of another VLAN. The switch receiving that frame doesn’t look at the VLAN tag, because 802.1Q is compatible with plain Ethernet. So, it just believes it is an Ethernet frame. According to layer 2 forwarding, the frame may go on a trunk as-is. As a result, the switch on the other side will receive a tagged frame, with the tag originally specified by the hacker.
Since this time the frame comes from a trunk, the switch looks at the tag. It then removes the tag, and create a plain Ethernet frame on the target VLAN.
Now, this attack allows you to reach a target host. Since that host won’t be able to do hopping back, you won’t get replies. As a result, you can’t establish any TCP connection by doing VLAN hopping. However, you can send purposefully crafted packets that can harm a device. Its major application is Denial of Service.
Prevention: non-native default VLAN
Preventing VLAN hopping is extremely easy. Cisco recommends using a non-native default VLAN. That is, in your design, you shouldn’t allow clients to be in the VLAN which is native on trunks. So, if your trunks have the native VLAN set to 1 (default setting), no client should be in that VLAN.
But we can take this concept and implement it even better. In fact, we can create a specific VLAN to be native on trunks. This is a black hole VLAN, that doesn’t go anywhere. It has no clients, it has no gateway: it is just the native on trunks. This way, if you set that unused VLAN to be the native, all traffic will be tagged, no matter what.
To that, we can add that we don’t want VLAN 1 at all. In fact, we want to be sure that even attaching a brand-new switch with clients in VLAN 1 won’t pose us at risk. This is possible if we just don’t use VLAN 1. Just create another VLAN, and use it. So, here’s what would happen if someone tries VLAN hopping.

The attacker will send a tagged frame, and the switch will just ignore the tag. However, when that frame goes on a trunk, it will be tagged with the VLAN the hacker is in (5). On the other end, the frame will still remain in VLAN 5, preserving the internal tag of VLAN 10. Since the frame is still in VLAN 5, it won’t go anywhere.
The configuration commands
Everything is built around using a dedicated native VLAN. To set such VLAN, you should use the switchport trunk native vlan command on the trunk interface. To learn more about this configuration, you can check our VLANs Configuration guide.
DHCP Attacks
DHCP is a powerful protocol. It allows clients to get dynamically their IP address from a server. With that, they can also learn who is their default gateway or DNS server. The thing is, to allow that clients must blindly trust their DHCP server. And they do, actually. However, as network engineers, we shouldn’t.
Most DHCP-related attacks start with the DHCP starvation. Basically, an attacker generates thousands of DHCP Discover and request with multiple fake MAC addresses. The DHCP server will give him all the addresses it has, and then will be knocked out. In fact, if a DHCP server has no available address to lease, it won’t respond to requests anymore.
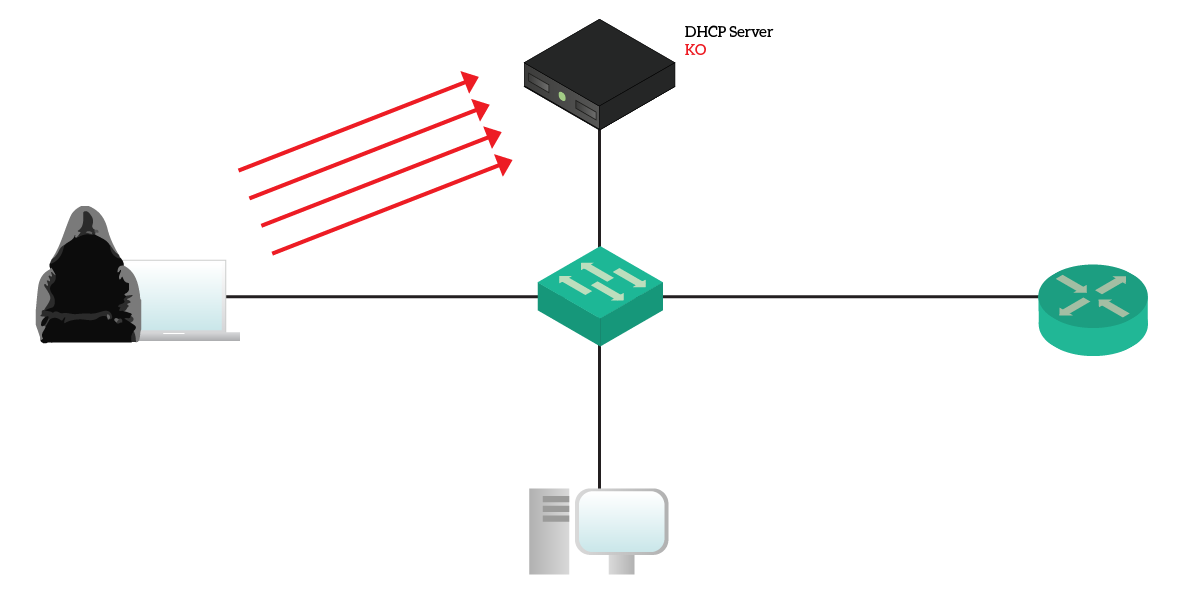
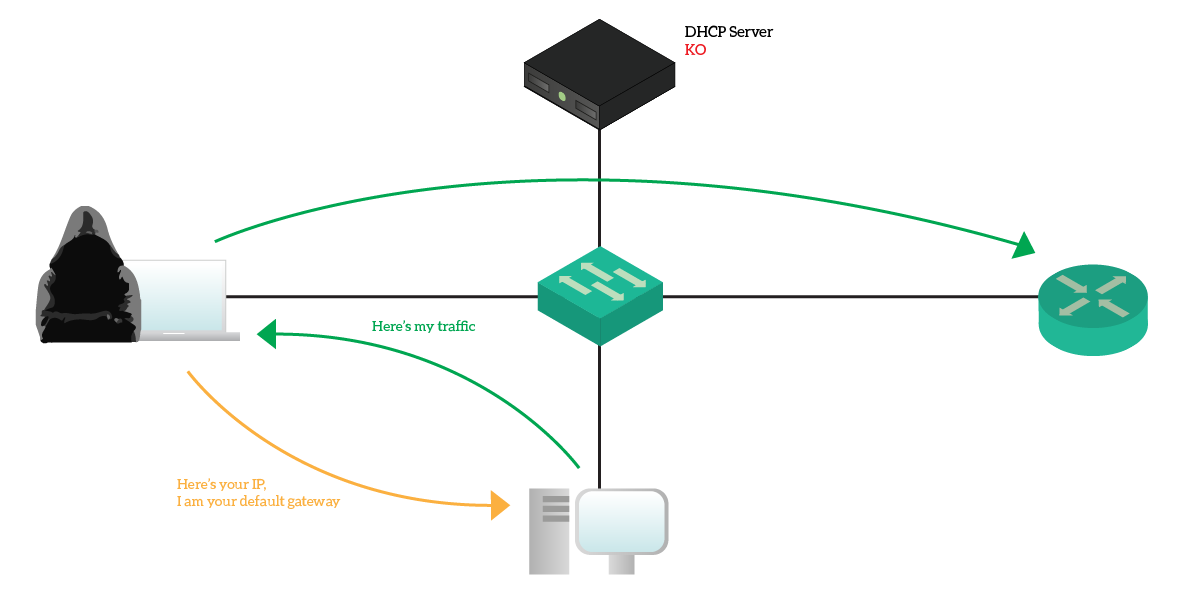
At this point, the network has no active DHCP server. This is the time the hacker starts to do DHCP spoofing. It just turns on a rogue DHCP server on his PC, becoming the one to assign addresses to clients. If he’s smart, he will assign valid addresses so that no one can notice. Furthermore, it can tell all the clients that he is the default gateway. Clients will start to send traffic to him, and he will be able to collect sensitive data. A common attack sees the hacker sniffing traffic and then sending it to the real default gateway. Users will be able to reach the Internet and do their stuff, but he will be collecting traffic.
This attack is extremely dangerous, as it may lead to credential leaks. We must protect our network.
DHCP snooping prevents DHCP spoofing
DHCP snooping is the name Cisco gave to the feature that protects you from DHCP spoofing. This feature gives the switch awareness of the position of DHCP servers in the network. To do that, it divides ports in trusted and untrusted. All ports can request an IP address, but only trusted ports can send out DHCP Offers.
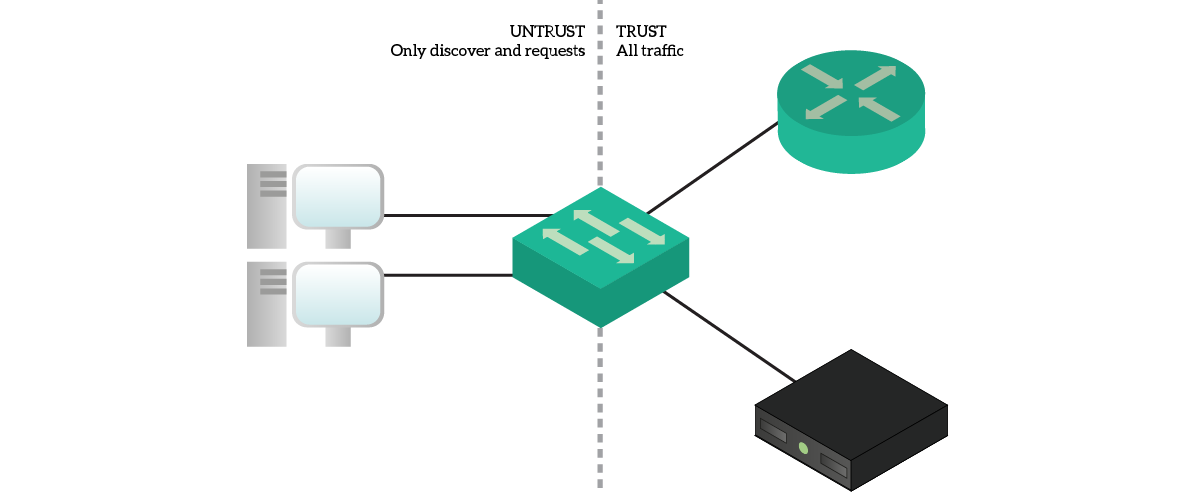
As you might guess, once you enable DHCP snooping all ports will be untrusted. You have to manually configure the ports connected to DHCP servers to be trusted.
The configuration commands
DHCP snooping is an optional feature that you need to enable. To enable that, you need to enter the configuration command ip dhcp snooping vlan . This will enable the feature on a specific VLAN.
Now, you need to specify the trusted port. Enter the configuration for a given interface, and type ip dhcp snooping trust. As simple as that.
Optionally, you can enable extra features that comes with DHCP snooping.
- Type
ip dhcp snooping verifyin the global configuration to enable MAC address configuration. The switch will check the MAC address in the DHCP request, and see if it matches the one in the Ethernet frame. - Use
ip dhcp snooping information optionto fill the DHCP Option 82 with information about this switch. If you are using a DHCP relay, this is useful because you can tell your centralized server which is the switch the client is connecting to. Furthermore, it protects you in case the clients try to set a value for this property.
By using these commands, you will protect your network from many man-in-the-middle attacks.
802.1X (dot1x) to authenticate clients
In most networks, you just connect and obtain access. Later on, you may go to the Enterprise services and log in from a web page. However, we have much better technology. We can verify who is connecting to the network, and granting access only to the good ones. This is possible with IEEE 802.1X, a protocol that authenticates clients before connecting.
If the network you are connecting is secured with dot1x, you will get a pop-up when connecting. It looks a lot like the one where you have to provide the password for a wireless connection, but it asks you for username and password. Who is asking this? You guessed it: the switch. However, the switch cannot remember all possible usernames, so it relies on the request to an authentication server. This could be done with RADIUS or TACACS+, two popular authentication protocols. The server analyzes the request and tells the switch if the users should or shouldn’t have access.

Now, this configuration has a lot of flavors. For example, you can assign the user to a specific VLAN, depending on the user itself. So, a user can move from a port to another and carry with him his VLAN. You will also need to define the behavior the switch should have if the authentication server is down. Optionally, you can define the MAC Authentication Bypass (MAB): some MAC address won’t get authenticated, such as printers not supporting dot1x. The possibilities of 802.1x are endless, but for the CCNA we will only explore the basic configuration.
The configuration commands
As a first thing, you need to enable RADIUS authentication and dot1x. You do that with the following two configuration commands:
aaa new-model
aaa authentication dot1x default group radius
dot1x system-auth-control
After that, you can optionally enable better resource management with mls acl tcam static-share. Now, you need to go to the interfaces you want and enable dot1x for each of them:
interface
 authentication port-control auto
 dot1x pae authenticator
 end
If you instead want to use the MAC Authentication Bypass, use the mab command at the interface level. Congratulations, you have enabled dot1x. Now, you need to ask your security specialist to configure the Authentication Server.
Conclusion
In this article, we learned how to protect your company from some common attacks. By applying security at the access layer, you grant a better control on the network. Here’s what you should do:
- Use a dedicated native VLAN for trunks, which is not used elsewhere. This will prevent VLAN hopping attacks. Also, try to not use the default VLAN (VLAN 1) to host clients
- Turn on DHCP snooping to be sure that only the real DHCP server can give IP addresses to clients
- Use dot1x to authenticate clients before they can access the network. This will require also an authentication server
Now you are ready to assess these basic security issues and fix them. This can make the difference between an engineer who protects the business, and one who doesn’t.

