
If you are following the CCNA course, you already know the fundamentals of Access Lists. This key topic allows you to better understand other Cisco IOS features, and implement basic security. In this article, we are going to use ACLs to transform our router in a simple stateless firewall. While doing so, we will see all the configuration and troubleshooting commands you need to work with Access Lists.
Since this article sees you configuring and troubleshooting ACLs, it has its own lab. You can download this free Access Lists lab for Cisco Packet Tracer by clicking on the link below.

Download it, and then just open the Packet Tracer. You will benefit the most from this article by trying the commands you learn in the lab.
Access Lists Configuration Lab
Lab Topology
For this lab, we need to work with three different networks under the same router. Specifically, we are going to work with an Internal network for clients, containing PC1 and PC2, a DMZ and an Outside network. To take care of the routing between them, we use a single EdgeRouter, where we will configure Access Lists.
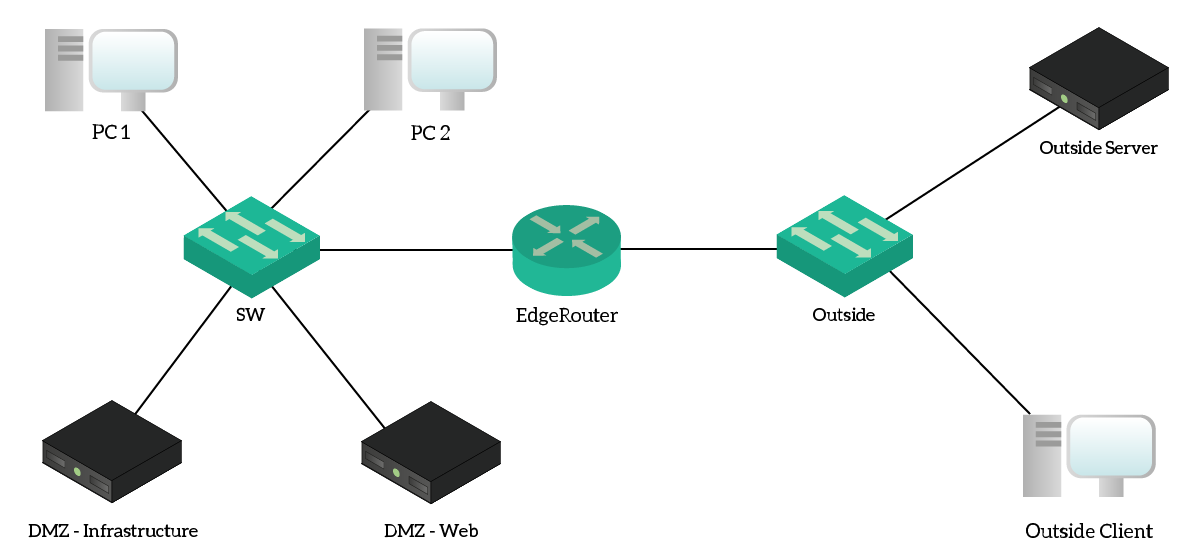
The Outside network tries to emulate the Internet, even if it uses a private addressing range. From a security point of view, everything on the Outside network is untrusted. Our goal, here, is to implement stateless security using Access Lists on the EdgeRouter. As a result, this router is the only device that we will configure. Instead, we can use the other device to test if we are correctly denying or permitting the traffic.
Since we need to work with source and destination addresses, it will be handy to have a reference of the IP addresses in the lab. For that, we created the following table.
| Address(es) | Name | Notes |
|---|---|---|
10.0.1.0/24 | – | Client’s subnet (VLAN 10), DHCP-assigned addresses |
10.0.2.10/24 | private.com | Physically hosted on DMZ-Infrastructure, this website should be accessible only from within the company |
10.0.2.11/24 | public.com | Physically hosted on DMZ-Web, this website should be accessible from inside and outside as well |
172.16.0.10/24 | outside.com | Example website on the Internet (OutsideServer) |
172.16.0.11/24 | – | Example client on the Internet (OutsideClient) |
Note that both private.com and public.com names resides on the internal DNS server. As a result, the client over the Internet can’t solve these names. Instead, you will need to test traffic by using directly the IP addresses.
The Requirements
We all know that our primary goal is to implement stateless security. However, this sounds a little bit too vague, and this is something we don’t want. When talking about security, we need to be extremely specific. If we don’t, our requests may be misunderstood and this will ultimately lead to a wrong configuration. Since we are permitting or denying traffic, a wrong configuration here can disrupt company services and even cause losses in profits.
Considering this, here’s a detailed list of requirements.
- Verify that traffic coming from the clients’ network is from the expected addressing range, or deny it if not
- Ensure that devices in DMZ can send responses if interrogated for web (HTTP and HTTPs)
- Ensure that devices in DMZ can make HTTP, HTTPs and DNS requests to external devices
- Allow traffic coming from outside to enter the network only if it is a response for a request originated from the inside
- Allow ICMP replies to come in
- Ensure that external devices can reach only the public webserver
10.0.2.1 - Show the “hit count” for denied traffic
If this is your first time dealing with Access Lists, don’t panic! We will explain how to read these requirements and how to translate them into a few beautiful policies.
Configuring Access Lists
How to construct a Policy
We all know from the previous article that Access Lists are sets of rules to identify traffic. Now, ACL is a Cisco term, while this kind of feature is known as “Policy” on many firewalls. For the purpose of this article, the term “Policy” is equal to “Access List”.
When creating a Policy, you want to end up with the cleanest possible set of rules. To do that, you need to truly understand requirements and avoid creating overlapping rules. Then, you also need to evaluate where to apply policies. This may change completely how the policy works, so you need to think both rules and position before you act.
There are two common places for access lists: close to the source and close to the destination. These two concepts rely on the fact that traffic must have a source and destination IP address.
Close to the Source
If you apply the policy close to the source, you can block traffic before it enters the network and consumes bandwidth for nothing. While this is a clear benefit, as a drawback, you need to create very specific rules in the ACL that includes destination addresses. If you don’t, you can potentially restrict a lot of traffic you want as permitted instead.
Since standard access lists do not consider the destination address, nor the Layer 4 information, they can’t work with this approach. They can only verify if the source address is from the expected range of IP addresses. Applying policies this way requires you to put them on many different routers (sources), increasing the administrative burden.
Close to the Destination
If you apply the policy close to the destination, you can potentially consider only the source address in a standard access list. This is because traffic already made it there, so we know that it was for this network as a destination. In other words, the destination is implicit. However, we can’t still verify ports. This allows centralized management, as you add access lists only in a few points.
However, you can boost the performance of this approach by using extended access lists anyway. This way, you will have granular control over the traffic and maintain centralized management. It is true that, this way, you will consume bandwidth for traffic that is dropped on the other end. This is widely accepted in modern networks.
In our lab…
In our lab, we are working with three different networks (or “legs”). One is the inside network where clients reside, another is the DMZ of the servers. On the other side, we have a leg facing the Internet – the outside.

On each of these legs, we can apply up to two policies: one for traffic entering the routing, and one for traffic exiting it. This results in six policies, but we will need far less than that.
Creating Access Lists
The commands
Our first requirement tells us that we need to verify the source for traffic on the Inside network. This means that we want to be sure that clients use addresses from the 10.0.1.0/24, and nothing else. To do that, we can use a simple Standard Access List. To create an access list, we can use two commands: access-list or ip access-list. While the result is the same, they slightly differ in how they operate.
- The command
access-listexpects a number, to identify the access list, and then the rule just after it. If you repeat this command multiple times, without changing the ID of the ACL, you will be adding rules to the same ACL. - The command
ip access-listexpects the keywordstandardorextended, to define the ACL type. After that, either a number or a name (characters, but no white space) to identify the access list. After that, it doesn’t expect the rule. Instead, if you hit enter it will move to the Named Access List configuration prompt. From there, you can type in rules one after the other, and typeexitonce you have finished.
If you want to use a number instead of a name, 1 to 99 is for Standard Access Lists. Instead, 100-199 is for Extended Access Lists. If you use names, you can use the name you like most.
Introduction to Rules
An Access List contains rules. We now know we can add them after the access-list command, or inside the “Named Access List” prompt. But what is the structure of a rule? It depends on the type, either standard or extended. As you might know, an extended ACL contains only extended rules, whereas a standard one contains only standard rules.
In an ACL, rules are ordered by a sequence number. If you add rules using the access-list command, the sequence number is incremented by 10 for each new rule you add. The same goes for the ip access-list command, if you don’t explicitly specify the sequence number.
Standard Rules
A standard rule has three parts: action, source IP, and wildcard mask. So simple. The action can be either permit or deny, while the source IP – alongside the wildcard mask, identifies the match. An example would be permit 10.0.0.0 0.255.255.255, that would allow the entire 10.0.0.0/8 network.
Instead of specifying Source IP and wildcard mask, you can use two special keywords:
anyto match with any IP address, this is equivalent to0.0.0.0 255.255.255.255host, followed by the IP address – this is equivalent to a wildcard mask of0.0.0.0, and will match only that single IP address
So, three examples of rules can be permit 192.168.0.0 0.0.255.255, permit host 172.16.1.30 and deny any. Remember that Cisco automatically adds an implicit “deny any” at the end of any access list, and you won’t be able to remove it. To create an ACL, with these rules, we can proceed with the access-list or the ip access-list command, as below.
access-list 1 permit 192.168.0.0 0.0.255.255
access-list 1 permit host 172.16.1.30
access-list 1 deny any
ip access-list 1
permit 192.168.0.0 0.0.255.255
permit host 172.16.1.30
deny anyExtended Rules
With extended rules, we have a few more things to play with. They always start with the action, which still is either permit or deny. Then, you need to specify the protocol: ip, icmp, tcp and udp are the most popular, but you can also specify eigrp, ospf, gre and more. To check that, the router looks at the header of the IP address for the “Protocol” field (if you need to have a refresh on that, you can check our article about the IP Packet). If you specify ip as a keyword, it will accept any value of the protocol field.
After that, you have the source IP and wildcard mask to match the source address. Even there, you can use the keywords host and any. If you have selected TCP or UDP as protocols, then you might want to specify the source port right after the wildcard mask. However, this is optional, but highly recommended. You can enter eq (equals) and the port number, name (like www for port 80), or use some keywords that we will describe later. If you don’t specify a port, the router will allow all ports.
Now, it’s time to specify the destination. You do it by typing destination IP and wildcard mask, followed by the ports if you want to. Here’s an example of a full rule that permit all the 10.0.0.0/8 network to contact any other host on the port 80.
ip access-list 150
 permit tcp 10.0.0.0 0.255.255.255 any eq www
Ports and TCP Fine-Tuning
Specifying a single port is simple, you just need to write eq and its number. But most of the time, you need to specify a range of ports. Cisco allows to do that with te following keywords:
eq, followed by a single port number. The port must be exactly as specified.neq, followed by a single port number. The port must be different from the one specified.lt(Less than), followed by a single port number. The port must be below the one specified.gt(Greater than), followed by a single port number. The port must be higher than the one specified.range, followed by two port numbers. The port must be within this inclusive range of ports.
For TCP extended rules, you may also want to check the flags in the TCP connection. For example, you can add the established keyword at the end of a rule. If you do that, that rule will match only if the TCP ACK flag is set to 1. In other words, it will match only if the traffic is coming as a response. A SYN message, trying to open a TCP connection, won’t match. As a result, this flag is perfect to allow only response traffic to come in. If you want to better understand these topics, you may want to dive into advanced TCP.
Access Lists Configuration
Our first Policy
We left the creation of our first policy to describe the possibilities of Access Lists. Now it’s time to do the configuration. Just to remember you, the first requirement was this:
Verify that traffic coming from the clients’ network is from the expected addressing range, or deny it if not
This translates into permitting the 10.0.1.0/24 network, and deny everything else using the implicit deny. For scoring purposes, use the access-list 1. We can simply enter the command access-list 1 permit 10.0.1.0 0.0.0.255 and we are good to go. With this configuration command, we created our first ACL.
The “From-DMZ” Policy
Now we need to create an extended Access List, a little bit more complex. We are going to use this to permit or deny traffic coming from the DMZ. We can summarize the requirements into a few technical statements:
- Permit HTTP and HTTPs responses
- Permit HTTP and HTTPs requests
- Permit ICMP replies
- Permit DNS requests
- Permit DNS responses
- Explicitly deny unmatching traffic, this is the only way to show the hit count of denied traffic
This policy will translate in a few rules. To clarify them, and ease troubleshooting, we can create some special rules: remark. A “remark” rule is just a comment, it doesn’t do anything. It helps you to read the ACL later. Now, for this lab, name this extended ACL From-DMZ. You should implement these commands.
ip access-list extended From-DMZ
 remark Responses to HTTP Requests
 permit tcp 10.0.2.0 0.0.0.255 eq www any established
 permit tcp 10.0.2.0 0.0.0.255 eq 443 any established
 remark ICMP and DNS
 permit icmp 10.0.2.0 0.0.0.255 any echo-reply
 permit udp 10.0.2.0 0.0.0.255 any eq domain
 permit tcp 10.0.2.0 0.0.0.255 any eq domain
 remark HTTP Requests
 permit tcp 10.0.2.0 0.0.0.255 any eq www
 permit tcp 10.0.2.0 0.0.0.255 any eq 443
 permit udp 10.0.2.0 0.0.0.255 eq domain any
 permit tcp 10.0.2.0 0.0.0.255 eq domain any
 deny ip any any
With these commands, we are also validating the source address, as it must be from the 10.0.2.0/24 network. Once you see your Packet Tracer score increase, you can move to the next section. However, take a minute to truly understand what’s happening in the access list, using the reference above.
The “From-Outside” Policy
The last policy we need to create is the one filtering traffic coming from the outside. Here, we want to be as restrictive as possible. This is because we don’t know what’s out there, so we need to apply a zero-trust politics. Again, as a first thing always translate the high-level requirements into technical ones.
- Allow TCP traffic only for existing sessions to come in
- Allow ICMP replies to come in
- Allow HTTP and HTTP requests for
10.0.2.11only to come in - Explicitly deny all other traffic
This will translate in a simple From-Outside policy with a few remarks in it. It should look like below.
ip access-list extended From-Outside
 remark Allow TCP Responses
 permit tcp any 10.0.2.0 0.0.0.255 established
 permit tcp any 10.0.1.0 0.0.0.255 established
 remark Allow ICMP Replies
 permit icmp any any echo-reply
 permit tcp any host 10.0.2.11 eq www
 permit tcp any host 10.0.2.11 eq 443
 deny ip any any
At this point, we only need to apply policies on the right interfaces.
Applying Policies
Access Lists will sit and do anything until you apply them on the right interface. To do that, you need to use the ip access-group command, followed by the ACL ID or name. After that, you also need to enter the direction, which can be in or out. Remember that this direction is as seen from the router:
inmeans traffic coming into the routeroutmeans traffic going out of the router
So, here’s the commands we need to enter.
interface GigabitEthernet0/1.10
 ip access-group 1 in

interface GigabitEthernet0/1.20
 ip access-group From-DMZ in

interface GigabitEthernet0/2
 ip access-group From-Outside in
At this point, your score should be 100%. Congratulations, you successfully completed your first Access Lists lab! Now, it’s time to understand the troubleshooting commands.
Troubleshooting Access Lists
To troubleshoot Access Lists at the CCNA level, we can use a single – yet powerful command. We are talking about the show ip access-lists, or show access-lists commands, that are essentially the same. The output shows the list of rules, excluding remarks, as well as the hit count. Note that the implicit deny is not shown here, and this is why we needed to add an explicit one. Here’s the output with the lab finished.
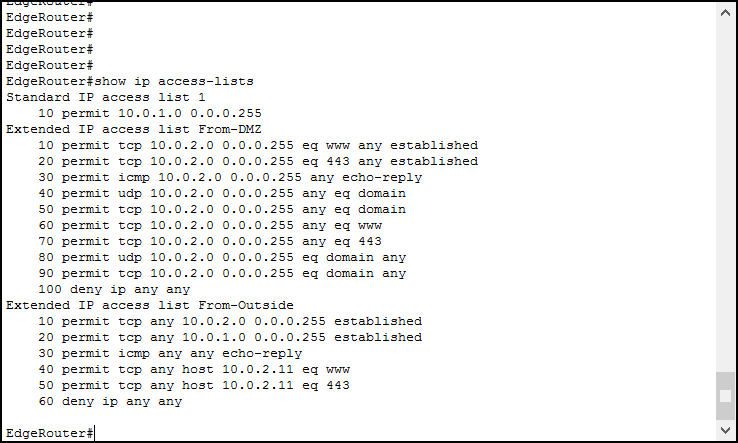
Okay, but we can see the same information from the running configuration, or even more considering remarks. What’s the benefit of this command? It shows the hit count. With it, you can see how many times an ACL matched until now. To verify that, try to navigate using the PCs in your lab: go to private.com, public.com or outside.com from internal PCs, and to 10.0.2.11 from the outside client. Then, log back into the router and type the command again.
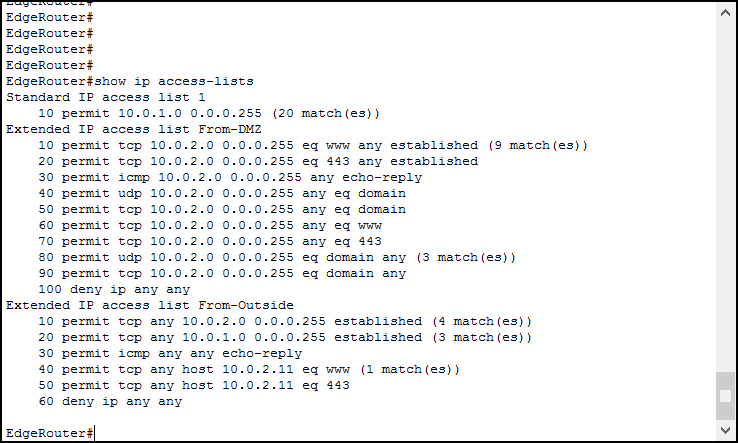
And this is it! With that, you can know which rule is matching and whether you need to modify it or not. Try to do a few tests by pinging from the outside, and see the count grow on the deny rule.
Modify a single rule inside an ACL
It can happen that you just mistype a rule inside an ACL. However, we haven’t covered the method for replacing a single rule. Deleting and re-creating an entire ACL is simple, you just need to put a “no” in front of ip access-list command. But editing rules inside an ACL can be tricky.
First, you need to enter the Named ACL Prompt configuration. No matter what type of ACL is, edit it with the ip access-list command. Then, using show ip access-lists, identify the IP of the rule you want to delete/edit. And then just type no, followed by the ID. If you want to delete the rule 50, for example, you can type no 50. Then, to insert a new rule in place of it, type the ID followed by the rule. For example, 50 permit tcp any any.
Conclusion
In this article, we covered all the knowledge you need to work with Access Lists. We then experienced those concepts in a simulated scenario using Packet Tracer, and this is what we learnt.
- Use the
access-listcommand to add rules to an ACL in a row, or theip access-listcommand to enter a dedicated prompt - Create standard rules with
permitordenycommands, followed by source IP and wildcard mask - In extended access lists, add at least the destination IP and protocol (IP, TCP, UDP, ICMP). You can also specify UDP/TCP ports for both source and destination
- Apply ACLs to the interfaces with
ip access-groupcommand - Verify ACLs with
show ip access-listscommand
Now you are ready to use Access Lists for stateless firewalling, but also in other Cisco IOS features such as Network Address Translation, that we will cover next in our Free CCNA course.


2 Responses
Alessandro,
Thank you for your very informative page. After having looked at several of your tutorials, i am very impressed. I am trying to get my CCNA R+S. I wanted to ask before I copied and pasted nay of your stuff, i started to but I see your a very generous person with your information. I just wanted ask first is all if not I will keep on opening and reading oyur CCNA Information .
Hello Brian,
Thank you, I believe in sharing knowledge and that is what I am doing. The content of the Free CCNA guide is pretty much complete and covers all the topics in the CCNA, so you should be all set. Of course, I reccomend reviewing the list of topics on Cisco website before going for the exam, just to see if they made some slightly changes. I cannot prevent anyone from copying and pasting anything from this ICTShore. The content is not for reproduction, but you may save it locally for personal use if you want. However, you will be supporting me better if you keep coming and reading. I hope this helps you 🙂
Comments are closed.