
All end-user devices use DHCP to get their addressing information. Whether you work in a big or small company, you need to know how to set up a DHCP Server. In this article, we explain to you how to do a complete DHCP configuration, involving a centralized server and a few DHCP relays. Then, we introduce the troubleshooting commands that will save you from panic.
This article sees you configuring devices, so it comes with a Packet Tracer Lab. Download it for free by using the link below.

Once you downloaded the configuration lab, just open it with Packet Tracer and continue reading. You will be able to try what you learn when you learn it.
DHCP Server Configuration Lab Intro
The Topology
For this lab, we are using topology with three sites. Take a look at the picture below, you will see two branches and one headquarter.
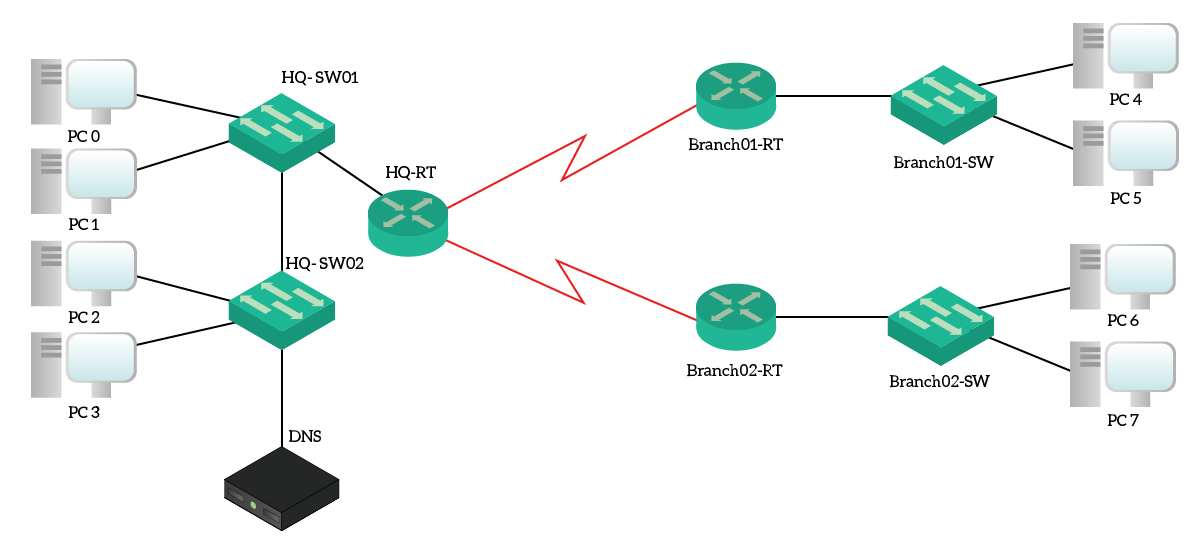
You can clearly see that traffic between branches passes through HQ. To handle this simple routing, we created a RIPv2 instance that advertises the networks of each site. Each site, including HQ, has a single network from the 10.0.0.0/8 major. In the headquarters, we have 10.0.1.0/24, whereas Branch “01” is 10.0.2.0/24 and Branch “02” is 10.0.3.0/24. If you look closely at the routing tables, you will see some links from the 192.168.1.0. These are the ones we use between sites (on the red serial links).
The Requirements
The overall requirement is the DHCP configuration in the entire infrastructure. Specifically, we need to implement a centralized DHCP Server on HQ-RT, that serves all the sites. Then, we need to configure the DHCP relay for the branches. In this deployment, we are going to use three different DHCP pools. You can consider this lab completed the moment all PCs get their correct IP address.
Configuring the DHCP Server
Centralized DHCP Server Configuration
The first thing we want to do is to configure the centralized DHCP Server on HQ-RT. Before we introduce the configuration commands, we should explain the logic behind them.
Cisco’s implementation of DHCP is simple and uses the concept of pools. According to Cisco, a DHCP pool is a logical container for all the DHCP settings to apply to a subnet. Therefore, in the pool, you can define the Default Gateway, DNS server, the domain name, and so on. Furthermore, in the pool configuration, you can specify the network that the pool will serve.
Now we have enough knowledge to start the configuration! After that, we will see some special cases and how the routers work with them.
Excluding Addresses
Most of the time, we don’t want all the IP addresses in a subnet to be leased. Instead, we want to reserve a few addresses to static devices, such as the default gateway. We need to do it before we create the pool, from the global configuration. Use the command ip dhcp excluded-address, indicating the start and end IP addresses. All the IP addresses within this range won’t be leased.
For this lab, we need to exclude the first 10 IP addresses of each subnet. So, we can use the commands below.
ip dhcp excluded-address 10.0.1.1 10.0.1.10
ip dhcp excluded-address 10.0.2.1 10.0.2.10
ip dhcp excluded-address 10.0.3.1 10.0.3.10
When creating a lease, the router will first check the excluded addresses list. This way, we are 100% sure that these addresses won’t be leased.
Creating the DHCP Pool for HQ
The Cisco DHCP Server relies on DHCP pools. We can start by creating the DHCP Pool for HQ. To create a pool, we simply use the ip dhcp pool global configuration command, followed by the name of the pool. You can use the name you want, but for scoring purposes, you should use the exact name “HQ”. If the pool doesn’t exist just yet, the router will create it. Instead, if the pool already exists you will configure the existing pool.
You will enter the Router(dhcp-config)# prompt. From there, we have several commands we need to enter.
network, followed by Subnet ID and Network mask – we associate the pool to a specific subnetdefault-router, followed by an IP – we specify what is the IP of the default gateway for that subnetdns-server, followed by an IP – we specify what is the DNS server (we can specify two)
With these three commands, we effectively enable DHCP for the HQ subnet. Your DHCP pool configuration should look like below.
ip dhcp pool HQ
 network 10.0.1.0 255.255.255.0
 default-router 10.0.1.1
 dns-server 10.0.1.5
Type exit to return to global configuration and commit changes. You will see your score grow as the PCs in HQ gets their IP address.
DHCP Pools for Branches
We are talking of a centralized DHCP server, so we need to configure pools for remote sites too. The configuration is identical to the HQ pool, we only need to change IP addresses and pool names.
Here’s what Branch01 configuration looks like.
ip dhcp pool Branch01
 network 10.0.2.0 255.255.255.0
 default-router 10.0.2.1
 dns-server 10.0.1.5
And here’s the configuration for Branch02:
ip dhcp pool Branch02
 network 10.0.3.0 255.255.255.0
 default-router 10.0.3.1
 dns-server 10.0.1.5
DHCP Server for Remote Sites
Understanding DHCP Request Process
If we configure multiple pools on the same DHCP server, how can he know which one to use for each request? We need to understand that before we can dive into the DHCP relay configuration.
If you recall the DHCP theory, you will remember that a DHCP request has several fields. Specifically, the router looks for the GIADDR field: the “Gateway Address”, or “Relay Address”. When this field is 0.0.0.0, the request comes directly from a client. Instead, when this field contains a valid IP address, the request passed through a DHCP Relay.
In case the request comes directly from a client, the router looks at the interface where the request was received. Then, it will use the IP address of that interface to search the DHCP Pool. For example, if the router receives a request on the interface with IP 10.0.1.1/24, it will search for the pool serving 10.0.1.0/24. Only if that pool exists, the router will craft a response. Otherwise, it won’t do anything with that packet.
When, instead, the request comes from a Relay, the router uses the Relay’s IP address. For example, if the Relay is 10.0.2.1, the router with the DHCP Server will search for the pool containing that IP address. If one exists, the router will send a response back to the Relay. Otherwise, it won’t do anything.
Configuring DHCP Relay
On Cisco devices, the DHCP Relay configuration is extremely simple. In fact, it requires only one command. The first thing you need to do is identifying the interface facing the clients on the remote router. In other words, enter the configuration for the interface in the same broadcast domain as clients. In this lab, it is GigabitEthernet 0/2 for both Branches. From there, enter the ip helper-address command, followed by the IP of the centralized DHCP Server.
You can apply the following code snipped to both Branch routers.
interface GigabitEthernet 0/2
 ip helper-address 10.0.1.1
After that, your score should grow up to 100%. In case it doesn’t, try a fast forward or force a new DHCP request on the clients. You can learn more about that in the client troubleshooting article.
Troubleshooting the DHCP Server
For the times when it doesn’t work, you need to have a few tools under your belt. Cisco offers us many show commands we can use to ensure our configuration is correct. Check out this section to understand how do they work.
Checking the pool
You can check the overall status of a pool by issuing show ip dhcp pool. Optionally, you can add the pool name after the command to see the output only for a specific pool. In the picture below, we are showing the full output after lab completion.
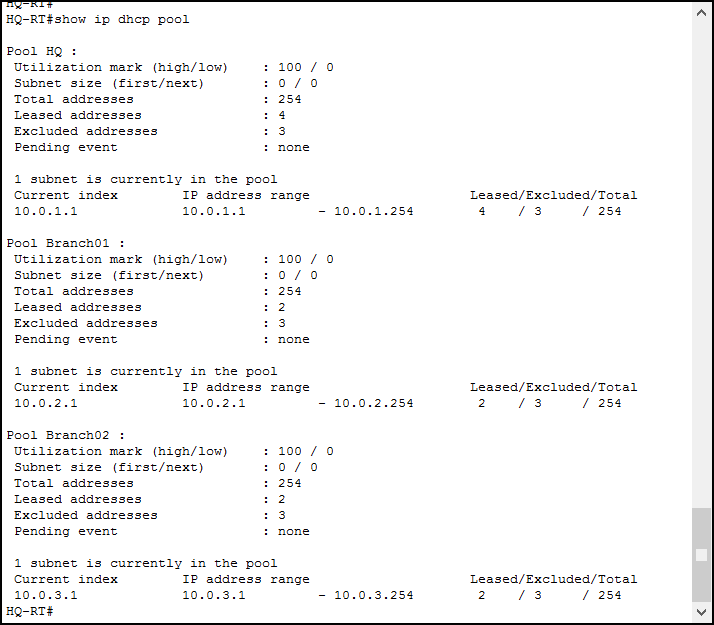
This command gives you a general overview of the current status of the DHCP Server. You can see a lot of useful information, like the start and end address of the range, how many addresses are excluded, and how many are leased. Furthermore, you can see the marks in percentage: if the number of leased addresses reaches the high mark, a Syslog message is generated.
Checking Bindings & Conflicts
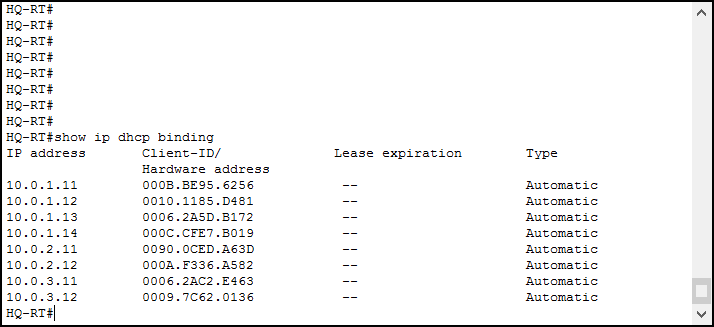
We define DHCP Binding the association between a MAC address and a leased IP address. Instead, a DHCP conflict is an address that apparently already exist in the network, but was not leased by our DHCP server (while it should be). In other words, another DHCP Server may be present, or that device might have a static address eating up our DHCP Server addressing range. All in all, a conflict.
You can have a list of all the bindings by issuing show ip dhcp binding, which results in the output below.
You can use show ip dhcp conflict to check conflicts. If the DHCP server finds a conflict, it won’t lease that IP address until the conflict is solved. Moreover, once you remove the conflicting device from the network, you will need to issue a clear ip dhcp conflict command to reset it from the server-side too. You can clear a specific conflict or all the conflict with a star (“*”).
Expert-level DHCP Server Commands
Cisco Packet Tracer is a simple tool for simple simulations. As a result, it doesn’t implement every single bit and command. While the commands we learned and tried today can help you in a lot of situations, there are a few more commands you might want to know. These extra commands allow you to tune the DHCP Pool configuration, and you have to use them inside the DHCP Pool configuration prompt.
leasecommand allows you to specify how long the DHCP lease is. I suggest you to never exceed one day, or even use a few hours when possible. This way, soon after a client disconnects its IP address will be available again.domain-nameallows you to specify the domain name for a machine (i.e. ictshore.com)utilization markallows you to tune the marks (as seen inshow ip dhcp pool)netbios-name-servercomes handy when working with Microsoft clients
Another great command is option, followed by the option number and then its value. Many clients require custom options, and you can define them from here. For example, Cisco IP Phones want to know the IP address of some TFTP servers in the option 150. So, if your TFTP server is 10.0.1.5, you can specify in the pool option 150 10.0.1.5, and add even more IP addresses after that if you need to.
This way, you have enough flexibility to support virtually any client. Cisco DHCP Server is an extremely simple yet powerful tool.
Conclusion
In this article, we learned how to set up and troubleshoot a Cisco DHCP Server, and two DHCP Relays. We covered several different commands you need to remember.
ip dhcp poolto configure a DHCP poolnetwork,default-routeranddns-serverto configure settings inside the poolshow ip dhcp pool, show ip dhcp binding and show ip dhcp conflict to troubleshoot the DHCP Server configuration
With these tools under your belt, you are now fully skilled in the LAN configuration. Now, we just need to get our IPv6 knowledge to the same level as our IPv4 knowledge. Then, before going to take your CCENT exam, you need to learn how to connect your LAN to the Internet. In our Free CCNA Course, we are going to cover both topics in the next articles. Stay tuned!

