
We create networks to serve users. However, often time users just complain that the network “doesn’t work”. They have no skill to give you extra information, so you need to identify the problem on your own. If it is just one user complaining, probably the whole network isn’t down. Instead, there might be something preventing that user to access the network. Because of that, you need to know the basics of client troubleshooting. In this article, we explain how to troubleshoot a client connection to the network, on both Windows and Linux.
This article comes in two sections. First of all, we try to troubleshoot clients in a lab environment using Packet Tracer. To benefit the most from that, you can use the link below to download the Cisco Packet Tracer lab for free.

Once you downloaded the lab, just open it and continue reading. When we finish it, we will see where to look on your PC to do the same things we did in the lab, in real-life.
Client Troubleshooting Lab Intro
The Topology
For this lab, we have a fairly simple topology. We have two separate network branches, connected by a Multilayer Switch. Here’s a drawing of the topology.
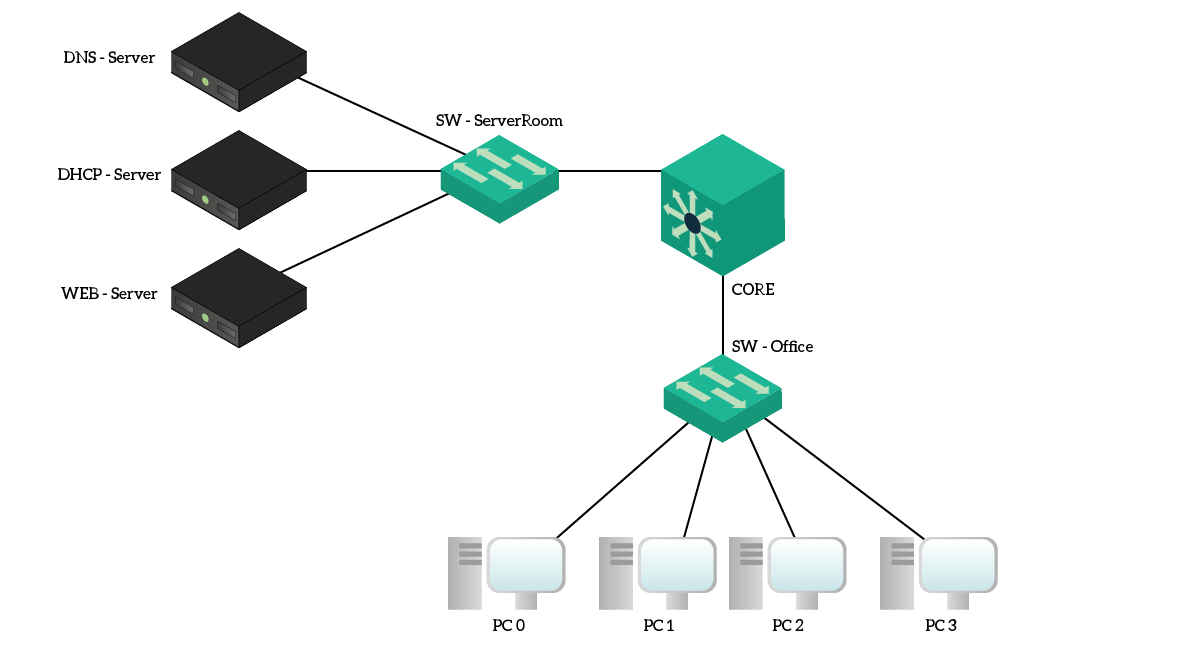
We named the multilayer switch as “Core”, as it is the one doing routing. It connects two subnets, one for the clients and one for the servers. VLAN 10 (10.0.10.0/24) is dedicated to clients and propagated only to SW-Office. Instead, VLAN 20 (10.0.20.0/24) is the one for servers and reaches the server room only. The Multilayer switch is acting as DHCP Relay, sending all the requests to DHCP-server.
The Requirements
For this lab, all clients must be up and running. Specifically, they must dynamically obtain settings via DHCP (IP, Mask, gateway and DNS Server). They must take an IP address from the 10.0.10.0/24 subnet. To help you in this, we logged three tickets.
- The ser of PC0 says nothing works
- The ser of PC1 says the network doesn’t work
- PC2 can’t access a corporate internal website
Before we start, you might find useful to review the basics of switch troubleshooting or the VLAN configuration tutorial.
Client Troubleshooting on Packet Tracer
Ticket #1 – PC0
If you open PC0’s desktop and try a ping from the prompt, you’ll see it doesn’t work. We can try to ping its default gateway 10.0.10.1 and see that it fails too. Before checking cabling or switch configuration, we can simply check the client configuration by typing ipconfig. You’ll that it is empty.

If you see 0.0.0.0 or no output at all, it means there is no IP address in the configuration. This means that the device is configured to have a static IP address, but that address hasn’t been configured. However, as a requirement, we know all clients must have a dynamic IP address. We can easily fix it from the desktop, by going to the “IP Configuration” tab. You will see that the PC is “static”. Simply change it to “DHCP” and wait for the IP address to appear.

Now you should see your score going to 25%. If so, you solved this ticket. Now that this user is happy, we can move to the next one.
Ticket #2 – PC1
The user on PC1 reported the same problem of PC0, complaining that nothing works. We go to his desk to check the configuration of the client. If we issue ipconfig on this PC, however, we will see a different problem. It has an APIPA address from the 169.254.0.0/16 range. This means that the client is requesting an address in DHCP, but it doesn’t get a reply.
We know that the DHCP server is working, we already obtained an IP on PC0. For the same reason, we also know that the DHCP relay configuration on the Core switch must be fine. The problem is somehow related to PC1. However, the client is already configured to be a DHCP client, so this has nothing to do with the configuration. Probably, we have an issue on the connection between PC1 and SW-Office.
To check out that, connect to SW-Office and use all your IP and ARP knowledge to find the port of PC1. It shouldn’t be hard to find out it is FastEthernet 0/2. If we check its configuration, we can clearly see that the port is in VLAN 1. Instead, it should be in VLAN 10. We can fix this with switchport access vlan 10 interface configuration command.
To verify this solution, we can go on PC1 prompt and force a new DHCP request by issuing ipconfig /release and then ipconfig /renew.

With the release option, we just cleared the APIPA address. With the renew option, we effectively generated a new request. Your score should now be at 50%. We can consider this issue fixed.
Ticket #3 – PC2 and Corporate Website
The user of PC2 complains she cannot access the Intranet. If you connect on her PC, and try from the web browser to go to http://intranet.local you won’t see any content. You already worked on the corporate website earlier this week, so you remember its IP address was 10.0.20.13. If you try to go to http://10.0.20.13, you’ll see that the page loads.
This is a name resolution issue. Probably, DNS settings on the client are misconfigured. We can verify that from the prompt, by issuing nslookup intranet.local. This command means “Tell me the IP address of intranet.local”, and you’ll see it timeouts.

If we check the “IP configuration” tab, we will see that the device has a static IP address. Furthermore, no DNS server is configured. If we switch it to DHCP, it will obtain this information too. Now, you should be able to access the corporate intranet website through its name. If so, your score should be 100% by now.
Real-Life Client Troubleshooting
Now that we had a little bit of practice in client troubleshooting, we can do it for real. Specifically, we will see how to do the same things we did in the Packet Tracer. However, in real-life we have Windows computers and Linux-based computers (including Apple). They slightly differ from one another, so we will need to explain the differences.
Microsoft Windows Client Troubleshooting
The Prompt
Microsoft has its own command prompt. Since Windows is the most popular operating system, Packet Tracer replicated its commands. Evert command we did today in the lab works on Windows too.
To launch the prompt, press the Windows key (near the space bar) and R at the same time (Win+R). You will open the “Run” box, that allows you to launch commands. In this box, type “cmd” and press “Enter”. You will now see the prompt. You can use ipconfig and nslookup commands like we already did.
However, be aware that a computer may have multiple NICs. For example, this is true if you have an Ethernet and Wireless connection. If so, the output of ipconfig will have several sections, one for each NIC. Instead, nslookup works exactly the same.
Changing the IP Configuration
To change the IP configuration of your client, you need to reach the NIC configuration page. The path to it might be different between different versions of Windows, but still similar. Looking around, you will be able to find it on your own. If not, just Google “how to change IP configuration on [your Windows version here]”.
We did a test on Windows 10. First, we opened the Control Panel. From there, using the search box at the bottom-right, we typed “Network and Sharing Center”.

From the Network and Sharing Center, you should see the active connections on your computers. Just click on the one you wish to edit.

A new box will popup, showing you an overview of this network. Now we need administrative rights to continue, as we are going to click on Properties.

From there, a more complex window will appear. In this pop-up, we see all the elements in use for this connection. We need to look for the Internet Protocol version 4 (TCP/IPv4) item. Ensure it is flagged, then double-click on it.

Here we go! From there, you can tune your IPv4 and DNS settings as you wish. To save, just click “OK”. Now you have changed the settings. You can do the same to revert them back.

You can specify DNS statically independently from the DHCP configuration. In fact, when you select DNS or IP address to be obtained automatically, you are telling your PC to use DHCP.
With this knowledge, you are now ready for client troubleshooting on Microsoft Windows.
Linux Client Troubleshooting
All the flavors out there…
Even if Microsoft is the most popular Operating System for the end-user, Linux is the most popular OS in the world. This is because it is natively embedded in many devices, such as Smart-home devices. Furthermore, Android and Operating Systems from Apple comes from Linux.
We have several core distributions of Linux, and there are a lot of differences between them. Many of them, even don’t have a graphical interface. Because of that, it’s not possible to make a comprehensive guide to change IP settings on all Linux distributions. However, we can still define a common ground.
The Terminal (Prompt)
On Linux, you still have a text-based user interface like the Microsoft prompt. We call this terminal, and it slightly differs from its Windows version. The nslookup command is still the same, but we don’t have any ipconfig.
Instead, Linux associates IP addresses to physical NICs, so you are not configuring the IP: you are configuring the NIC. As a result, the command to see IP settings is ifconfig, where “if” stands for “interface”. You can add the interface name just after that to see the settings for a single interface, like ifconfig eth0 for the first Ethernet interface on the PC.
To change IP settings, you can use a graphical interface if available. However, in many distributions, this will involve editing a text file containing all the settings.
The Bottom Line
In this article, we covered all you need to know about Client Troubleshooting. After practicing with Packet Tracer, we learned how to apply this knowledge in real life. What you absolutely need to take with you from this article is this:
- Use
ipconfigorifconfigcommands to check IP settings - Use
nslookupcommand to check Domain Resolution - If a device has no IP address, then the device is configured to have a static IP address, but that IP address is not configured
- If a device has an APIPA address (
169.254.X.X) its DHCP requests are failing
Now that you know client troubleshooting, you are ready to move to the next part. To complete our CCENT journey in LANs, we will see how to configure DHCP Servers on Cisco devices. Then, we will see how to connect your company to the Internet. With this knowledge, you will be able to take your CCENT certification or continue pursuing your CCNA.

