
Cisco devices all run some version of the Cisco Internetwork Operating System (Cisco IOS). This comes with a simple file management system, which allows you to organize files into folders, download, and upload them. Like on your PC, you can store files on a router. In this article, we are going to discover the internal storage of Cisco devices, and how to use it. We will then see how we can upload and download files from a remote server, using TFTP or FTP.
We can try part of what we will learn from this article with Packet Tracer. Therefore, this article comes with a free Cisco Packet Tracer lab that you can download by clicking on the link below.

Once you downloaded it, just open it with your Packet Tracer. You will be able to try what you learn the time you read it: practice will make boost your learning. Note that, since Cisco Packet Tracer has some limitations, we won’t be able to try everything we see in the article.
Cisco IOS File Management Lab Intro
The Topology
For this lab, the topology is clean and simple. Our focus is on a single router, with the interaction of a server. As a result, all we need is a router and a server, with a switch to connect them.

Our router is 192.168.1.1/24, while the server is 192.168.1.11/24. The switch is just blank, and has no IP address, all working in VLAN 1.
The Requirements
Due to the limitations of Packet Tracer, we have one simple requirement: downloading a specific file from the server. However, we will also see the syntax to check the files on the router, and how to use TFTP and FTP. In other words, our final goal is to be a master of File Management on Cisco IOS.
File Management in Cisco IOS
Flash and NVRAM
The majority of Cisco devices store files in two hardware components: the Flash and NVRAM. Flash and NVRAM are implemented with different technologies, as they have different functionalities. The NVRAM is a simple Non-volatile RAM with the main purpose of holding the startup configuration. The flash, on the other hand, is an SSD device of a few MB in size and holds different files. Among them, we have the image of the operating system, and the VLAN Database (only for switches). In the following table, a quick comparison between the two.
| Item | Flash | NVRAM |
|---|---|---|
| Purpose | Contains IOS image and VLAN database | Contains the startup configuration |
| Size | Up to 512MB or a few GB | A few KB or MB |
| Maintain files after reboot? | Yes | No |
| Removable | Only on some models | Never |
| Technology | Solid-State (SSD) | EEPROM |
Probably, you will never need to work with the NVRAM. Instead, you will have a lot to do with the Flash. The most common thing you will do with it is downloading a new IOS image to change the boot of the device. However, you can also use it to store some logs and then push them to a server.
Cisco IOS Images
A Cisco IOS image is a file containing the operating system, normally in .bin format. You can think about it like the DVD containing Windows 7, or Windows 10. Instead of being a physical disk, it is a virtual one represented in the form of a single file. When a router boots, it looks for that file in the flash. You can download a more recent version and remove the old file to upgrade your router. As simple as that.
Working with the File Management System
Referencing partitions of memory
Probably you are already familiar with Windows, and the good old disk C:/. In Cisco devices, portions of memory aren’t named with a letter, but with their explanatory name. You will have to reference flash with flash:/, and NVRAM with nvram:/. Then, you can use a file path like in the Windows file management system. For example, if you are looking for the file named conf.txt in the folder temp on the flash, you will use flash:/temp/conf.txt.
But this was the easy part because in Cisco you won’t be copying files from the flash to NVRAM or vice versa. You are going to interact with remote servers.
Virtual Partitions (TFTP, FTP, HTTP, SCP)
Each remote resource is identified with a virtual partition which correspond to the protocol we use to access the resource. All virtual partitions use a double slash, not just one. All resources you access with FTP, for example, are in the virtual ftp:// partition. However, unlike local partitions, here you need to reference two things: the path to the file and the IP address of the server. To do that, we add the IP address followed before the path. For example, if we try to access a file on 192.168.1.11, we can use ftp://192.168.1.11/folder/file.txt. Of course, we can always use a name instead of an IP address, if our router has DNS servers configured.
In Packet Tracer, we can only use TFTP and FTP. However, in real-live we can connect to TFTP, FTP, HTTP, and SCP (Secure Copy). These protocols may require you to authenticate. To do that, we need to specify the password and username in the path. To do that, we insert the username and the password, separated by a column, before the IP address. As a separation character between password and IP address, we use “@”. So, we can access the same file as before by authenticating with ftp://username:password@192.168.1.11/folder/file.txt.
Copying files
To copy a file, we use the copy command in privileged exec (Router#). This command expects to know the source file and the destination file name. Below, a quick example.
copy tftp://192.168.1.11/ios-image.bin flash:/ios-image.binNow, you don’t really need to specify everything at this time. You can only reference partitions, like with copy tftp: flash:. As you can see, if you don’t insert a file path right now, you don’t have to add any slash. With this syntax, the router will guide through a wizard, asking you to insert the remote server IP, the remote file name, and the destination file name. You will be prompted to override if the file already exists.
For this lab, we need to copy a file named asa842-k8.bin, which resides on the TFTP server 192.168.1.11. Here’s what we need to do.
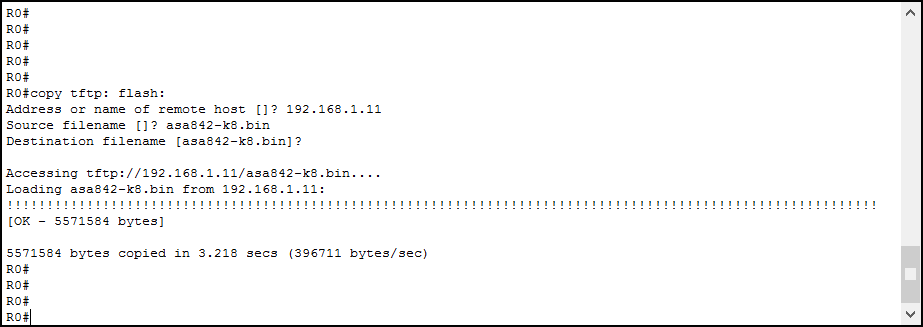
As you can see, you don’t need to write the destination file name. You can just hit enter, and it will use the same name as in the source. This can save you a lot of time, since IOS images have fairly complex names.
Check what’s in the File Management System
If you want to check what’s in each partition of memory, you can use show followed by the partition name. A very common way to use it is show flash:, which results in the following output on our current lab. Of course, you can’t do this command with virtual partitions like tftp: or ftp:.
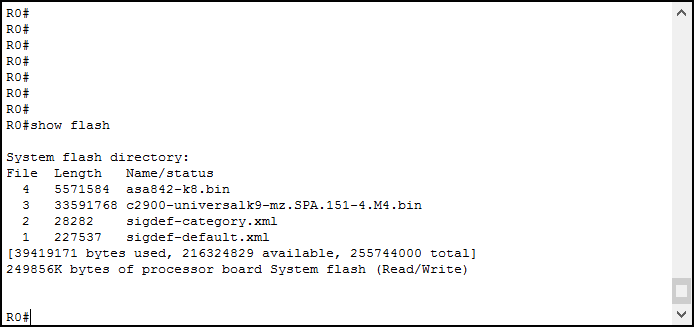
As you can see, this commands list all the files in the folder, and specify the size (Length, in byte) of each. At the end, it shows a recap of the total memory used and available.
Day-by-day File Management
When working on Cisco devices on a daily basis, you may want to move easier in the file system. To do it, you can create folders and delete files with the following two commands.
mkdircreates a new folder, it expects to know the path. If you don’t specify a partition, the flash will be used.deletepermanently deletes a file, it expects its full path
But useful commands don’t end here. On some Cisco low-band products, copying from an FTP server is not supported. TFTP is always supported, but it is incredibly slow if compared to FTP. So, copying files from distant locations, or using a poor bandwidth, will be a real pain using TFTP. But you can play a trick to overcome that. If you have, in the same LAN, a device supporting FTP download you can download items on that device.
Then, on Cisco devices, you can run a small TFTP server. Other devices will point to your central Cisco device and download it from there in TFTP. A common example is a remote site where the router supports FTP, but switches support TFTP only. To host a file in TFTP on a Cisco device, just run tftp-server command, followed by the full path. Below, an example.
tftp-server flash:/conf.txt
Now, you will be able to access conf.txt from a device by pointing at the IP of the router in TFTP.
Conclusion
In this article, we learned how to work with the File Management System on Cisco devices. We learned how to copy files, delete and create folders and what are the available partitions. Below, the commands you absolutely need to take with you.
- Cisco devices have two partitions (
nvram:andflash:) and several virtual partitions (tftp:,ftp:,http:,scp:) - You can use the
copycommand to copy a file between partitions - Use
mkdirto create a directory, anddeleteto remove a file - Use
tftp-serverto host a file on the router in TFTP
With the knowledge of this article, you have a new skill under your belt to use in your day-by-day networking. With that, you will be ready to upgrade Cisco devices. Keep following the Free CCNA Course, and you will learn advanced troubleshooting techniques before diving into a more complex overview of the switching technologies.
A special thanks to gigi, who pointed out that the last version of Packet Tracer supports also FTP.


2 Responses
Dear Alessandro,
In Packet Tracer, we can only use TFTP servers.
Errata corrige ! In Packet Tracer can use also FTP servers.
FTP Server set:
username:gigi
password:class
Router RO:
R0(config)#no ip domain lookup
R0(config)#ip ftp username gigi
R0(config)#ip ftp password class
R0#copy ftp: flash:
Address or name of remote host []? 192.168.1.11
Source filename []? asa842-k8.bin
Destination filename [asa842-k8.bin]?
Accessing ftp://192.168.1.11/asa842-k8.bin…
[OK – 5571584 bytes]
R0#show flash:
System flash directory:
File Length Name/status
4 5571584 asa842-k8.bin
3 33591768 c2900-universalk9-mz.SPA.151-4.M4.bin
2 28282 sigdef-category.xml
1 227537 sigdef-default.xml
[39419171 bytes used, 216324829 available, 255744000 total]
249856K bytes of processor board System flash (Read/Write)
R0#dir fla
Directory of flash0:/
4 -rw- 5571584 asa842-k8.bin
3 -rw- 33591768 c2900-universalk9-mz.SPA.151-4.M4.bin
2 -rw- 28282 sigdef-category.xml
1 -rw- 227537 sigdef-default.xml
That’s all .
A nice site and a very usefull lab !
Dear gigi,
Many thanks for pointing that out. I didn’t knew they added support for that! Not only have I modified that sentence, I also added a special thank to you for pointing that out. And very nice demonstration!
Thanks so much!
Comments are closed.