While working as a network engineer, you will need a clear understanding of different technologies. However, knowing the single technology is simply not enough. In your real-world job, you will integrate different technologies every day. This is where Skill Integration labs come to the picture. In this lab, we are going to use VTP, HSRP, DHCP, and NAT to create a real campus network.
This article specifically guides you through a lab. You can download such lab for free using the link below. If you want to try VTP, HSRP, DHCP, and NAT together, you are in the right place.

Once you downloaded the Packet Tracer lab, un-zip it and open it with Cisco Packet Tracer. Then, follow the requirements on this page. Once you finish, you can check your work against our solution (below in the article).
Skill Integration Challenge: VTP, HSRP, DHCP, NAT
This lab is a Skill Integration Challenge. You will need to read the requirements and try to implement the lab on your own. When you finish, you can scroll down and check the step-by-step solution we propose. Since this is a challenge, we assume you already know the involved technologies. If you don’t, refer to these articles.
- VTP – Understand and Configure VLAN
- Configuring and Troubleshooting Cisco HSRP
- DHCP Server on Cisco Router: Configure and Troubleshoot
- NAT Configuration and Troubleshooting on Cisco devices
Lab Topology
Here you can have a look at the topology for this lab. As you can see, we have several devices involved, and we will configure most of them.
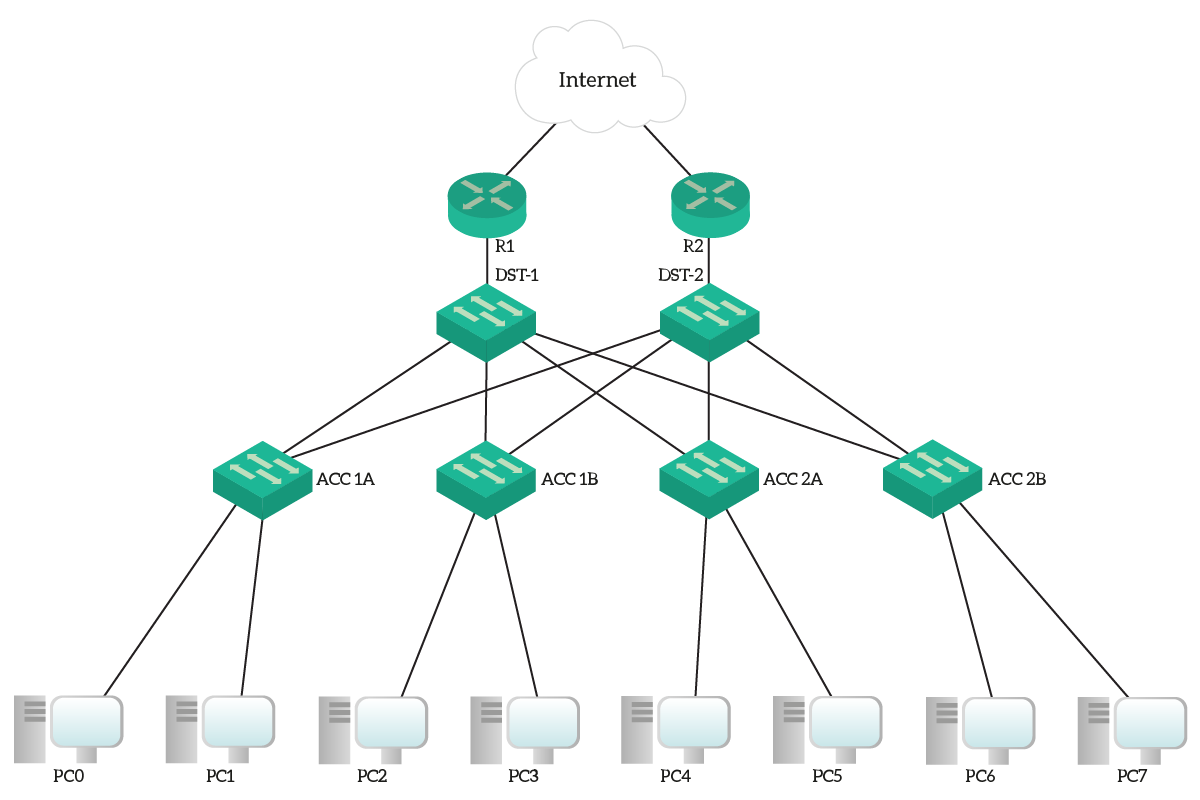
Our two routers, R1 and R2, are connecting our entire campus to the Internet. Instead, inside the campus, we have a two-tiers infrastructure with two Distribution Switches and four Access Switches. To make things easier, we already created redundant connections between the two layers.
The Requirements
For this lab, our final goal is to achieve redundant Internet access. Specifically, we want all our PCs to surf the Internet like they would at home. To implement that, and score the lab, we will need to implement these requirements:
- Propagate VLANs from the DST-1 switch to all other switches using VTP. Furthermore, the infrastructure has to accept VLAN configuration only on the DST-1 switch. To do that, we need to use the domain acme-office and the password ictshore.
- All links between switches (and with the routers) must use 802.1Q tagging.
- On access switches, ports FastEthernet 0/1 t0 0/22 are reserved for clients. They need to connect clients in VLAN 10, and Phones in VLAN 20. Furthermore, they must have trunk negotiation turned off, and they must immediately go to the STP forwarding state. In case the user connects a switch, the port must immediately turn off.
- STP should prefer DST-1 as a root, then DST-2. Use priorities of 4096 and 8192.
- The default gateway for all the VLANs must be a floating IP maintained from both router, that must do Router-on-a-Stick. To do that, the subinterface ID must reflect the VLAN ID.
| VLAN | Subnet | Floating IP | R1 IP | R2 IP |
|---|---|---|---|---|
| 10 | 10.0.10.0/24 | .1 | .2 | .3 |
| 20 | 10.0.20.0/24 | .1 | .2 | .3 |
| 30 | 10.0.30.0/24 | .1 | .2 | .3 |
| 40 | 10.0.40.0/24 | .1 | .2 | .3 |
Furthermore, you need to implement the following requirements:
- Use a Cisco-proprietary protocol for the floating IP
- Enable preemption; by default, R1 must be the active router with 10 priority points of advantage over R2, which must have the default priority
- Use always the default protocol group (0)
- Both routers must be able to lease IP addresses for the “data” and “voice” VLANs, as below:
- The addresses ranging from .1 to .10 must be excluded from the lease
- The pool for VLAN 10 must be
OFFICE_DATA - The pool for VLAN 20 must be
OFFICE_VOICE
- R1 should reach the Internet through
190.34.7.9, R2 should reach the Internet through73.123.11.128(use static routes) - All clients in VLAN 10 and 20 must access the Internet using NAT overload. To identify clients, use Access List #10.
Some tests
Once you finish the lab, all clients must get an IP address, and you must be able to ping 8.8.8.8 from any PC. This must be possible even if you simulate the failure of some devices (e.g. R1, DST-1, etc.).
So good luck, see you for the solution!
The Solution
In this part of the article, we will give you all the commands you need to score 100% at this lab. For simplicity, we will group them for requirement items.
#1 – VTP Configuration
The first thing we asked was the configuration of VTP. From the requirements, we know the domain and password to use. We also know that we want to configure VLAN only on DST-1, which means all other switches will be clients. So, we need to type this on DST-1 (in configuration mode).
vtp domain acme-office
vtp password ictshore
And this on all other switches, including DST-2 (always configuration mode).
vtp mode transparent
vtp mode client
vtp domain acme-office
vtp password ictshore
Setting the mode to transparent before setting it to client is a good practice. It resets the revision number of the VLAN Database. This way, we are sure that this switch will get VLANs from the other, and not push its own instead.
#2 – Trunks
All links connecting two network devices must be a trunk. As a result, we need to type these commands on DST-1 and DST-2.
interface range FastEthernet 0/21 - 24
 switchport mode trunk
interface GigabitEthernet 0/1
 switchport mode trunk
And these commands on all access switches.
interface range FastEthernet 0/23 - 24
 switchport mode trunk
#3 – Edge Ports
Edge ports connect clients, like PCs or phones. We need to set the access VLAN to 10 and the voice VLAN to 20. Furthermore, we want to enable all best practices regarding STP: portfast and BPDUGuard. On top of that, we need to turn off the negotiation.
To do that, use these commands on all access switches.
interface range FastEthernet 0/1 - 22
 switchport access vlan 10
 switchport mode access
 switchport nonegotiate
 switchport voice vlan 20
 spanning-tree portfast
spanning-tree bpduguard enable
#4 – STP Priority
Type spanning-tree vlan 1-4096 priority 4096 on DST-1 and spanning-tree vlan 1-4096 priority 8192 DST-2. This way, DST-1 will be the primary root, and DST-2 will take its place if DST-1 fails.
#5 – Router on a Stick and HSRP Configuration
For this lab, we need to implement HSRP on a Router-on-a-Stick configuration. To do that, we will need to configure the subinterfaces of R1 and R2. This will go on R1…
interface GigabitEthernet0/1
 no shutdown
!
interface GigabitEthernet0/1.10
 encapsulation dot1Q 10
 ip address 10.0.10.2 255.255.255.0
 standby 0 ip 10.0.10.1
 standby priority 110
 standby preempt
!
interface GigabitEthernet0/1.20
 encapsulation dot1Q 20
 ip address 10.0.20.2 255.255.255.0
 standby 0 ip 10.0.20.1
 standby priority 110
 standby preempt
!
interface GigabitEthernet0/1.30
 encapsulation dot1Q 30
 ip address 10.0.30.2 255.255.255.0
 standby 0 ip 10.0.30.1
 standby priority 110
 standby preempt
!
interface GigabitEthernet0/1.40
 encapsulation dot1Q 40
 ip address 10.0.40.2 255.255.255.0
 standby 0 ip 10.0.40.1
 standby priority 110
 standby preempt
And this will go on R2.
interface GigabitEthernet0/1
 no shutdown
!
interface GigabitEthernet0/1.10
 encapsulation dot1Q 10
 ip address 10.0.10.3 255.255.255.0
 standby 0 ip 10.0.10.1
 standby preempt
!
interface GigabitEthernet0/1.20
 encapsulation dot1Q 20
 ip address 10.0.20.3 255.255.255.0
 standby 0 ip 10.0.20.1
 standby preempt
!
interface GigabitEthernet0/1.30
 encapsulation dot1Q 30
 ip address 10.0.30.3 255.255.255.0
 standby 0 ip 10.0.30.1
 standby preempt
!
interface GigabitEthernet0/1.40
 encapsulation dot1Q 40
 ip address 10.0.40.3 255.255.255.0
 standby 0 ip 10.0.40.1
 standby preempt
#6 – DHCP Pools
To configure DHCP pools, we need first to exclude the IP addresses. Specifically, we want to exclude 10.0.10.1 to 10.0.10.10 and 10.0.20.1 to 10.0.20.10. Then, we need to create two pools named as specified, and tell the default router. The default gateway, of course, must be the floating IP of HSRP.
To do all of that, we need to type these commands on both R1 and R2.
ip dhcp excluded-address 10.0.10.1 10.0.10.10
ip dhcp excluded-address 10.0.20.1 10.0.20.10

ip dhcp pool OFFICE_DATA
 network 10.0.10.0 255.255.255.0
 default-router 10.0.10.1
ip dhcp pool OFFICE_VOICE
 network 10.0.20.0 255.255.255.0
 default-router 10.0.20.1
#7 – Static Routes
To enable Internet access, we need to add two static routes. Specifically:
- On R1, add
ip route 0.0.0.0 0.0.0.0 190.34.7.9 - On R2, add
ip route 0.0.0.0 0.0.0.0 73.123.11.128
These are default routes pointing to their respective next-hop.
#8 – NAT Overload
To implement NAT Overload, we need to define the clients that can access NAT Overload. To do that, we have to use the Access List 10. Then, we need to identify the inside interfaces and the outside interface, and finally configure the NAT Overload.
To implement that, use these commands on R1.
access-list 10 permit 10.0.10.0 0.0.0.255
access-list 10 permit 10.0.20.0 0.0.0.255

interface GigabitEthernet 0/1.10
 ip nat inside
interface GigabitEthernet 0/1.20
 ip nat inside
interface GigabitEthernet 0/0
 ip nat outside

ip nat inside source list 10 interface GigabitEthernet0/0 overload
And these commands on R2 instead.
access-list 10 permit 10.0.10.0 0.0.0.255
access-list 10 permit 10.0.20.0 0.0.0.255

interface GigabitEthernet 0/1.10
 ip nat inside
interface GigabitEthernet 0/1.20
 ip nat inside
interface GigabitEthernet 0/2
 ip nat outside

ip nat inside source list 10 interface GigabitEthernet0/2 overload
Some thoughts
Congratulations! Now your lab should be 100% in score. You now know how to set up a basic (but big) campus network. However, know the real campus network is even more complex. It’s unlikely that a company access the Internet directly through a Router: a firewall is used instead.
Furthermore, we haven’t considered some parts like exposing servers to the Internet or accessing internal resources. But don’t worry, this stuff will be in future labs.
How was this lab? Did you reach 100% the first time? How much did it take? Even if you didn’t, don’t worry. Skill Integration Challenges are often hard to get right the first time. With practice, you will master them and avoid a lot of errors in your real-world job.


4 Responses
Wow !! Perfect one !! Can you Please do some Firewall fundamentals on one week topic ?
Thank you so much Uthara! So glad you asked!
I’ve put in my schedule a drill-down article about Firewalls that explains the fundamentals of modern firewalls, like the concept of zone. To that, I will also add some design tips to help you position your firewall in the best place. We will see that in April probably, but in the meantime keep coming for other cool stuff we have for these two months, like Wireshark, Hacking and GNS3.
THANKS.I AM PERFECT ON THE ABOVE ONE.iF IT IS POSSIBLE FOR YOU, DO OTHER ROUTING PROTOCOLS LIKE OSPF,EIGRP,RIP,ACL AND OTHER.
Thank you mate! I have some OSPF and EIGRP-OSPF Redistribution articles coming, stay tuned!
Comments are closed.