In a network, you want to have a clear map to know the interconnections between devices. However, we don’t have a map all the time. Or, if we have it, it is not 100% up-to-date. Therefore, we need to find an alternative to know the interconnections between devices. Luckily, Cisco comes to help us with CDP – Cisco Discovery Protocol. With this simple yet powerful protocol, we can find finally discover the network topology as we are working on it.
This article comes with a Cisco Packet tracer lab, that you can download for free using the link below. To benefit the most from the contents of this article, download the lab now and then follow it as you are reading the article.

Once you downloaded it, continue reading with the lab already opened.
CDP and LLDP lab intro
The Topology
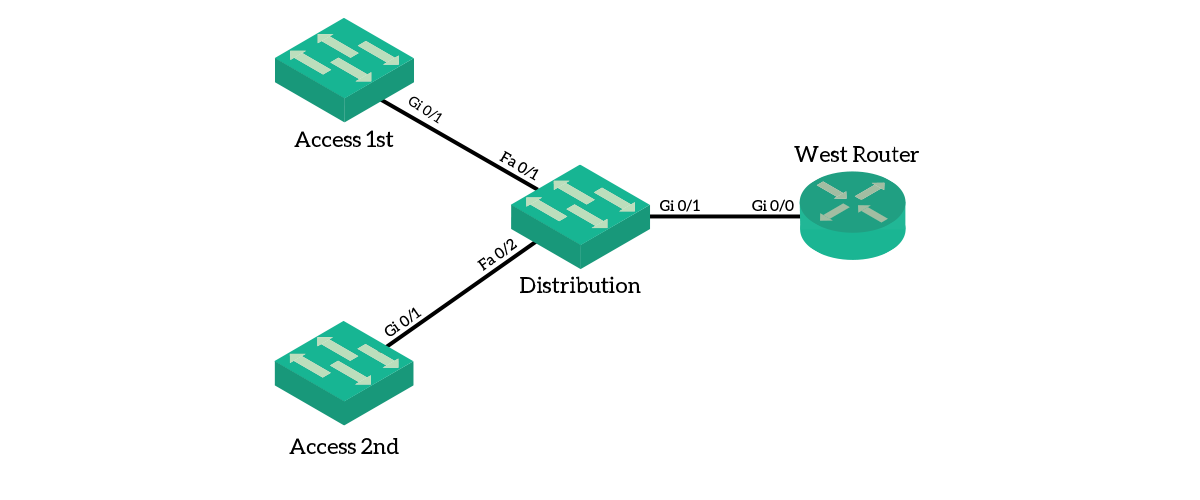
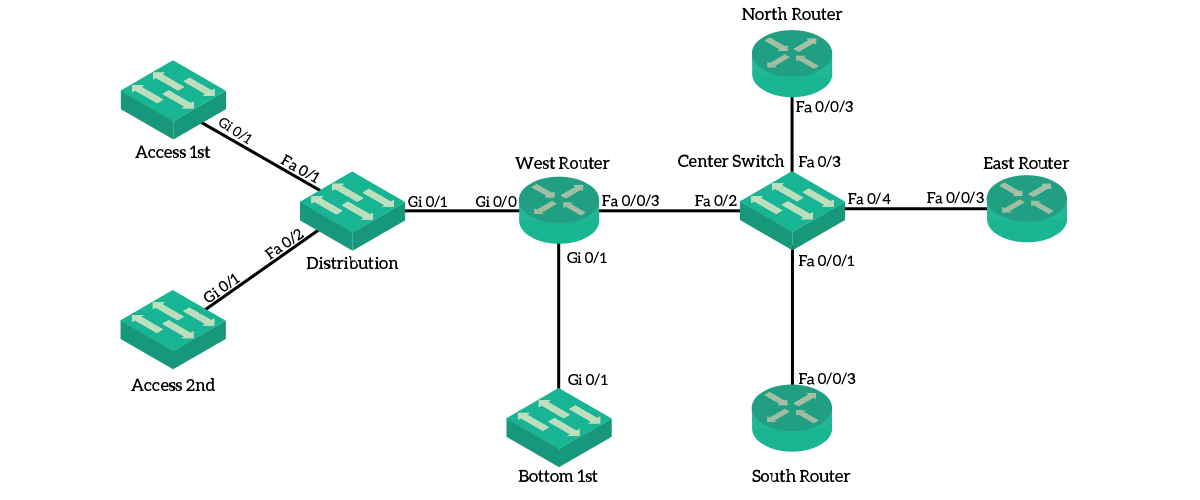
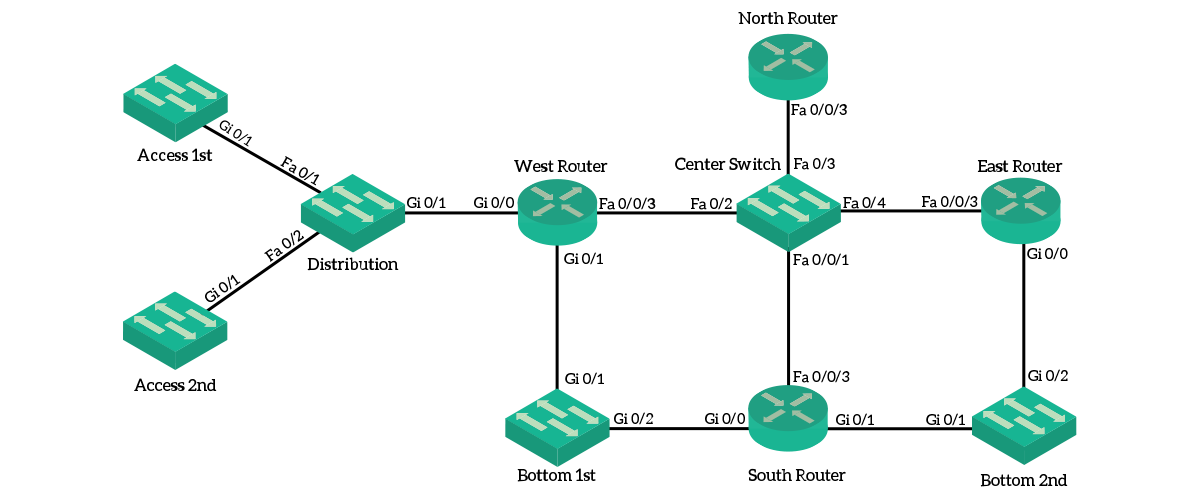
CDP and LLDP are two protocols allowing you to discover the topology of the network. Consequently, as part of this lab, you will have to discover some of the network topology, so we won’t be showing it here. Therefore, we have a hidden part of the topology in a cloud.
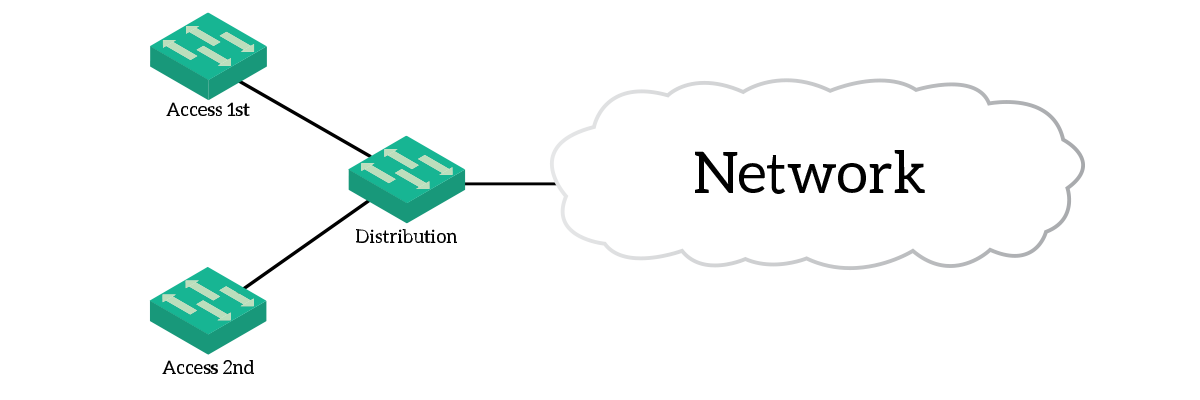
As you can see from the topology, we have three switches connected together, and one of them connected to the cloud. We will work on these switches to tune CDP and LLDP behavior, then we will use telnet to explore the cloud.
The Requirements
We have divided this lab into two parts. First, we are going to configure and tune both CDP (Cisco Discovery Protocol) and LLDP (Link-Layer Discovery Protocol) on the three switches we can see. This is all the configuration we have to do. Then we will have to use the protocols we configured, along with telnet, to discover other devices in the cloud and connect to them. Here we have the configuration requirements
- Access switches must have CDP disabled on access ports (
Fa0/1 - 24) - Distribution switch must be run both CDP and LLDP
For the discovery part of this lab, I suggest you write down a table. Use the following columns: hostname, IP address(es), and Device Type (Switch or Router). You are going to populate it as we advance with the discovery. Moreover, you will also have to draw the topology of the network as we discover it. This means that you are going to draw switches and routers, and links interconnecting them. Therefore, get ready with a piece of paper.
| Type | Password |
|---|---|
| VTY Password | ictshore |
| Enable Password | ictshore |
Before we dive into configuration and exploration, we should talk a little about how these protocols work. That’s what the next section is about.
Some theory about CDP and LLDP
What are CDP and LLDP?
Both CDP and LLDP are neighbor discovery protocols that can operate in an IEEE 802 environment (Ethernet). Both protocols do the same thing almost identically, with the major difference being the vendor. CDP is a Cisco proprietary protocol, while LLDP is an open-standard protocol. In fact, CDP stands for Cisco Discovery Protocol while LLDP stands for Link-Layer Discovery protocol. Again, both work exactly the same.
Neighbor discovery protocols work with a simple yet powerful concept. A device advertises information about itself and listens for information coming from others. These protocols are completely stateless, hence we don’t have any session establishment nor retransmission of lost packets. Instead, each device sends out always the same pieces of information periodically. In case you have missed them, we will have to wait for the next one. A device informs the others about its hostname, management IP address (in CDP), capabilities (is it a router, a switch, or what else?) and its software version.
Interestingly, neighbor discovery messages are not forwarded – not at Layer 2 nor at Layer 3. This means that a switch receiving a CDP message won’t send it to anybody else, but will keep it for itself. This is due to the purpose of these protocols: find out directly connected neighbors. Therefore, any neighbor discovered with CDP or LLDP is directly connected to our device, no intermediary device in the middle. Note that this excludes passive devices, such as hubs or patch panels. Devices will store the messages they receive in their CDP/LLDP table.
Besides being used by network administrators to discover the topology, CDP and LLDP have another purpose. IP Phones leverage these two protocols to find out the VLAN reserved for VoIP and other information.
CDP and LLDP on Cisco devices
Almost any Cisco device in the world will support CDP natively. In those devices, CDP is already enabled globally and will send and listen for messages on all device’s interfaces. The majority of Cisco devices will also support LLDP, as this allows them to interoperate with other vendors. However, in those devices, LLDP is off by default. LLDP is an extremely powerful tool, compared to CDP, as you can specify what pieces of information you want to send to other devices. This is outside the scope of this article, and not even supported in Packet Tracer. Nonetheless, we can (and will) individually turn on the transmission and reception of messages on interfaces. This is not possible with CDP, where transmission and reception are treated as the same item.
The following table shows the commands we are going to use in this configuration.
| Command | Description |
|---|---|
Device(config)#cdp run | Turn on CDP globally (on by default) |
Device(config)#lldp run | Turn on LLDP globally (off by default) |
Device(config-if)#cdp enable | Turn on CDP on a single interface (if you have disabled it globally) |
Device(config-if)#lldp transmit | Turn on the sending of LLDP messages on a single interface |
Device(config-if)#lldp receive | Turn on reception of LLDP messages on a single interface |
Step-by-Step CDP/LLDP lab
Configuration of CDP and LLDP
We have to configuration requirements for this lab. The first thing we have to do is disable CDP on all access ports of access switches. Thus, we need to connect to an access switch (in this case Access1st). To accomplish this task, we need to enter no cdp enable for all the FastEthernet interfaces we have. Below, the commands we need to type.
Access1st(config)#
Access1st(config)#interface range FastEthernet 0/1 - 24
Access1st(config-if-range)#no cdp enable
Access1st(config-if-range)#exit
Access1st(config)#
Once you do the same for both access switches we will be ready to turn on LLDP on the Distribution switch. This is extremely simple: just connect to it and type lldp run in the configuration prompt. After that, you will see the score of your lab reaching 100%. This is because we don’t need to configure anything else. Instead, from now we will focus on the discovery of devices.
Cisco Discovery Protocol in a known topology
Just to babysit our first steps, we will start to use CDP in the part of the topology we can see on Packet Tracer. Even if we disabled CDP on access ports for access switches, we kept it enabled on uplinks. Therefore, we expect to see CDP messages between Distribution switch and access switches. To see if they are working, we need to check the CDP table of our distribution switch. We do that by typing show cdp neighbors.
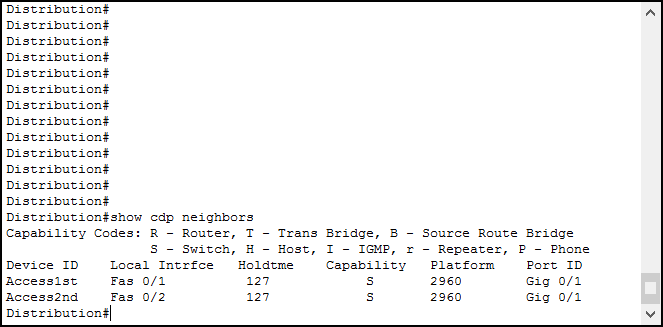
The output of this command is extremely simple, but let’s break it down anyway.
- Device ID – this field represents the hostname of the neighbor
- Local Interface – the interface on the current device (in this case Distribution switch) we received the advertisement on
- Holdtime – How many seconds before removing this neighbor from the table, this is re-set to 180 each time we receive an advertisement from this neighbor
- Capability – Capabilities of the remote device, refer to the legend presented in the command
- Platform – Device model of the remote device (in this example we have two Catalyst 2960)
- Port ID – The interface on the remote device the advertisement/message originated
Based on that, we know that FastEthernet 0/1 of Distribution connects to GigabitEthernet 0/1 on Access1st. We can add this to our drawing of the topology.
LLDP Discovery
If you check out the previous output, you are going to find that something is missing. In fact, the Distribution switch correctly sees the two Access switches, but it doesn’t see anything else. However, we clearly see a cable going into the cloud: a neighbor is missing. This is because that neighbor does not run CDP with us, so we need to check the LLDP neighbor table. The command for that is show lldp neighbors.
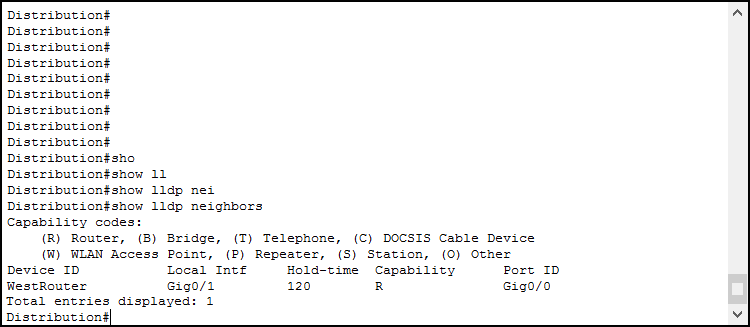
Note: if you see multiple entries for the same device, this is probably due to a Packet Tracer bug.
The output of this command is exactly the same as the one for CDP, we won’t go any further on that. Instead, we can add WestRouter to our topology drawing, connected on GigabitEthernet 0/1 of our Distribution switch.
Adding some details
At this point, we should arise a question: how can we connect to that WestRouter to see if it has neighbors too? We need to know its IP address. Unlike CDP, LLDP on packet tracer does not give us an easy way. Instead, we need to do our trick we learned in the Switch Troubleshooting article: retrieve the IP address from the MAC. The first thing we need to do is to retrieve the MAC address, we can do it with show lldp neighbors details.

As you can see from the picture, the MAC address is identified as Chassis ID. Now, all we need to do is the lookup of that MAC address in the ARP table of our switch. We already know from the previous article how to get the IP address from the MAC address using the show ip arp command. Therefore, we have just found out that WestRouter has an IP address of 10.0.1.1.
The topology from WestRouter
Now it’s time to discover the cloud! From the Distribution switch, telnet to WestRouter issuing telnet 10.0.1.1 and log in with ictshore password. From now on, we are going to use CDP only. Issue show cdp neighbors to see all the neighbors we have.
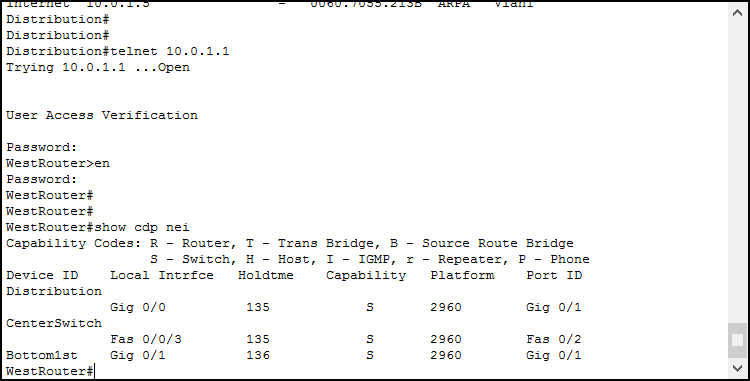
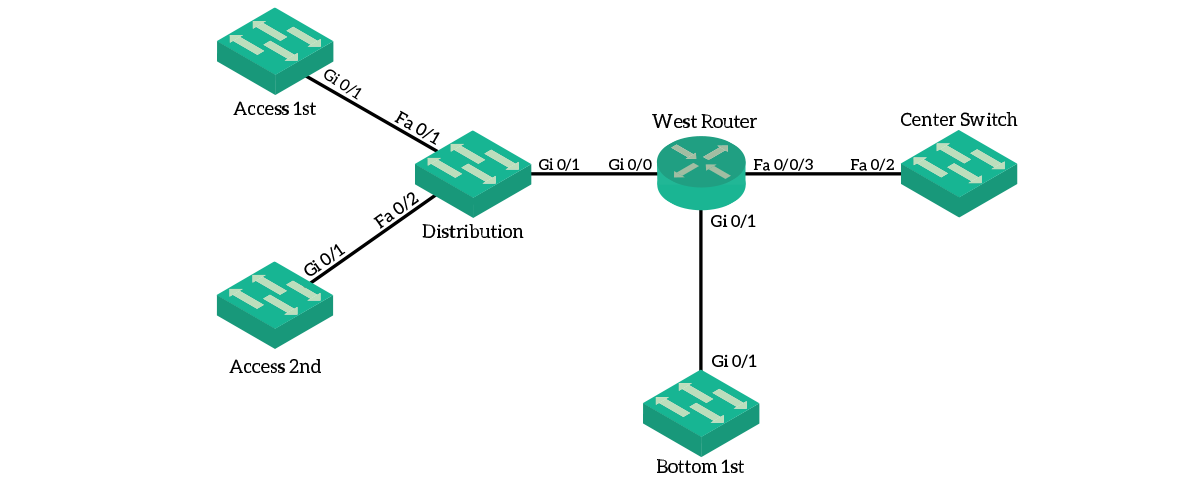
If we continue to draw the network, we should create something like that.
Now, CDP has an amazing extension allowing us to directly see the IP addresses of connected devices. As a result, we don’t need to do any lookup in the ARP and MAC address tables. Instead, we just use CDP as a comprehensive tool to discover the topology. We can see all the details we are looking for by issuing show cdp neighbors detail.
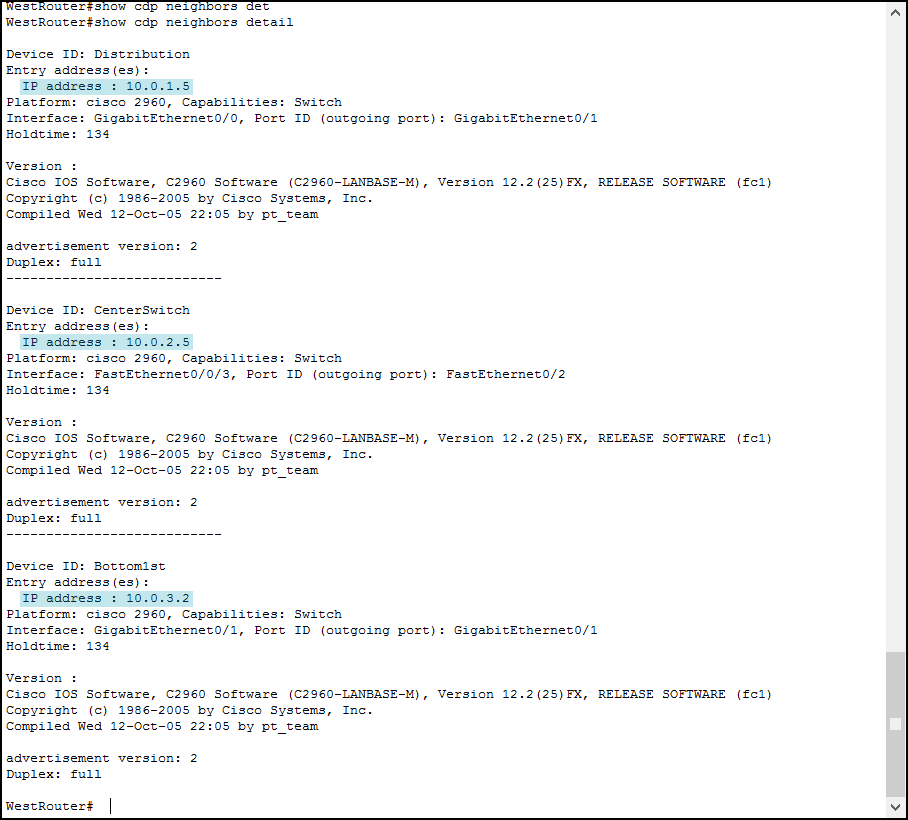
At this point, we have the IP addresses we need to connect to. The process is going to be the same: connect, check neighbors, report on the drawing, gather IP addresses, connect to the neighbor, and repeat.
The topology from CenterSwitch
If you telnet into CenterSwitch, you are going to see these neighbors.

As you can see neighbor discovery is very simple, moreover you should be confident about that by now. Thus, let’s continue our drawing (see below).
The Topology from Bottom1st
Before we connect to any other router we discovered from CenterSwitch, we need to remember about Bottom1st. We discovered this switch from WestRouter, and we should check that in order to maintain a mathematical approach. Hence, telnet into that and check the neighbors: the expected output is the one below.
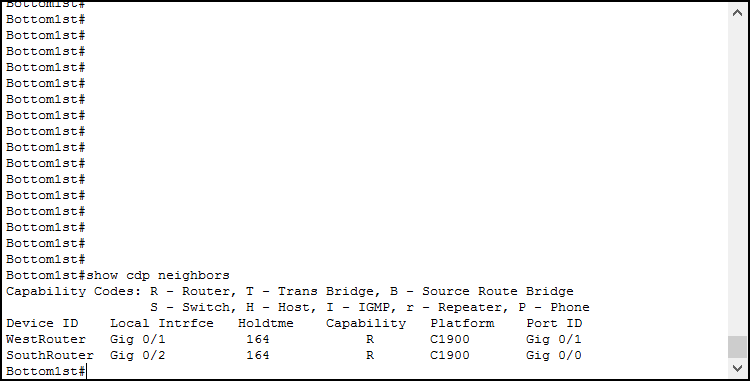
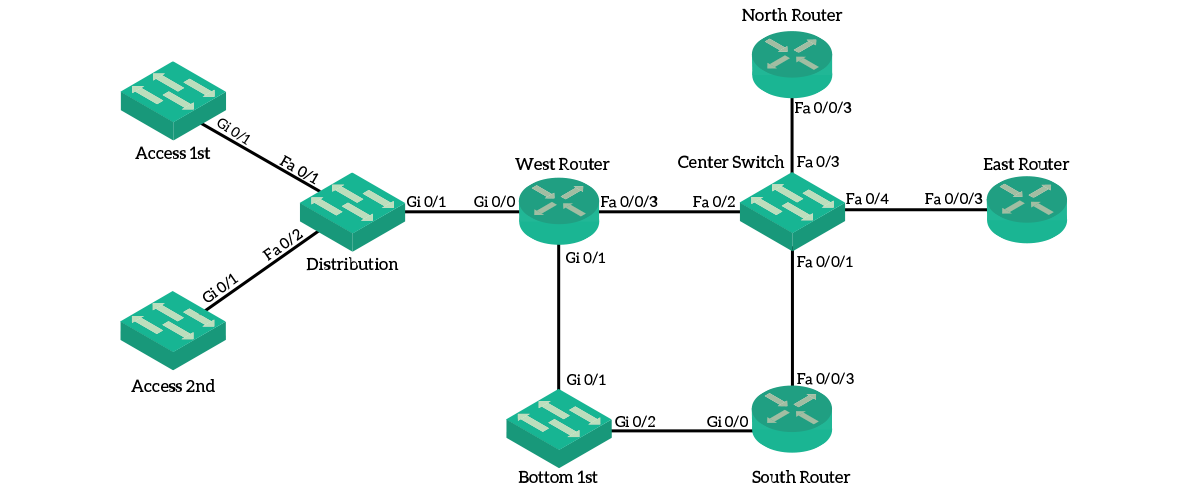
Since we already know about both WestRouter and SouthRouter, so we don’t need to add any device in the drawing. However, we didn’t know about the link between Bottom1st and SouthRouter, so we should add it.
The Topology from NorthRouter, EastRouter and SouthRouter
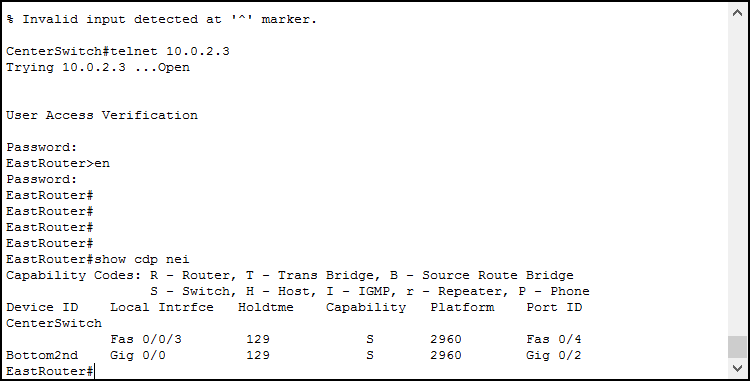
If you telnet into NorthRouter, you will see a single neighbor: CenterSwitch. We already know about it, so we should continue looking at other devices. Once you telnet into the next device – which is EastRouter, you will see the following two neighbors.
If you issue the same command on SouthRouter, you will find Bottom2nd again. Verify that, then map this new switch into the drawing just like below.
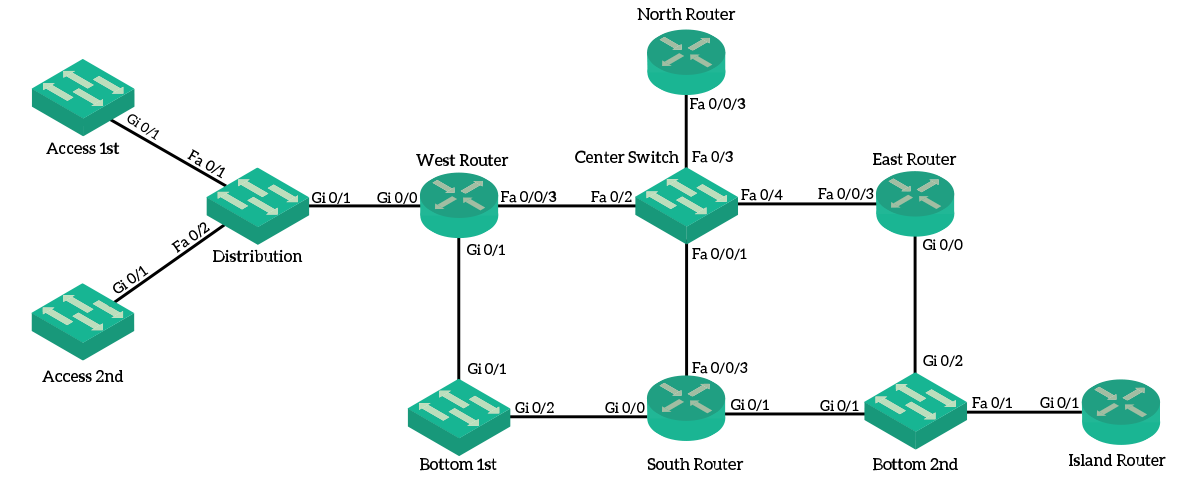
Topology from Bottom2nd
If you telnet into Bottom2nd, you will find three neighbors: EastRouter, SouthRouter, and IslandRouter. By connecting to IslandRouter and checking its neighbors, you can verify it is connected to Bottom2nd only. Therefore, we completed the topology. It looks just like below.
In case the topology is not enough, or in case you want to telnet into a specific device and check its neighbors again, we have developed the following table with the list of devices we found and related IP addresses.
| Device | IP |
|---|---|
| Access1st | 10.0.1.10 |
| Access2nd | 10.0.1.11 |
| Distribution | 10.0.1.5 |
| WestRouter | 10.0.1.1, 10.0.2.1, 10.0.3.1 |
| Bottom1st | 10.0.3.2 |
| SouthRouter | 10.0.2.4, 10.0.3.3, 10.0.4.1 |
| CenterSwitch | 10.0.2.5 |
| NorthRouter | 10.0.2.2 |
| EastRouter | 10.0.2.3, 10.0.4.2 |
| Bottom2nd | 10.0.4.3 |
| IslandRouter | 10.0.4.4 |
Conclusion
In this lab, we discovered all the secrets of two key protocols: CDP and LLDP. Besides the theory, we learned the configuration commands and the way to enable or disable them. However, the most important thing we learned and practiced with this article is the neighbor discovery process. As a result, you now know how to discover how the network is made starting from scratch. Just to recap, these are the steps you need to follow.
- Connect to a device
- Check its neighbors (both in CDP and LLDP)
- Report neighbors on a drawing and write down their IP addresses
- Connect to each neighbor and repeat the process
In case you are reviewing this article before taking your CCNA, here are the commands we used.
cdp runandlldp runto turn on CDP/LLDP globally (or off with the “no” keyword before the command)cdp enableto turn on CDP per-interface (or off with the “no” keyword before the command)lldp transmitandlldp receiveto turn on LLDP transmission or reception on a per-interface basis (or off with the “no” keywords before the command)show cdp neighborsandshow lldp neighborsto quickly check the list of neighborsshow cdp neighborsdetails to find out the IP address of each neighbor
Pursuing the CCNA with our Free CCNA course is a lot like building a house. With every article, you add a few bricks to your walls, and with this article, you added some very important bricks. Now that you are more comfortable with the network topology, you are ready to continue with physical layer troubleshooting.


9 Responses
Thanks Alessandro for this tutorial. i have a question.how could i discover a large network when lldp are not enable on it? CDP are excellent but it is limit. for my case, i have a large network with more than 12000 devices from many vendors.
Thanks so much Billy! Discovering large networks can be hard, but with patience you can achieve great results. CDP and LLDP are protocols that allow the discovery of devices on the same broadcast domain. It means they must be part of different LANs.
For your case, I don’t think everything is in the same LAN. The best option is to start doing some traceroutes, find the devices in the middle and connect to them. Try to understand which device is doing what, and how it is connected to the others. For that, you will need to check its IP and subnet mask. From that, you can see what is the subnet, and use the ARP table to find connected devices.
I hope this helps you!
thanks Alessandro. i will try to do as you say.
Good article
Thanks!
Very usefull and great work !
Thank you so much! I am happy to have helped 🙂
This article cleared up so many questions I had about CDP, you really do great work and it is greatly appreciated!!
Thank you for taking the time to let me know! Appreciated!
Comments are closed.