
As a strong supporter of ICT greatness, you want to work from your desk all the time. Limiting the on-site intervention you will save a lot of time, that you can use for most important things. However, what if you have to deal with physical issues? Sometimes, the cable is simply not plugged in, or it is somehow broken and losing packets. For these times, you need to be confident in troubleshooting interface errors. Cisco offers us a great set of tools to identify and even fix some of those problems. In this article, we will cover these tools, making you a ninja in physical layer issues, because troubleshooting interface errors is a skill you want to have.
You can benefit the most from this article by downloading now the associated lab. Use the link below, open the lab with Cisco Packet Tracer, and continue reading the article while trying the lab.

Once you are ready with your Packet Tracer, just read on.
Troubleshooting Interface Errors lab intro
The Topology
The topology for this lab is quite simple. The following picture shows the list of devices we are going to use, as well as the connections between them.
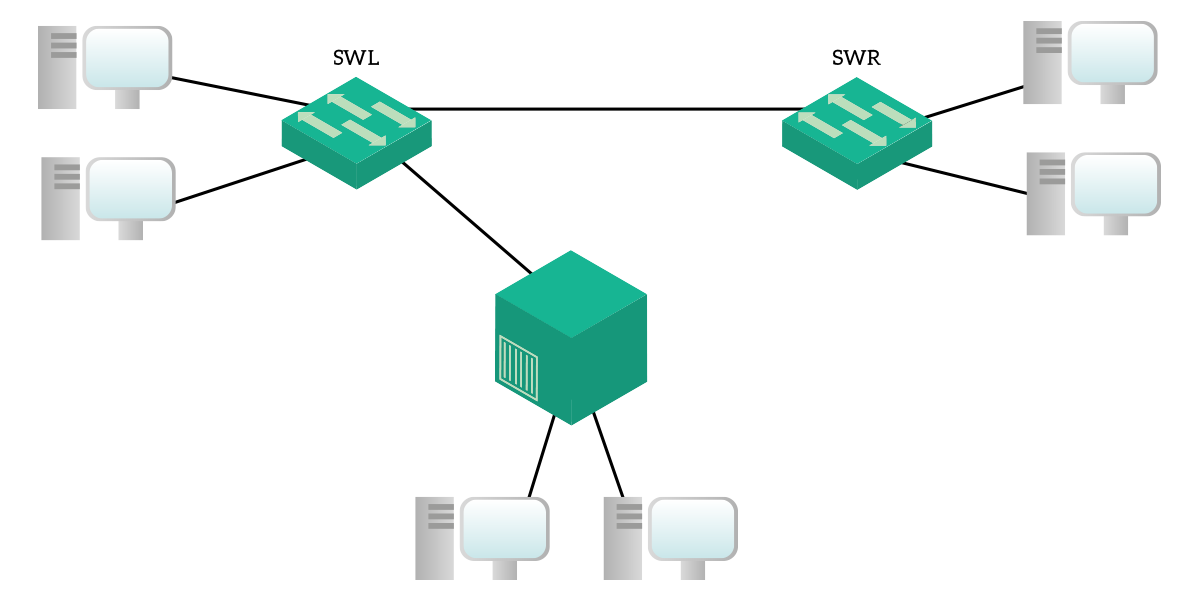
In this lab, we are going to work with two switches, Left and Right (SWL, SWR), and a hub. Unlike switches, you cannot configure a hub, as they are passive devices working at the physical layer only. Neither left switch nor right switch has an IP address, and they both works at layer 2 only. We won’t change that, as we are going to focus on interface errors only. To complete this lab, we have six computers perfectly configured to use for tests, such as ping.
The Requirements
As this is a troubleshooting lab, we don’t have any configuration requirements. Instead, we know some issues of the infrastructure and we need to address them. Specifically, this is what we know:
PC0cannot talk withPC1andPC2, but it should- The link between
SWLandHubis not working PC3experiences poor bandwidth when talking with any other device- We do not allow inter-VLAN traffic by design
Since all of these are small issues, we will use a single ticket in our ticket-based troubleshooting approach. It is time to start!
Interface Troubleshooting step-by-step
The link between SWL and Hub is down
Sometimes, you need to prioritize your work. Even if this is not the first problem in our list, we should work on this before the others. The reason for that is simple: this problem is impacting more users. Therefore, we can define this problem as more severe than others, even if we are talking about two users over a single one. In real-life, always prioritize the most impacting problem.
Given that, we cannot check anything on the hub, so we should check what’s wrong on the Left switch. Connect, jump into enable and then check the status of all interfaces with show ip interface brief. We are looking for the FastEthernet 0/24, the interface connecting the hub.
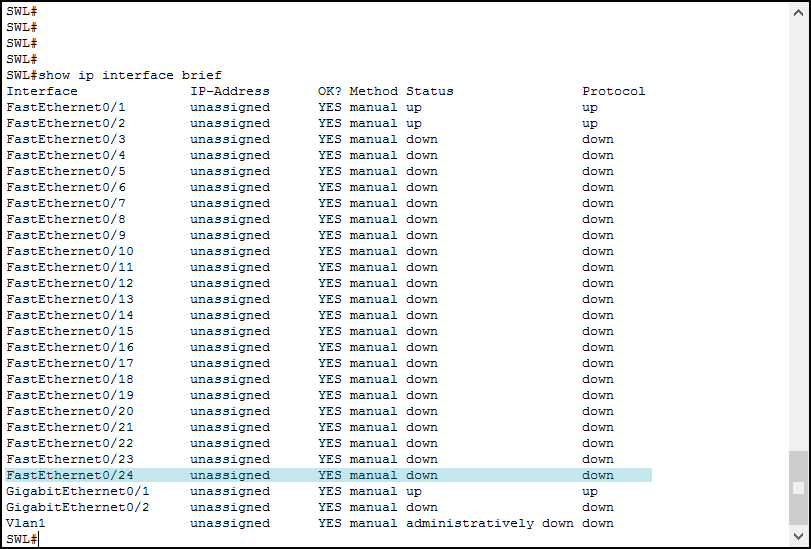
Look at the last two columns, they are both indicating “down”. Before we can draw a conclusion, we should explain the output of this powerful command. Here we have its columns.
- Interface – The name of the interface
- IP-Address – The IP address assigned to that interface, if any
- OK? – Whether that interface is hardware OK on the switch (do not consider the cable/link, only the port)
- Method – Indicates how the interface obtained an IP address, it can be manual (statically configured from the administrator) or DHCP
- Status – Indicates the physical layer status of the interface
- Protocol – Indicates the data link layer status of the interface
Analyzing the output
As you can imagine, we need to focus on three fields: OK?, Status and Protocol. When troubleshooting interface errors, it is unlikely to have a problem in the “OK?” field, as this means something very bad happened on the switch. Given that the switch is OK, we need to check the Status and the Protocol. There are three possible states for the Status field.
administratively down– The interface is configured to be shut down with the shutdowncommanddown– The interface is down, it does not receive any electric signalup– The interface is receiving a signal (technically it closes the Tx/Rx loop)
Only if the physical layer is up the protocol can be up, in any other case it will be down. In case the physical layer is up but the protocol is down, you are having a problem with the negotiation of protocol’s parameters. This is common on protocols for serial links such as PPP or HDLC. Since this is not our case, we need to investigate further.
The command for Troubleshooting Interface Errors
We just reached a point where we know there is something wrong in the physical layer. Therefore, we need to gather all the details about it. We can do it easily with show interfaces, a powerful command giving you an overview of the interface status. Because the output for this command is quite long, we might want to trim it out. Cisco helps us in that, allowing us to select for which interface we want to see the output. To do this, we simply add the interface name and ID after the command.
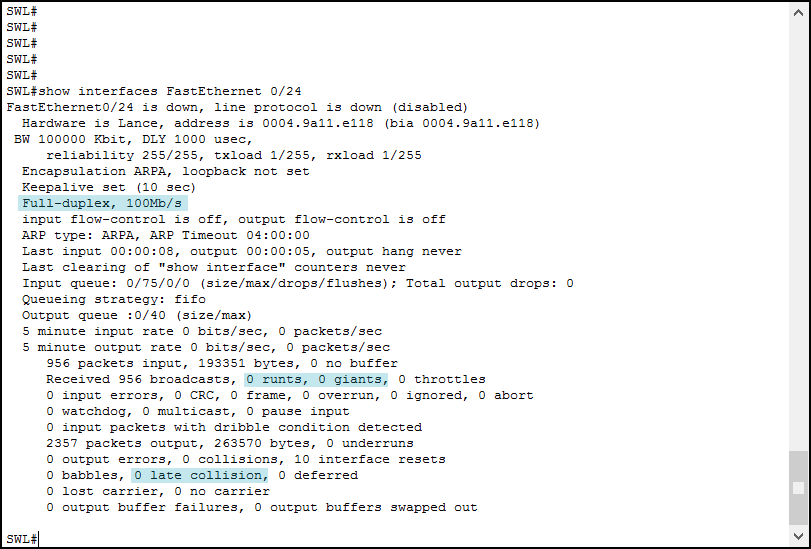
This output is huge, and we haven’t covered just yet all the knowledge needed to fully understand it. However, we can understand the three most important parts, the ones you are looking for.
- Duplex – either
Full-duplexorHalf-duplex. Full-duplex means that the interface will send and receive simultaneously. Instead, half-duplex means that the interface will behave considering the media as shared at layer 1. As a result, a half-duplex interface will send only if the channel is clear and stops in case any other interrupts it, considering it a collision. - Bandwidth – The configured or negotiated bandwidth of the link.
- Runts and Giants – These are frames too small or too big that our switch discarded.
- Late collision – These happens on half-duplex connections, where a collision happens when the transmission already started.
In this case, the interface is facing toward a hub, therefore it must be half-duplex. Since Cisco has a good duplex auto-detection mechanism, someone probably set the interface to be hardcoded in full-duplex. This is causing the interface to be down, and we will fix that in a minute. Before we do it, check out the following table.
A quick guide to interface errors
Remember this table, as this will save you a lot of time.
| Condition | Cause | Solution |
|---|---|---|
| Interface down | Interface is full-duplex | Set the interface to be half-duplex or auto |
| High number of collisions | There is a bandwidth mismatch between this device and the other device, or bandwidth negotiation is not working | Set the interface to the correct bandwidth or restore it to auto |
| High number of runts and giants, and/or high number of late collisions | Interface is half-duplex | Set the interface to be full-duplex or auto |
Fixing the issue (duplex)
To fix this issue, we simply need to change the duplex settings. We can do that by entering the interface configuration prompt, and using the duplex command. We have three possible way of using it:
duplex halfhardcodes the interface as half-duplexduplex fullhardcodes the interface as full-duplexno duplexturns on the duplex negotiation mechanism, and this is the default
For this lab, we are going to turn on the negotiation, so we will go for the last. Done. Now we can focus on other problems.
PC2 is isolated
We know that PC2 is isolated, but PC3 is working (slowly, but working). Therefore, since we know they are on different VLANs, we can assume we have problems on the trunk. Let’s issue show interfaces trunk on the Left switch we are already connected to.
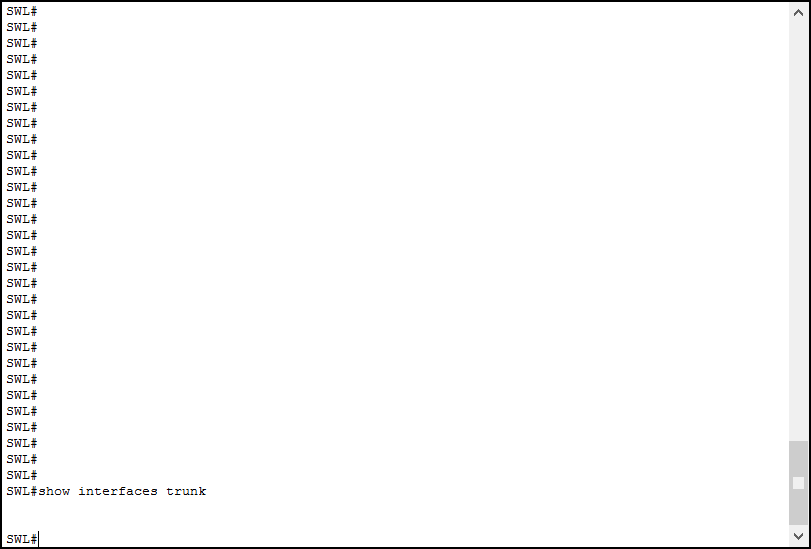
This is the problem since there is no trunk only the default VLAN will pass. We need to configure GigabitEthernet 0/1 as a trunk, and we can do it with the following commands.
SWL(config)#
SWL(config)#interface GigabitEthernet 0/1
SWL(config)#switchport mode trunk
SWL(config)#switchport nonegotiate
SWL(config)#exit
SWL(config)#
This will solve our issue so that now we can focus on the last and weird problem, the one affecting Pc3. To solve that, we will be troubleshooting interface errors again.
PC3 has low network performance
The worst problem you can have as a network engineer is when users complain about the network being slow. This is unlikely to be your issue, but instead some applications performing poorly. However, this is one of the few times slowness is a network issue. We will go into troubleshooting interface errors as described below.
Since PC3 can only speak with PC2 on the hub, we need to investigate the path. We are still connected to SWL, so we will start from the middle. Moreover, since we already fixed the problems toward the hub, we will go toward PC3 by checking the configuration of our trunk. We do that by typing show run and hitting space bar several times until we reach what we need.
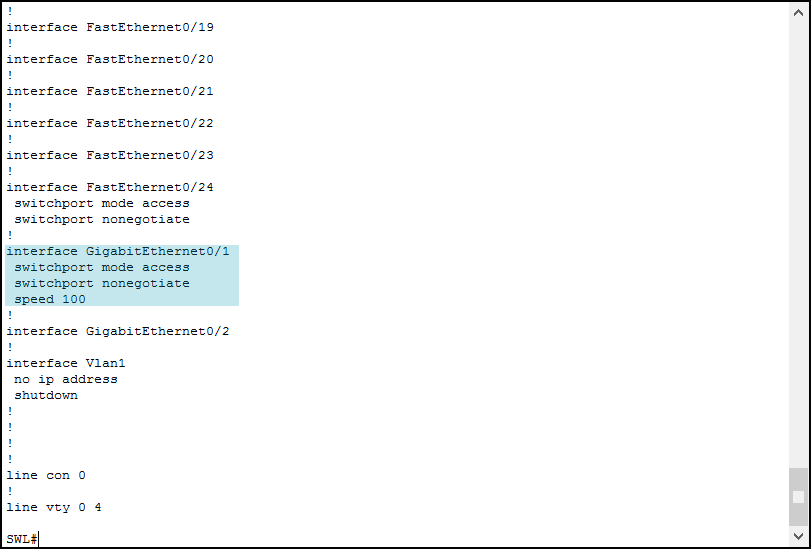
As you can see, we have the two commands we previously entered, but there’s more. Right below our commands, we can find the speed Cisco IOS command, which is the one used to hardcode the speed. Its behaviour is very similar to the duplex command.
speedfollowed by 10, 100, 1000 (depending on hardware/software version) hardcodes the speed, in Mbpsspeed autoorno speedturns on auto-negotiation (default)
So, we can fix it very quickly by typing no speed under the GigabitEthernet 0/1 interface. Now our lab should be complete, we fixed all the issues we need.
Important note: Packet tracer is not so good in emulating late collisions, runts, and other items you can check when using show interfaces command. Keep it in mind!
Conclusion
In this quick article, we learned everything we need for troubleshooting interface errors, duplex mismatches, and speed mismatches on Cisco switches. Troubleshooting interface errors is a mandatory skill for any networking engineer. It might come handy both during engineering and operations tasks, and now you have this skill under your belt. Just to recap, here’s the command we covered:
show ip interface briefto quickly check the status of all interfacesshow interfacesto check the details about physical and data-link layerduplexto configure duplex settingsspeedto configure speed settingsshow running-configurationto verify the configuration of an interface
Review these commands and learn their output and behavior. Then, just continue with our CCNA course to become a top-skilled network engineer.


2 Responses
Some doubts that i have:
How do one know that LeftSwitch is connect to Hub from port FastEthernet 0/24 ?
Later on, we say that PC3 can only communicate with PC2 via Hub, didn’t catch this… Have you mistaped or am i missing something ?
You can know that by looking at the MAC address table for that interface (
show mac address-table, orshow mac-address-tabledepending on the model). You will see multiple MAC addresses, so you have multiple devices there.Comments are closed.