If you are in IT, you probably have heard of Python. Python has been constantly growing in popularity in the last years, and now everybody talks about it. Therefore, no matter your role, it is likely that you know what it is. If not, don’t worry – we are going to cover it all. In this guide, you will learn python for beginners in 1 day.
What is Python?
Python is a programming language, and probably you know that. However, Python is one of the most versatile tools we have when it comes to programming.
The major strength of Python is the ease of use. In fact, writing Python code is dramatically simple. This, of course, reduces the performance of Python if compared to other languages, but for non-CPU-intensive tasks, this is not a problem. Besides that, you can give Python commands to your PC on-the-fly. You can write Python code into files and run them later, or you can create a complete application. Python is versatile because you can use it for any purpose. You can create a simple script or a complex application.
On top of that, Python runs on Linux, Windows, and MAC. It can run on Android as well! It integrates with other programming languages, and it is open-source. Its community is so big that you are going to find all the support you need.
For all its characteristics, Python is also the best choice for Network Automation. With Python, you can easily write code that automates the configuration of network devices, like switches and routers.
Introducing Python for Beginners in 1 day
The Mission
Everybody is embracing Python because it is easy to learn. The question is, how easy is Python? How much will it take before I can start writing code? As the title says, we think you can start in just 1 day. Of course, this doesn’t mean you are going to learn everything about Python – that will take time. However, you are going to get the basics to understand intermediate and advanced concepts. Most importantly, after this guide, you will be able to create simple Python scripts.
Table of Contents
Here’s what we are going to cover today:
What will I be able to do after this guide?
Understanding the basics of Python code is great. Just after this guide, you will be creating scripts that…
- Process and manipulate sets of data like tables
- Search for a specific value in a set of data
- Performs some mathematical operations
- Guide through the user in a process (e.g. guided input)
This is great for a beginner. Furthermore, you learn how to use files as well (in the upcoming guides), you will learn how to load and store data. With just a little knowledge more you will be starting to process Excel files or pictures, and automate tasks on them!
Getting started with Python
Installing Python 3
If you are here to learn Python for Beginners in 1 day, probably you have never written Python code in your life. Thus, it is better starting with the right foot. In fact, we are going to install the latest Python version, so that you don’t have to worry about porting scripts and compatibilities.
Since python comes pre-installed on almost any Linux distribution, you probably don’t need to do anything for this step. However, if you have an extremely lightweight distribution, you may need to install it. On Windows, you will have to install it.
Installing Python 3 on Linux
Installing Python 3 on Linux is extremely easy, as it requires just one command. Use your package manager like Aptitude or Yum to download it. For example, on Ubuntu-based distributions, you could use this command.
sudo apt-get python3Note that some versions of Linux may have Python 2.7 (simply python) installed, but not Python 3. Just to be sure, try to install it anyway.
Installing Python 3 on Windows
Windows don’t come with Python pre-installed, so you will need to download it. Go to the download page of the Python project, that will detect you are on Windows. It will propose you to download the last version of Python 3, or the last version of Python 2 (2.7). Just download Python 3.x, as in the screenshot.
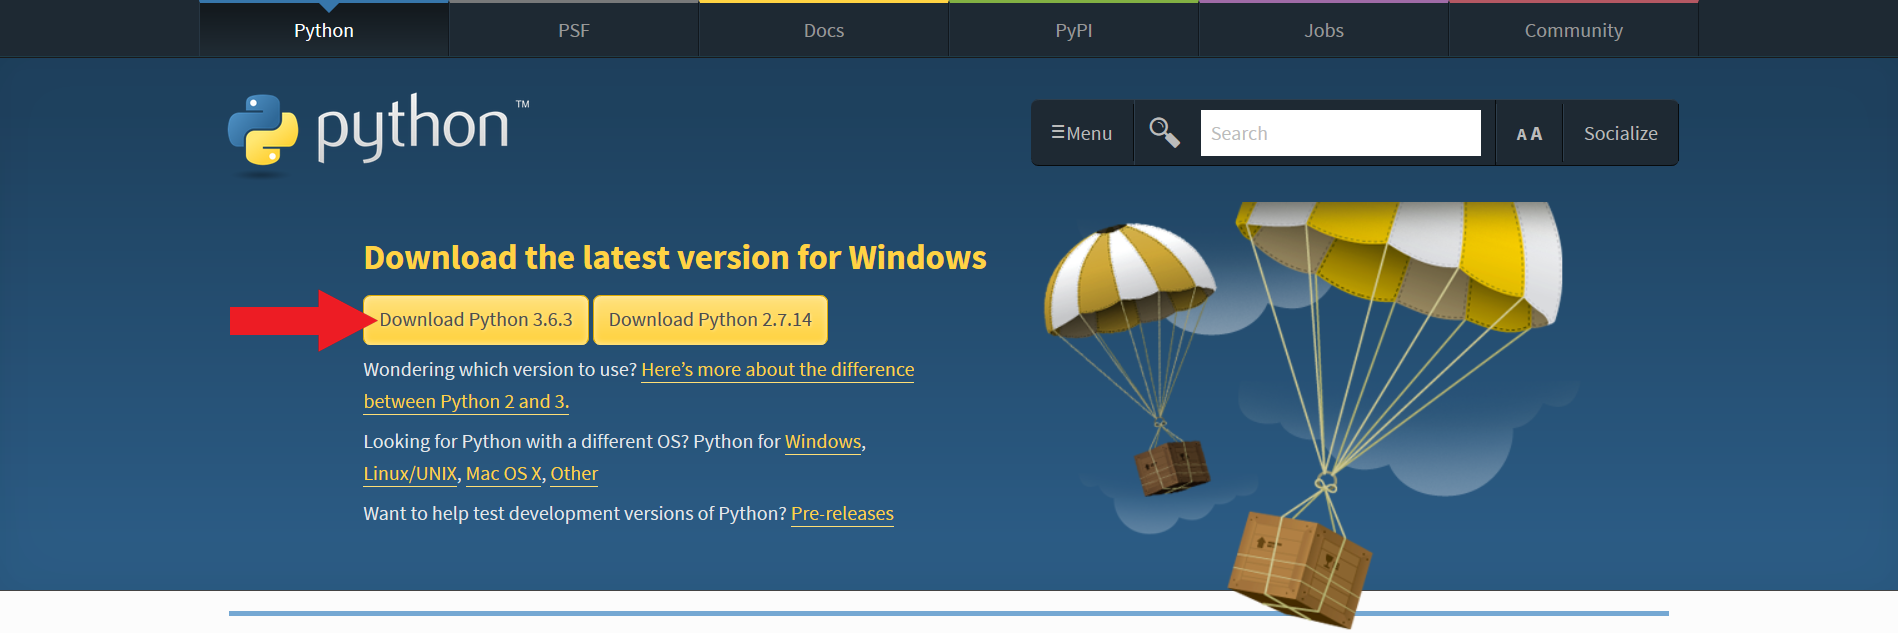
Download Python on Windows (version 3).
This will download an executable installer. Run it with administrative privileges, and leave everything to default. This will configure Python correctly on your system.
Python 3.x and Python 2.7
Before starting our “python for beginners” journey, we should understand why we have two different python versions. In fact, Python 2.7 scripts are not necessarily compatible with Python 3, you must re-adapt them.
Python 2 meant significant growth for Python, with significant improvements. However, like all good things, it has to come to an end. To continue improving and moving forward, the Python team switched to a whole new framework, Python 3. For a while, the last version of Python 2 (Python 2.7) was developed together with Python 3, but this was temporary. Python 2.7 officially end of life since January 2020. No more updates, no more security patches. Just go with Python 3.
Thus, in this python for beginners course, we wanted to put you in that direction. In fact, if you start using Python 3 from the very first moment, you won’t worry about anything. You won’t rely on modules that were not ported to Python 3, and you won’t be blocked on Python 2 because of them. You will simply start in the new age.
The Python Console
The best place to start learning Python is the Python Console. This is simply a utility where you can run Python commands on-the-fly. In other words, you type a Python command and press enter. The console will execute it and gives you the result (or an error, if the command wasn’t valid).
Launching the Python console is easy, and you can do it from the Prompt. On Linux, simply launch your Terminal. On Windows, just open the command prompt.
Command Prompt on Windows
Launching the command prompt on Windows is simple. First, press the Windows key on the keyboard and R at the same time to open the Run utility. In here, write cmd and press enter. The command prompt will immediately open.

How to run the Command Prompt or Windows.
From there, we will use the Python console. Just continue reading.
Launching the Python Console
Once you are in the prompt, just type python and press enter. If you are on Linux and you have installed Python 3, type python3 instead. The prompt will launch the console, and tell you the version of Python running. Then, you will see three angular brackets after which you can type Python commands.
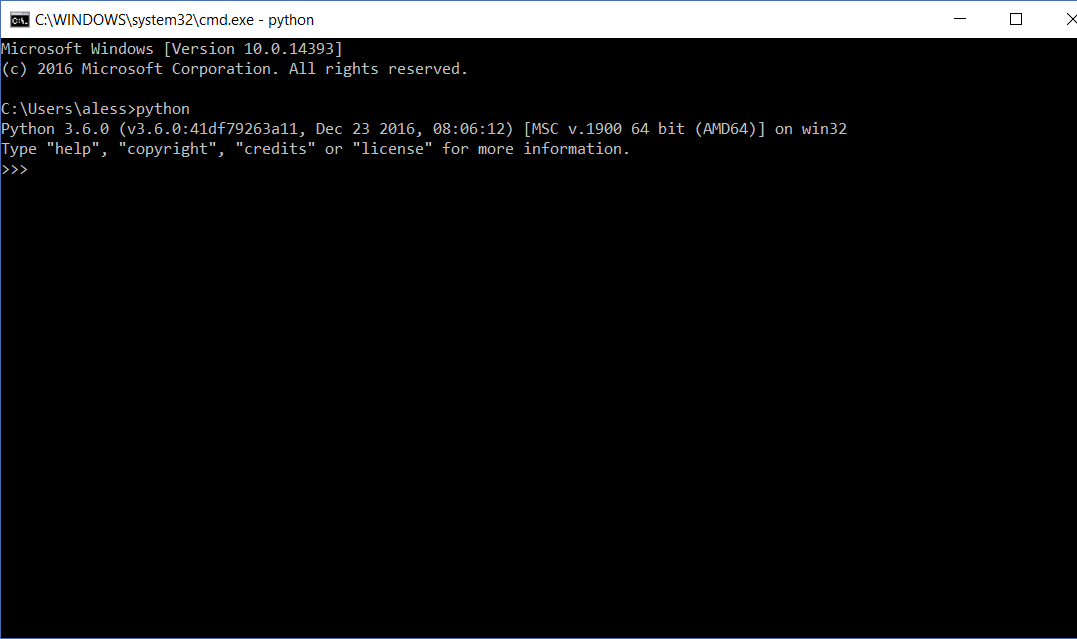
An example of Python 3.6 console.
Python for Beginners in the Console
In the Python console, you can quickly write something that Python can understand. For example, try to write a number and press enter. Python will print the same number again. The reason for that is simple, Python will try to find the value of the expression you typed. Thus, if you type a number – which is a very simple expression – Python will reply with the value of the number.
>>> 5
5
Of course, Python can evaluate mathematical operations like in the example below.
>>> 5 + 4
9
And even use parenthesis…
>>> (5 + 4) * 2 - 1
17
Like with any programming language, use only curved brackets in mathematical expressions. Squared and curly brackets have a different meaning in Python, as we will see later. For example, this mathematical expression…
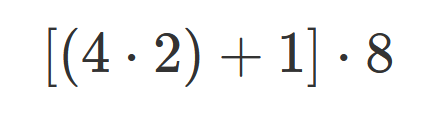
Will translate to ((4*2)+1)*8 in Python. If you are not much into math, don’t worry about that right now.
Python Console can also work with pieces of texts, if you include them in quotes. For example, you can repeat a piece of text several times, like in the example below.
>>> "Hello " * 5 + "World!"
'Hello Hello Hello Hello Hello World!'
Creating and Running Python Scripts
Python is powerful, and the more code you write the more things it will do. Of course, sending an encrypted file over the Internet will require more code than printing “Hello World”. In fact, you don’t want to write all the code manually every time, but instead prepare it for later use. You can’t do that in the Python Console, which is designed for immediate use.
What you can – and should – do is creating a Python script. All you need to do is write some Python code into Notepad (or better yet Notepad++) and save it as a Python file. Once you do that, you will be able to run your Python file anytime you want. You will have your code pre-written, ready to be executed.
Creating your first Python Script
If you have been following ICTShore, you already have Notepad++. It is much better than Notepad for writing scripts, because it colors the text to highlight the python syntax. In this article, we explained all the reasons why you should use Notepad++, as well as where to get it. However, if you think you don’t have time for that, just continue with Notepad.
In the Python Console, Python will evaluate the expression you write and print the output to screen. When creating a script, whenever you want Python to output something to the screen, you need to explicitly tell that. Here’s an example of a script that won’t do anything:
"Hello, World!"
Note that this would have printed Hello, World! if executed in the console. That’s not the case when creating a file. Instead, here we have the correct version, with the print instruction telling Python to write that piece of text to the screen. To do that, we use the print function.
print("Hello, World!")
Thus, write print("Hello, World!") in notepad and then save the file with the Python extension, which is .py. If you use .txt, it won’t work. To do that, when saving, write .py at the end of the name of the file. However, you must change the Save as format from TXT to “All files”. Here we have an example in the screenshot below.

Saving a Python Script.
Now we need to execute this script
Executing a Python Script (from a file)
In this Python for Beginners course, we are going to execute Python scripts from files. Thus, you need to understand how to execute them. This is extremely simple, just go back to the prompt.
If you have the Python console still open, close it by typing exit(). This special function can terminate a Python script, including the console itself. Now, use the cd command to navigate to the location of your script. For example, my script is in C:\Users\aless\Desktop, so I am going to type cd "C:\Users\aless\Desktop" and press enter. This will position the prompt to the new location (cd stands for Change Directory).
At this point, I can write python myscript.py to run the Python script. Of course, you need to specify whatever the name of your file was. Here’s what will happen.
C:\Users\aless\Desktop>python myscript.py Hello, world!
Now we are all set to create and run complex scripts! Our real Python for Beginners tutorial can start!
Get cracking with Python for Beginners
The “magic” Python Machine
Before starting, stop for a moment and think about a Python script. Think about a script as a magic machine that receives some data and gives you back elaborated data. Like a factory takes wooden planks and produces doors, a Python script takes some data and produces some different data.
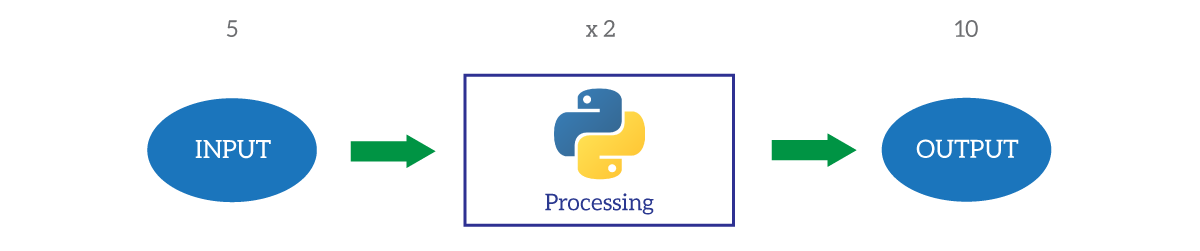
All in all, the Python script will take some input data and returns some output data. Of course, this example is ridiculously simple: the whole script simply doubles the input. But even the most complex scripts can be reduced to this process: take something in, give something out.
The script is always the same but will give different results based on the input data. However, the same input data will always mean the same output results. How is this possible? Thanks to the concept of variable, that we will see in the next chapter.
A quick info on the Syntax
We are going to face the Python Syntax deeper, but for now remember this:
In Python, writing an instruction per line is crucial. It is the only way Python has to define where an instruction ends and where the next one starts.
The Variable
Now read carefully. The concept of Variable is common to all programming languages, and if you get it right once, you will apply it to any programming language.
A variable is like a container, a placeholder. You write code that works with placeholders instead of values. Then, when you run the code, you give an initial value to these placeholders and perform operations on their value.
Technically, a variable is a space in computer memory where you can store data. However, we don’t need to worry about that – that’s a python for beginners course, isn’t it? Since we consider variables like containers, we can picture them like boxes.
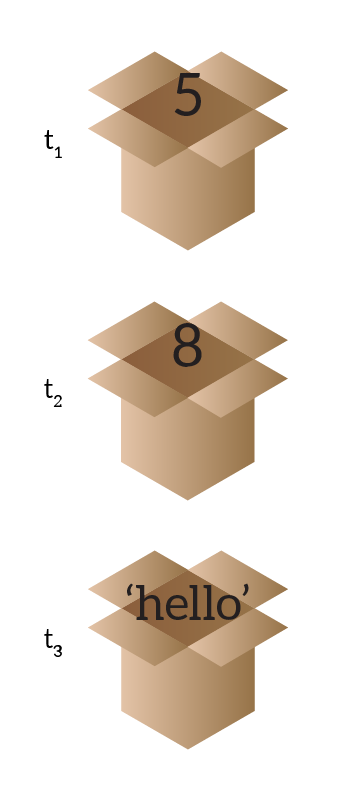
So, at the beginning the variable A has a value of 5. In a second moment, its value changes to 8 and then, finally, to “hello”. If you reference to A after t1, Python will know that it has a value of 5. As a result, you can write code using variables as placeholders. Here’s an example to make this concept clear.

As you can see, this code takes the variable named input and multiplies it by 5, storing this result in a variable named temp. Then, it adds 2 to this value, and store this result in a final_result. Presumably, it will print out the variable final_result later on in the code.
Using Variables
To make the concept of Variable clearer, we can give you an example of Python code that uses variables. Below, a common example of code that inserts a variable in a phrase.
name = "John"
salutation = "Hello"
print(salutation + ", " + name + ".")
With these values, this script will write to the screen “Hello, John.”. The same string can give different results if you change the name and/or the salutation.
Getting variable values at Runtime
The runtime is the moment where your script is executing. If you got the concept of variable right, you know that a script like the one below doesn’t make sense. You are using variables because they can change value based on input data, but if you hardcode their value in the script what’s the point? None, you are right. You should load the value of variables from a file, or ask to the user.
To ask Console Input, use the input() function. With this function, you have to specify a some text used to ask the user for a variable. So, here we have a more meaningful example.
name = input("What is your name? ")
salutation = input("What salutation would you like? ")
print(salutation + ", " + name + ".")
If we execute this script, it will look like this.
What is your name? Albert
What salutation would you like? Good Morning
Good Morning, Albert.
In the first two lines, we have provided both Albert and Good Morning and pressed Enter.
Naming variables
You can use uppercase and lowercase characters, as well as underscores and numbers when defining the name of a variable. Any other character, including spaces, won’t be allowed. Of course, keywords used by python like print, and, or, not cannot be used.
However, stick to Python best practices: variable names should use only lowercase characters, underscore, and numbers if strictly needed. You can include uppercase characters if they represent an acronym, that’s the only exception. Try also to make names self-explanatory: you want to remember what a variable will contain.
Variable Types
Python is a language with weak typing. This means that variables are not bound to types. In other words, you can store a number in a variable, and later put some text in the same variable. After a while, you can even change it again to something more complex like a file handler. Even if you can store whatever you want in a variable, you need to pay attention when working with other variables.
Basically, a variable can be either simple or complex. We will see complex types later, for now just focus on simple types:
- String – a piece of text
- Number – I think anybody gets this
- Boolean – a special variable that can be either
TrueorFalse, useful for flags
No matter the type, a variable can be valued to None, which indicates that it has no content.
Be careful with variables
Now, the fun part is being careful. If you have a string that contains something that could look like a number, Python won’t care. For Python, it is going to be a string. So, here’s what happens:
>>> "5" * 4
'5555'
As you can see, Python didn’t check inside the quotes. It assumed “oh, this must be text” and treated it like that. If you want to convert it to a number, you can use the int() function if the number is an integer (no decimals). So here we have a working example.
>>> int("5") * 4
20
Of course, in case we pass a string which cannot be converted in a number, this will result in an error.
Remember: strings must be enclosed in quotes ' or double quotes ".
Types and the Console
All of that is extremely important because Console input variables are going to be strings unless you convert them. How to do that? It is extremely simple, and if you look at the following script you will think “Oh, why didn’t I thought that on my own!”.
variable = int(input("Tell me a number: "))
The true meaning of “=”
The equal sign is a powerful command that allows you to assign a value to a variable. Whenever you use it, remember that it will always execute what is on the right first. This makes a lot of sense. If you set the value of a variable, you need to calculate that value first.
This is not really something to consider if you do static assignation. However, you want to consider that if you are asking the user to provide input in the console. In fact, Python processes instructions from the top down. The input function will interrupt the execution until the user provides some data and press enter. This might not be a problem for beginner scripts. Even if this is a “python for beginners” guide, we want you to see the whole picture, so just know it.
More on the top down – swapping two variables
Take a look at the following code.
a = 5
b = 8
# Swap
a = b
b = a
Awesome, isn’t it? Well, sadly – no. Even if this code is simple and beautiful, it won’t work. This is true because, as always instructions are executed from the top down. Therefore, the first line assigns to a the value of b. Thus, at this point both a and b are valued 8. When you execute the last instruction, you assign the new value of a (8) to b. As a result, you end up with both variables with the value of b, which is useless. You need to rely on a temporary variable.
a = 5
b = 8
# Swap
# This to make sure we don't lose the value of a
temp = a
a = b
# Recovering the value of a
b = temp
Conditional Expressions
Doing thins in a sequence is good, trust me. However, it will not solve any problem besides mathematical problems. We need to go somehow deeper and to do that we need to use Conditional expressions.
A conditional expression is an expression that, in the end, evaluates to either True or False.
We are going to use them a lot in our scripts, but to test them we can use the console. So, just open the console again!
The simplest expressions
As always in this python for beginners tutorial, we start from the simplest route. The simplest expressions are comparisons: they compare two items. Are they equal? Fine, the expression will be True, otherwise, it won’t.
>>> "John" == "Ben"
False
>>> "John" == "John"
True
As you can see, to compare two items we put an operator in the middle. Here we all the common operators in Python.
==translates to “equals“, we couldn’t use a single=because that symbol is used for variable assignment!=translates to “not equals”, the opposite of==>stands for greater than, and it returns True in case the first item is greater than the second<stands for smaller than, and it returns True in case the first item is smaller than the second>=and<=are respectively greater or equal than and smaller or equal than
Of course, besides ==, those operators make sense with numbers only (at least at a beginner level). To that, we can add the is None operator, that returns true in case a variable has no value.
Combining expressions
Using a single expression might not be enough. You might need to create a condition that evaluates multiple variables at once, in a specific order. You can use the following logical operators to join together multiple conditions.
andreturnsTrueif both conditions are trueorreturnsTrueif at least one condition is truenotreturns the opposite value of the condition written afterwards
Use parenthesis as needed to evaluate some conditions before some others. Here we have a few examples.
>>> 5 > 6 or 1 >= 0
True
>>> 5 > 6 and 1 >= 0
False
>>> 5 > 6
False
>>> not 5 > 6
True
>>> name = "John"
>>> surname = "Doe"
>>> (name == "John" and surname == "Doe") or (name == "Walter" and surname == "White")
True
>>> (name == "John" and surname == "White") or (name == "Walter" and surname == "Doe")
False
Tip: as you can see, you can define variables on the go in the console too.
The Selection Statements
A selection statement (or conditional statement) is a piece of code that may be executed, or may be not, according to input that. Specifically, based on the input data, Python will select to do something or something else.
It sounds a lot like “if this… then that”, and it is exactly that. We have three major keywords to use: if, elif and else.
The “if” statement
if <condition>:
    <instruction to execute if True>
    ...
<this will be executed no matter what>
This is extremely simple. If the condition is written after the if is true, Python will execute the instructions inside the if. Otherwise, it won’t. What are the instructions inside the if construct? The ones that are tabulated inside. Remember this, as Python is entirely based on tabulation. Take a look at the following example.
title = input("What is your title? ")
name = input("What is your name? ")

if title == "Dr.":
    print("Welcome home, Doctor.")
    print("Good morning, " + name + ".")
In this case, the instruction print("Welcome home, Doctor") is inside the if. All other instructions are outside. If you want to add more instructions inside the if, just add them with the same tabulation.
The “elif” statement
if <condition 1>:
     <instruction to execute if condition 1 is True>
    ...
elif <condition 2>:
    <instruction to execute if condition 1 is False AND condition 2 is True>
    ...
The elif statement is simple. You can use it in conjunction with if, and you can concatenate multiple of them. In case the first if (and the previous elifs, if any) returned false, the condition in this elif will be evaluated. In case it’s true, the code inside will be executed. Take a look at this example.
title = input("What is your title? ")
name = input("What is your name? ")

if title == "Dr.":
    print("Welcome home, Doctor.")
elif title == "Mr.":
    print("It is a pleasure to have you back home, Sir.")
elif title == "Mrs.":
    print("Glad to see you home, milady")
print("Good morning, " + name + ".")
Of course, you cannot use the elif construct alone.
The “else” statement
if <condtion>:
    <do that if true>
else:
    <do that if not true>
This statement is the last in the selection statements belt. Its operation is simple and natural: it acts like a catch-all expressions, to be executed if no if or elif construct were true. Of course, the content of the else statement will be executed only in case no if/elif in the same group was executed. Here we have our complete example.
title = input("What is your title? ")
name = input("What is your name? ")

if title == "Dr.":
    print("Welcome home, Doctor.")
elif title == "Mr.":
    print("It is a pleasure to have you back home, Sir " + name + ".")
elif title == "Mrs.":
    print("Glad to see you home, milady " + name ".")
else:
    print("Dear " + name + ", I guess I didn't get your title right.")
Something more about Python Syntax
Many programming languages use semi-colons and parentheses to separate sets of instructions. Python doesn’t, it uses colons and indents. That’s for a reason: it forces you to write code with indentation, which is much easier to read. You need to remember two things:
- A colon at the end of the line means that an indented block of at least one line is expected to start from the next line. As you can see, if, elif and else all ends with a colon. This is because they need some extra instructions afterward in order to work.
- A set of python code with the same indent level is a block of code, which will be executed sequentially
There’s more about Python Syntax, but not for this Python for Beginners course. However, one thing you should know are comments. A comment is a note left in the code for other programmers to read (or even for yourself). Python will simply skip it, as the computer doesn’t need it.
In Python, you write # and then everything from that to the end of the line is a comment. Here we have an example.
name = input("What is your name?" )                    # Here we ask for the name
salutation = input("What salutation would you like?" ) # Here we ask for a salutation
# Below we print the phrase adapted to the user
print(salutation + ", " + name + ".")
Loop statements
A loop is a repetition of something, isn’t it? If you are going to do the same set of operations over a large set of variables, loops are the way to go. We have two key loops in Python, the while and the for.
If you do something wrong, your script may be stuck in an endless loop. To terminate the execution, hold Ctrl+C for a few seconds.
Looping with “while”
while <condtion>:
    <execute something>
This loop is quite basic, and very versatile. Python evaluates the condition, and if it is True it executes the code inside. After that, it evaluates the condition again. Only when the condition is false, it will stop executing the code inside the loop. Here we have an example.
correct_password = "supersecret"
password = input("Please insert your password: ")

while password != correct_password:
    password = input("Wrong password. Insert correct password: ")

print("Welcome, you are authenticated.")
As you can see, this script will ask for a password. The while instruction will evaluate if it is correct by comparing it with the correct_password variable. In case it is not correct, it will start asking for the password again, until the user inserts the correct password. Of course, this is not a great security mechanism, but it explains the concept of loop.
The “for” loop
This special loop allows you to work on a set of values, known as collections. We will see that later when talking about lists. For now, just think you can use it to repeat an instruction N times.
times = int(input("How many times? "))

for i in range(times):
    print("Time #" + str(i))
This script will repeat the instructions in the block for the times specified. Note the keyword i. That’s a variable, and you could use whatever the name you want. Every time the loop executes the block of code, it will increment the value of i, that will start from 0 and end at times-1. So, the output will be this:
How many times? 4
Time #0
Time #1
Time #2
Time #3
Collections
Without collections, your script won’t go far. Even if you are a beginner, you need to know them. This is why we included collections in our Python for beginners course.
What is a collection?
Here we have a beautiful definition.
A collection is a complex type that contains multiple values.
In other words, a collection is a complex type of variable. It is made of other types, simple types or even other collections. At this point, all of this may simply look a little bit too abstract. It’s not, and if you look at the two types of collections we are going to face you will see why.
Lists
A list is probably the simplest type of collection. Guess what, it is just a list of stuffs. For example, you can list the pets you own. In Python, you write lists enclosed in squared brackets, separating each item from the next with a command. Thus, if I have three pets, named Bobby, Pluto and Bertha, a list with their name will be the following.
["Bobby", "Pluto", "Bertha"]
Of course, you can assign a list to a variable. Furthermore, you can populate lists dynamically.
Populating a list at runtime with “while”
Here’s what you need to do.
my_pets = []
more_pets = True

while more_pets:
    add_pet = input("Would you like to add a pet? [y/N]" )
    if add_pet == "y":
        pet_name = input("Insert your pet's name: ")
        my_pets.append(pet_name)
    elif add_pet == "N":
        print("You have added " + str(len(my_pets)) + ".")
        more_pets == False
    else:
        print("Please write 'y' or 'N'.")

print(my_pets)
In the first line, we init the value of my_pets to an empty list. Therefore, we are starting the script with no pets. Then, we run a loop that asks every time to the user if he wants to add a pet. In case the user says so, we ask for the name. And this is where the magic happens.
By using the function append() of our list, we add the name as a last element to the list. One creat thing of Python lists, in fact, is that they can grow dynamically. You can simply add items as you wish, and you don’t need to define a size beforehand like in other languages.
If look close enough, in the elif statement, we used the len() function. This returns the number of items currently in the list. Try to run this script on your own!
Looping though list items with “for”
As said before, the “for” loop is great when working on lists. In fact, it gives you an easy way to process each item in a list. For example, you can attach this code to the script we just created for adding pets.
for pet in my_pets:
    print("I have a pet named " + pet + ".")
This simple snippet will loop through the list my_pet. It will start taking the first item in the list and putting its value into the pet variable. Then, in the next cycle (after the print statement), it will do the same with the second item. The for loop will repeat this process until, eventually, all items are processed. Pretty much awesome, isn’t it?
Direct access to list items
You can access directly an item in a list if you know its positions. Remembers that the first position is always 0, not 1. Here we have the syntax.
first_pet = my_pets[0]
fourth_pet = my_pets[3]
In case the list doesn’t have an item in that position, it will return an error, and if not handled the program will crash. Nothing to worry about in a python for beginners course.
With this approach, you are copying the variable from an item of the list to a variable. Thus, you are not removing it from the list.
A list of everything
A list can be a list of pretty much anything, not just strings, not just numbers. You can even mix different types together. Therefore, the following list is valid for Python.
["Pasta", "Pizza", ["Ribs", "Potatoes"], None, -1, "Water", False]
As you can see, the first two items are strings, then we have a list, a None, an integer, a string again and then a bool. Even that is fine for Python.
Dictionaries
You can think about dictionaries like records. They represent an entity which cannot be represented by a single, simple variable, and that is not a list of items.
Imagine you want to represent the concept of Contact Information. A person may have multiple contact information, and for each, you want to know the type (e.g. phone, mobile, e-mail), its value (e.g. the e-mail address itself), and the time at which you can try to reach them. Dictionaries are perfect for that. You define them between curly brackets. Inside the brackets, you define pairs of key and value, each pair separated from the next with a comma. The key indicates what this is about (e.g. the type), and the value indicates the value of this key (e.g. “mobile phone”). Each key is separated from its value by a colon. Here we have an example.
{
    "type" : "mobile phone",
    "value": "+1 555 800 300 200",
    "time range": "8:00am - 5:00pm"
}
Accessing the keys of a dictionary directly
Once you have a dictionary defined in a variable with var = { ... }, you can access its keys directly. You do that by referencing the variable followed by the key name between square brackets. Thus, if we stick to the example above, we can do something like this.
print(var["type"])
And this will print “mobile phone” to the screen. You can of course use this syntax not only to get the value, but the set the value as well. Furthermore, you can use the same syntax to define a new key on the fly.
var["key that did not exist before"] = "Yay!"
Mix lists and dictionaries to create tables
Many sets of data can be best represented by tables. A table has a set of columns, and then several rows each with the same fields (one per column). With Python, you have the flexibility of defining custom fields that are not common to all rows, but only specific to some of them. No matter what you do or how you do it, the best way to represent a table is by creating a list of dictionaries. In the following example, we populate the list of contacts, and then allows the user to search.
The big example that combines everything
# Start with no contacts
contacts = []

# Will loop until user explicitly interrupts it
loop_again = True
while loop_again:
    print("1. Add contact")
  print("2. Search for type")
  print("3. Exit")
  choice = input("What would you like to do? [1/2/3] ")
  # Compare string, not number
  if choice == "1":
      # Adding a contact
    # Creating a temporary variable
    contact = {}
    contact["type"] = input("Insert contact type: ")
    contact["value"] = input("Value for this contact: ")
    contact["hours"] = input("Insert availability hours: ")
    # Add to the list of contacts
    contacts.append(contact)
    print("Contact added")
  elif choice == "2":
    # Searching contact
    search_for = input("What would you like to search for? ")
    # If not valid key, ask again
    while search_for not in ["type", "value", "hours"]:
      search_for = input("Please insert either type, value or hours: ")
    search_value = input("What are you looking for exactly? ")
    # We start without having a match
    match = False
    # Scan all contacts
    for contact in contacts:
        if contact[search_for] == search_value:
          print(contact)
        # We found it, so we set match to True
        match = True
    if match == False:
        print("Sorry, no matches found")
  elif choice == "3":
      # We exit
    loop_again = False
  else:
    print("Please write either 1, 2 or 3")
Conclusion
In this huge article, we got you up and running with python and – hopefully – with programming. Even with this, our Python knowledge is still limited and pretty much useless. However, we have now the tool to grow our Python skills and we will be able to do complex stuff very soon.
Right now, we are able to perform basic elaborations of data sets – since we have to input data manually, however, these sets of data are limited. In the next article, we will start working with files so that we can create something useful, like a script that processes a matrix in an excel-fashion.
Then, we will start explaining more and more tools and functions to your Python belt, so that you will end up working with advanced contents like decorators or custom iterators in less than you think. But for now, that’s all. Practice a little bit and lest your brain!
And, as always, let me know what you think about this article. Why are you learning Python? What would you like to read in more detail? What are the challenges you encounter while learning? Just let me know in the comments!


5 Responses
My God !! you are unbelievable !! Awesome .. didnt expect python here 🙂
Uthara, how kind of you!! I feel like programming (or at least scripting) and networking are converging, so python was a must! 🙂 I want everyone to be familiar with python, so I will add a few more articles on that… then, we can start working on some serious SDN!
You are correct. Python is more convenient to networking. It is powerful language in terms of networking.
Yes! It is probably the best options when working with Telnet, SSH or SNMP. Thank you!
Great Man…. Simple and clear
Comments are closed.